|
by Willow Enright 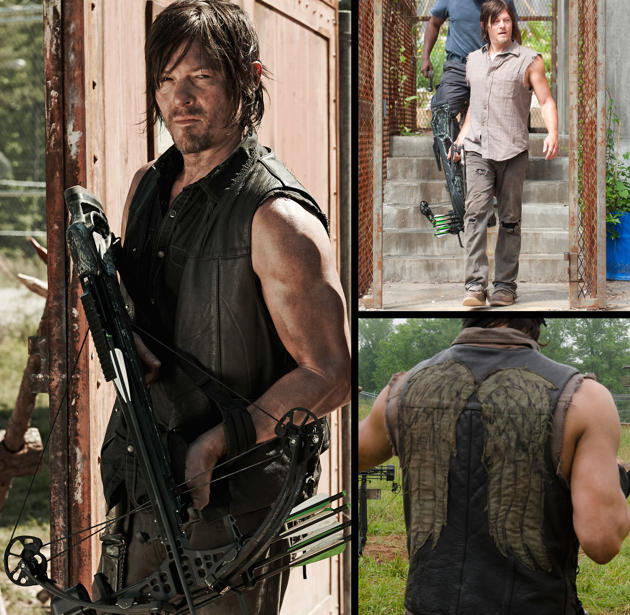 The Walking Dead's Daryl Dixon We all have our heros, and although this particular hero doesn't wear spandex or a cape he certainly inspires me with his everyday choices. Daryl Dixon from The Walking Dead's T.V. show is the kind of hero I hope that I would be in an End of the World scenario. Not only are his hunting and tracking skills legendary, but his tender heart within his tough exterior melts even the most calloused individual. Below are the steps I took to recreate my hero, Daryl Dixon! Identifying Costume & Accessories:Cargo Pants Boots Solid Color Shirt Plaid Shirt Leather Vest Crossbow Knife, Sheath, & Belt Makeup & Hair
Cargo Pants &BootsAll of the clothing in this cosplay was either acquired second hand at a thrift shop, or I already owned it and I modified it. The light brown cargo pants aren't the right shade of brown, but otherwise they worked. Including the newly acquired hole in the butt which is now patched with the sleeve of the dark blue shirt I reappropriated for Daryl's wardrobe. The cargo pants and my Caterpillar boots required the least amount of attention for modification. My boots were already worn and weathered from years of wear and tear, and although they aren't the exact same ones that the actor wears they are a close enough approximation. For the shoe lace straps he wears wrapped around his pants legs I simply used old broken shoe laces tied together for added detail. Solid Color Shirt
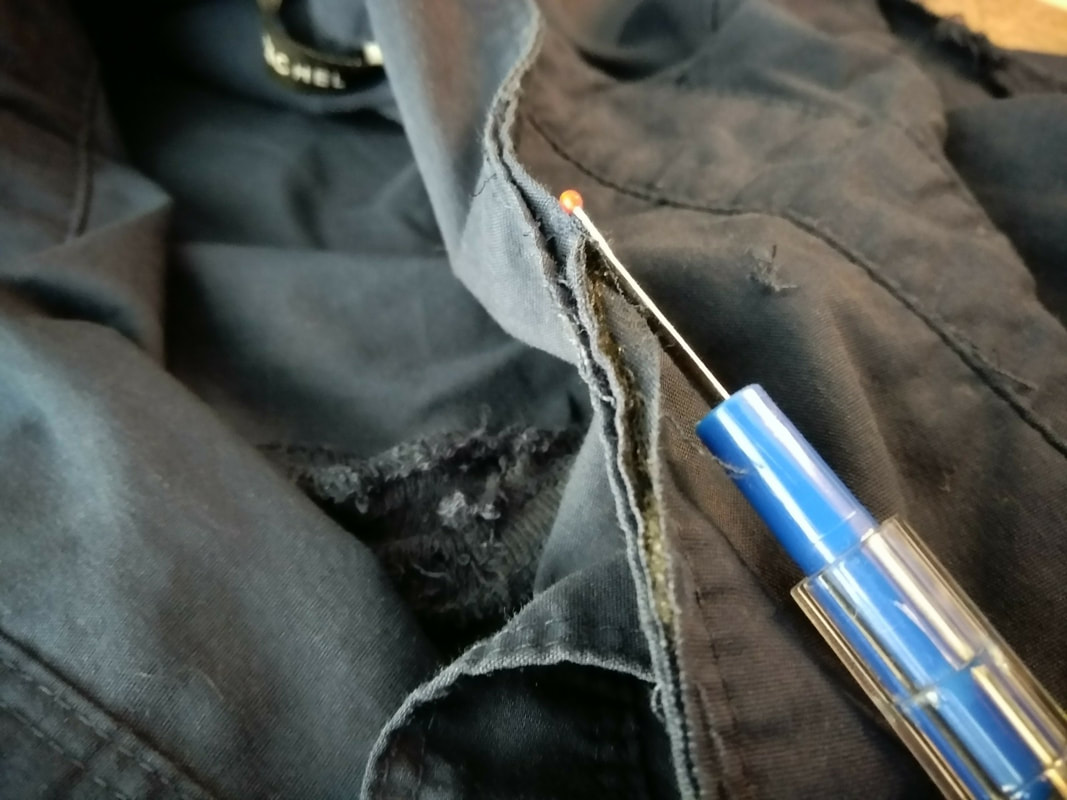
The dark blue button shirt was an old three quarter length work shirt that was annoying with its awkward sleeve length and button popping. So, I tore off both sleeves using a seam ripper to get Daryl's classic sleeveless shirt. I used one sleeve to patch my holey cargo pants, and since the shirt always gave me troubles with the buttons randomly popping open I chose to sew the shirt permantly shut. So, no more button popping! With the sides being a nice stretchy material I can easily slip the shirt over my head like a t-shirt. The seam ripper was used to strategically create frayed seams all over the shirt including the inside collar. In the process of taking off the sleeves I accidently let the seam ripper go wild and created a few rips which I decided added to the authenticity of weathering so I left them as they were. Plaid Shirt
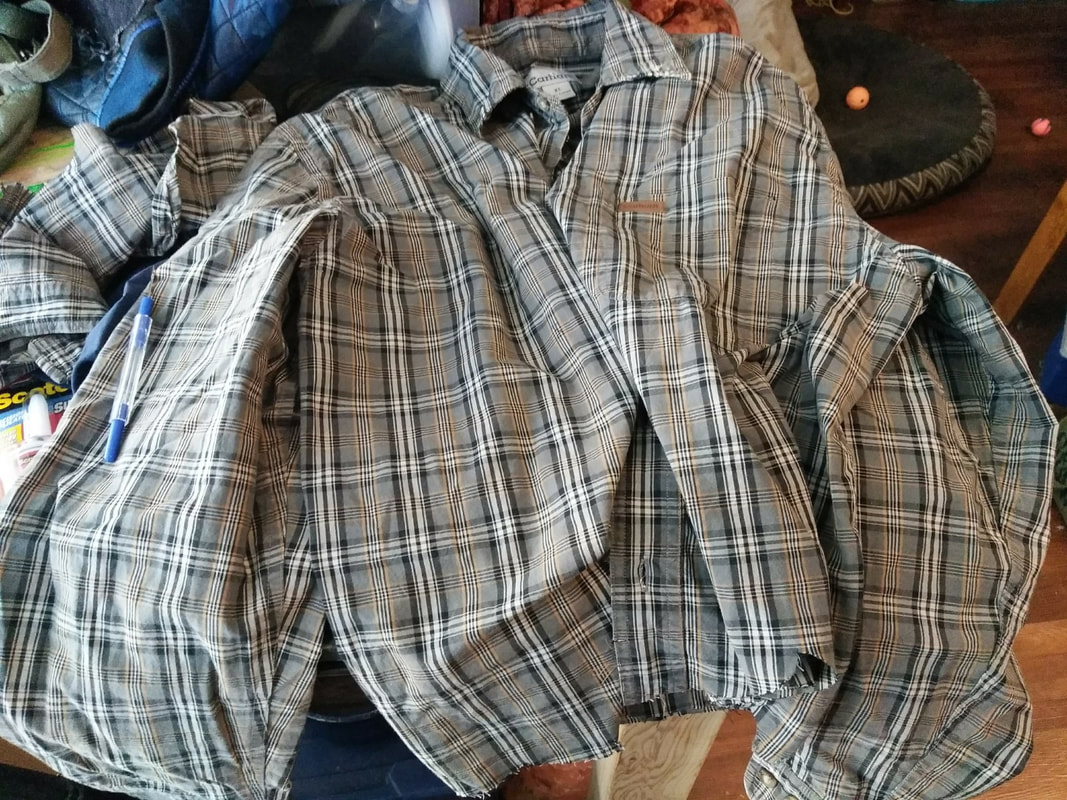
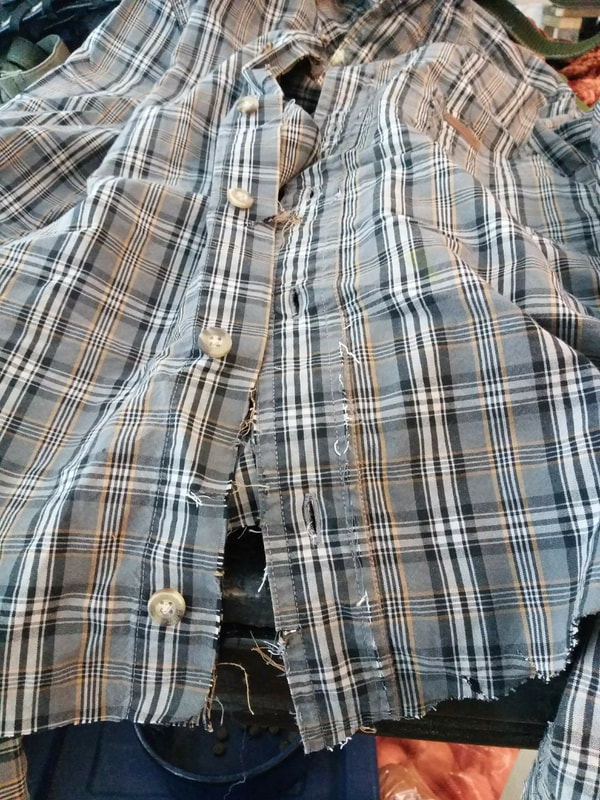
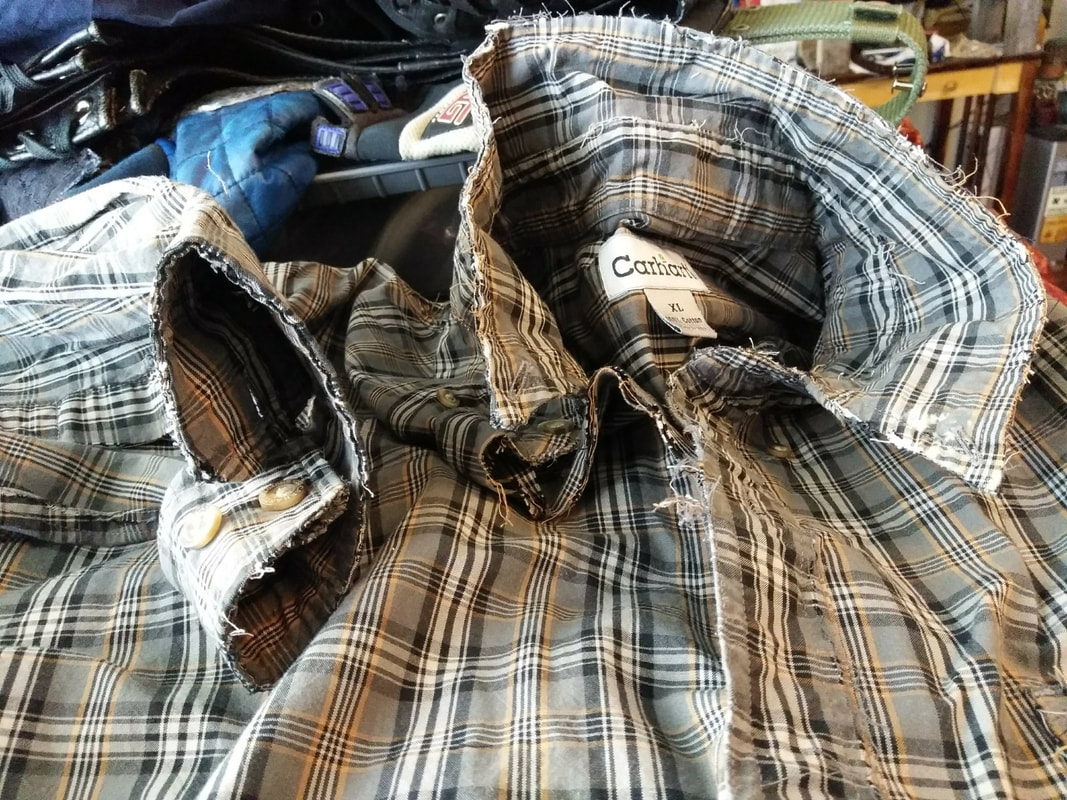
The long sleeve over shirt was acquired at a second hand store specifically for its pattern and the fact that it was a Carhart brand. Not only did I think that Daryl would actually choose such a shirt, but it also gave me tons of double seams for maximum fraying and weathering without compromising the shirt's structural integrity. Again, the seam ripper was my tool here, and I used it along every single seam that I had the option to fray. Since the button shirt is a man's it was entirely too long to fit my short frame and I had to remove several inches from the bottom. I tore the bottom asymmetrically so that it would look like a walker got me or something. The sleeves were also ridiculously long, so these were both folded and permanantly sewn to keep the original sleeve hems intact. On the left cuff there was some awesome bleach stains on the inside that I wanted to keep visible so I simply folded the cuff and sewed it to have a permantly folded sleeve. A huge hole was ripped in the left elbow as if I had been caught on something, and in my vigorous seam ripping I accidentally tore a big hole that I didn't want next to my breast pocket. So, I used some green twine thread that looked a bit like fishing line to sew it back up crudely like Daryl would. Woredrobe in a Post-Apoclytic world is so easy to replicate all it is is rips, tears, and stains. Although you can't just fling mud on your clothes and say, "Done." It's strategic planning with a few minor "Did I do that," moments thrown into the mix. Leather Vest
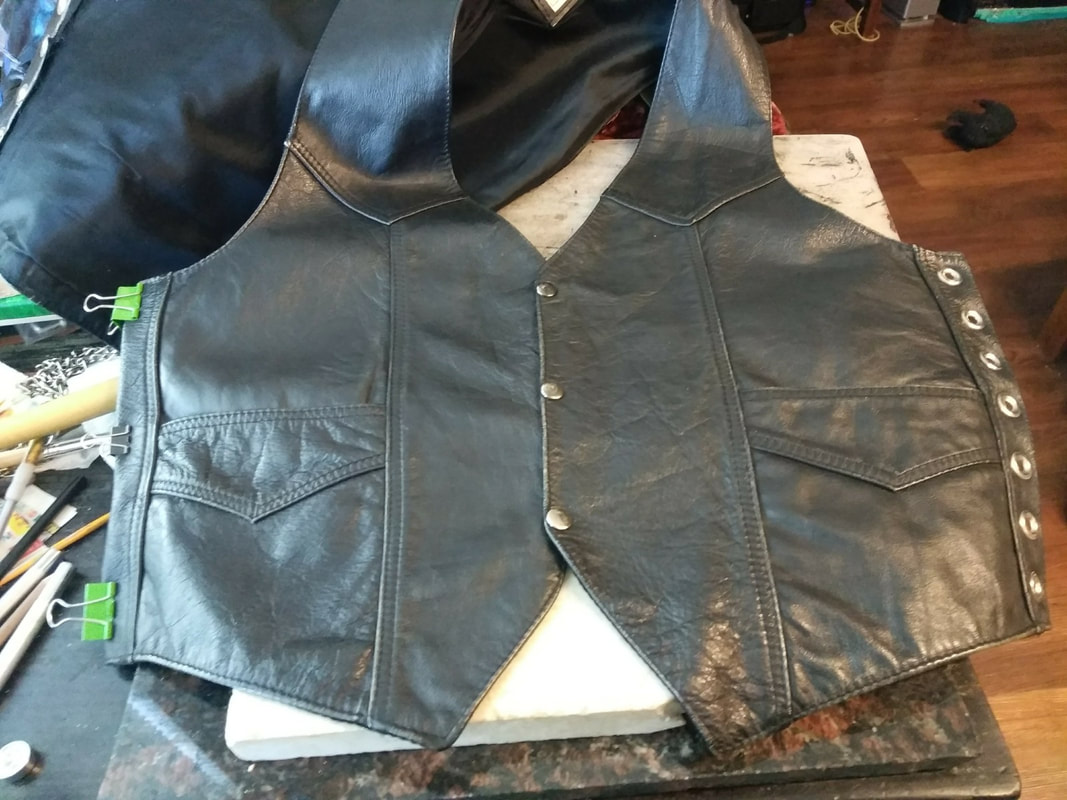
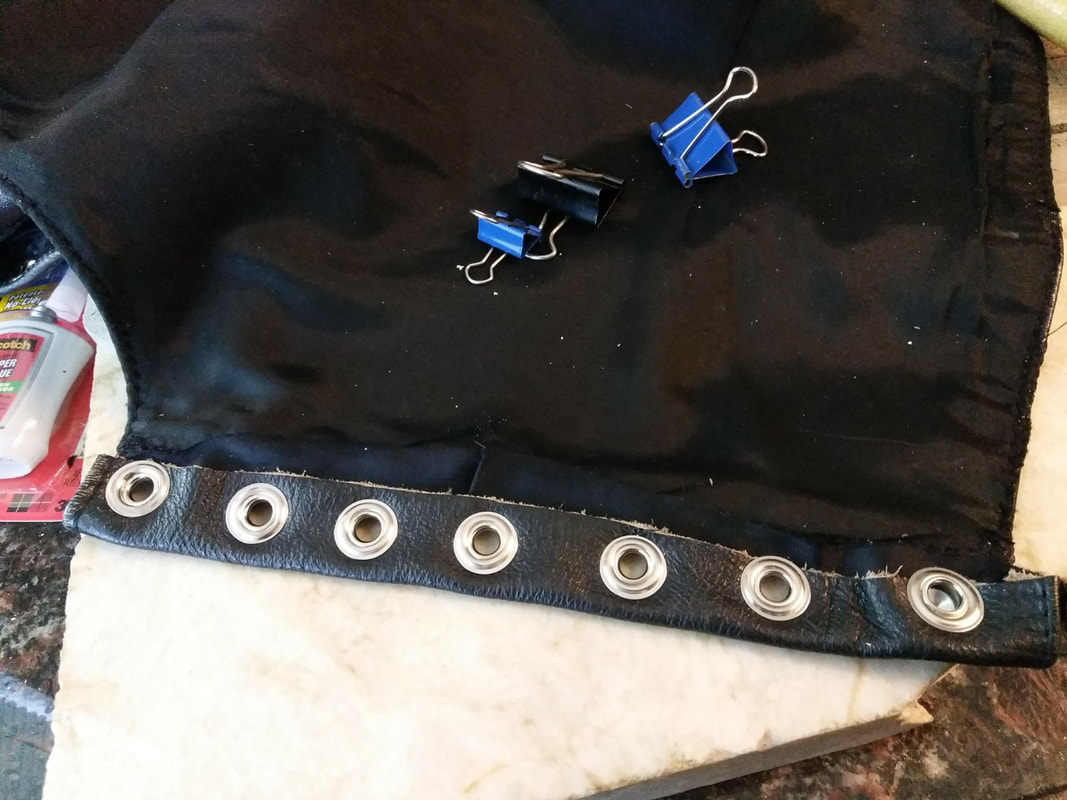
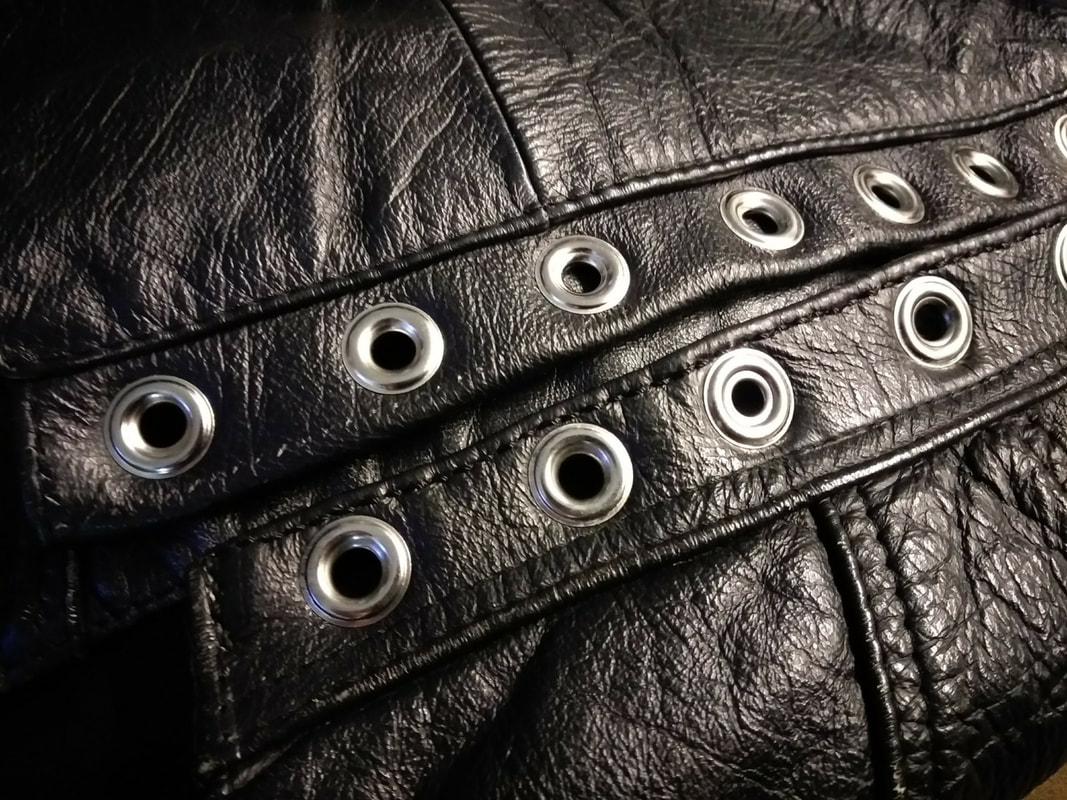
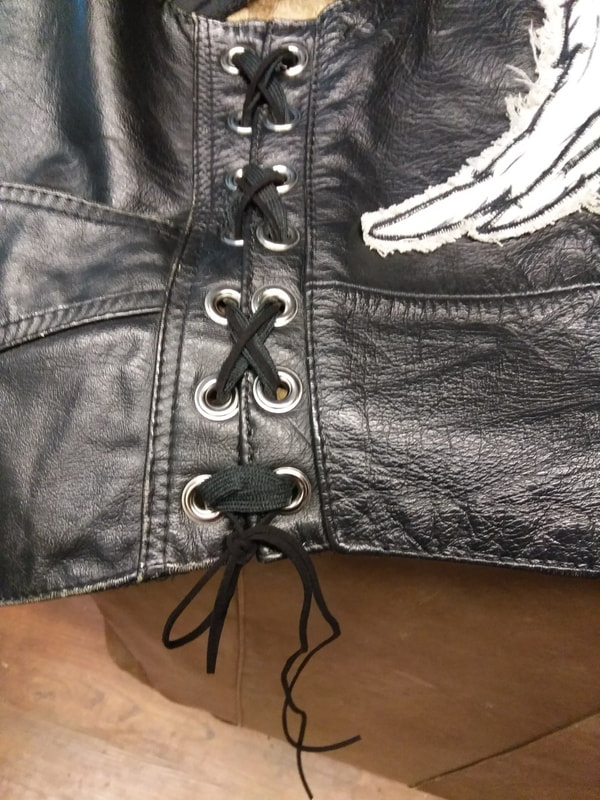
Daryl's signature leather vest was a bit more challenging. It took me a good while to find the vest at a second hand shop, but when I did, all the hunting was worth it. It's almost an identical match to the T.V. show one. I split the sides of the vest evenly and used 7 grommets on each side of the split followed by hand stitching to finish off the edges. To lace the panels back together I temporarily used a black shoe lace until I can find the right leather cording.
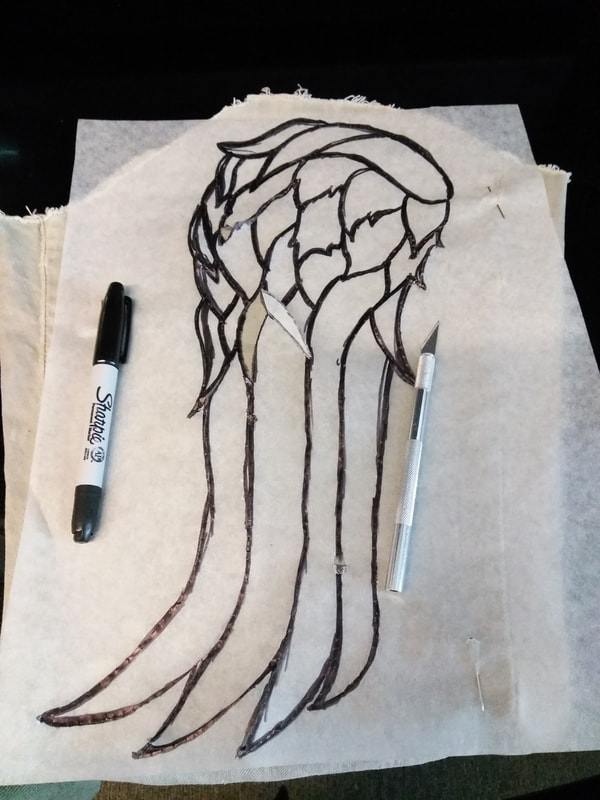
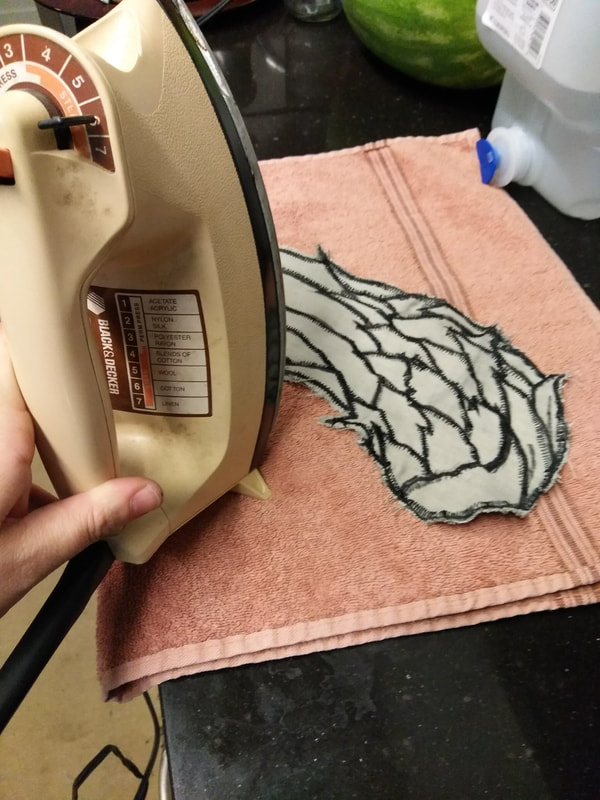
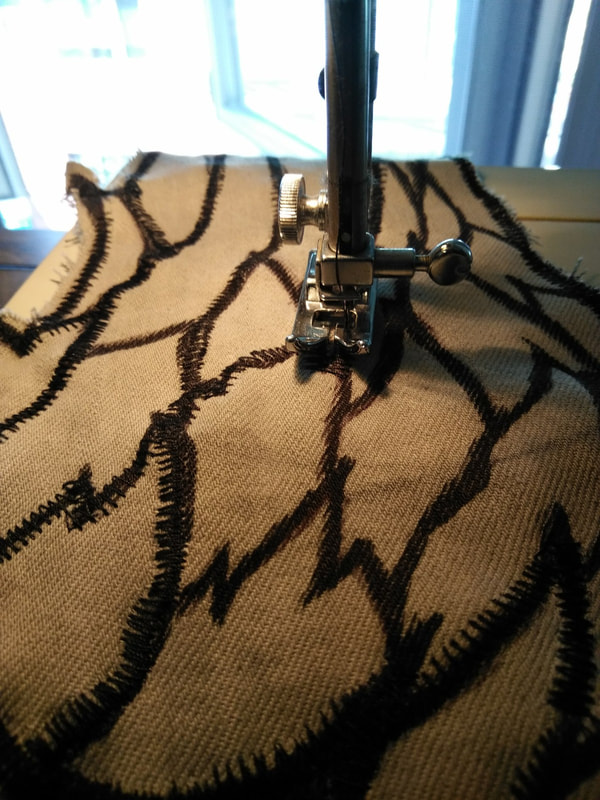
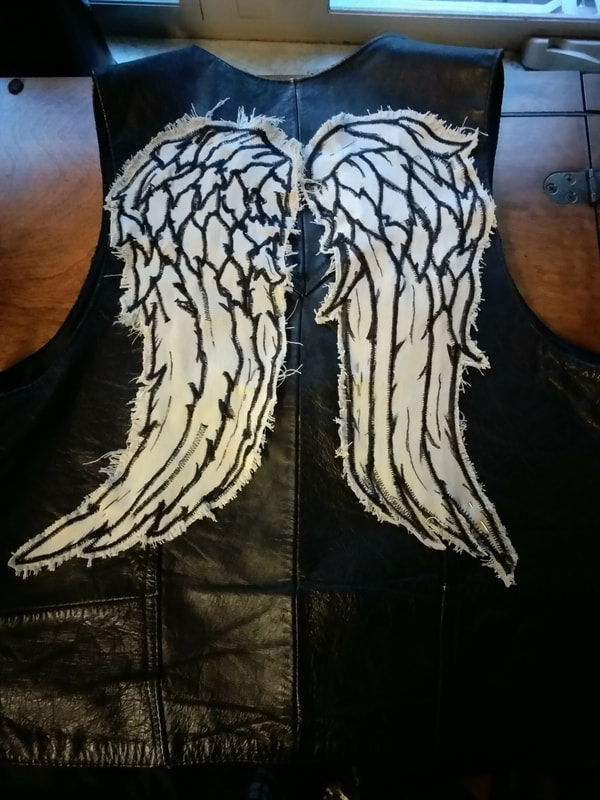
I also used a pair of old denim jeans for the wings, starting by bleaching them until they were a dingy white. This took several hours of soaking and checking on the denim and I used various YouTube videos to guide me in the process. The wings were sized, drawn and traced and instead of using a fabric transfer marker which would have been easier, I instead used an exacto knife to cut each feather out of the tracing paper before tracing the outline left with a black sharpie pen. Once my wings were drawn onto the denim I used a zig-zag pattern on my sewing machine to go over the sharpie pen lines to give them an embroidered look. I made sure to leave a good half inch of denim along the edges to be frayed for weathering. This was finished with a straight stitch along the zig-zagged edges to attach the wings to my leather vest. Crossbow
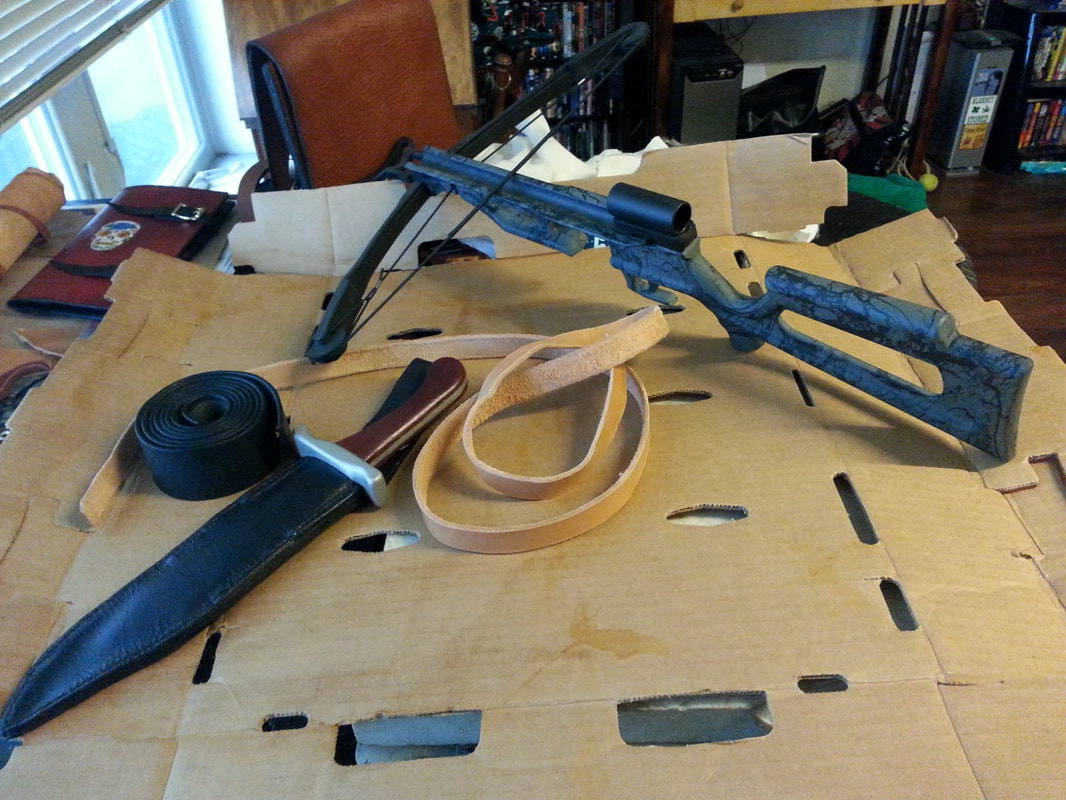
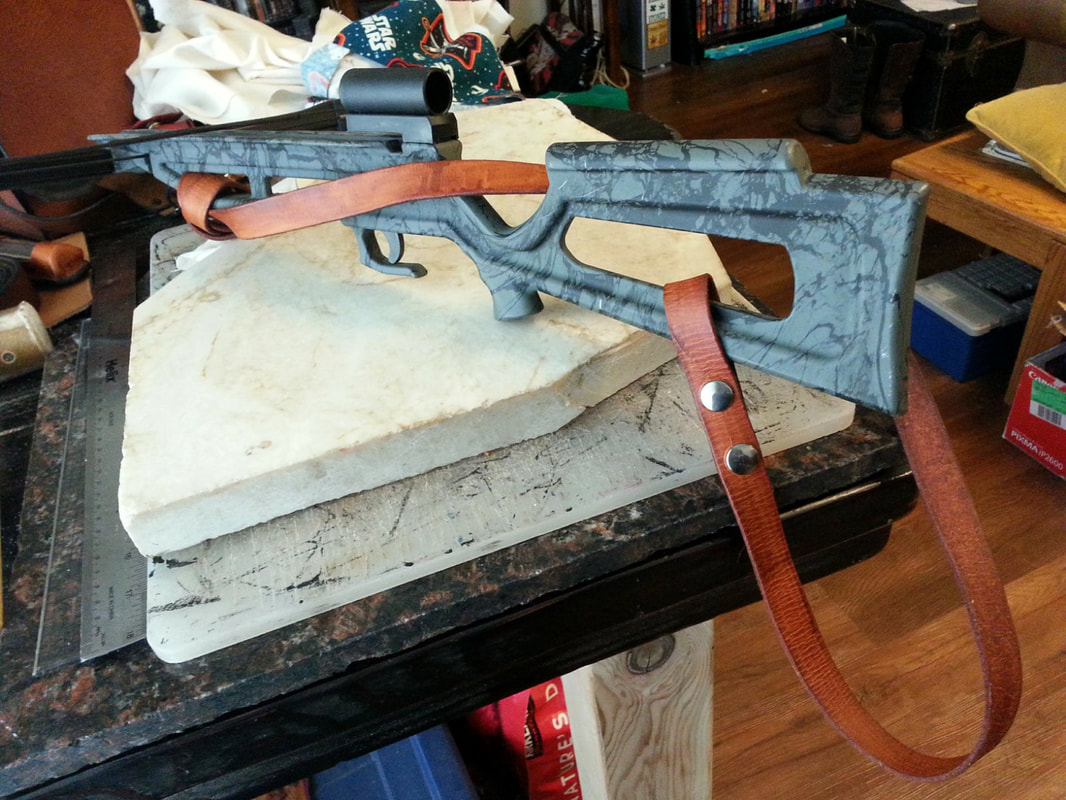
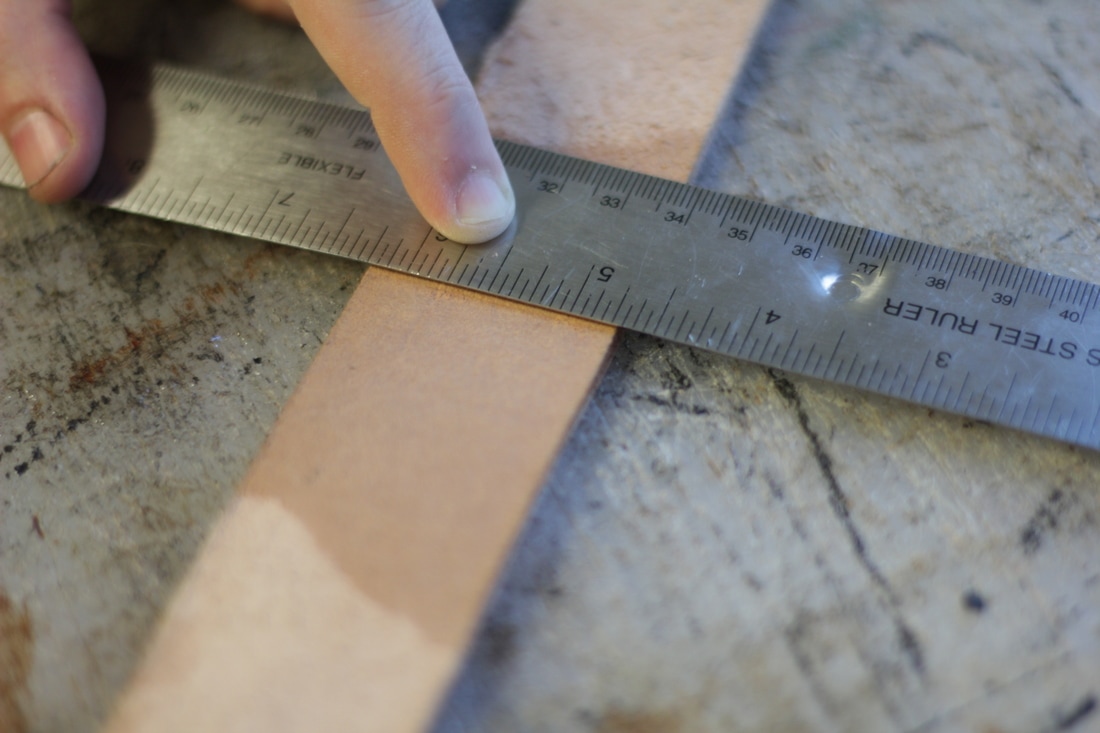
The Crossbow accessory is plastic and was bought at Emerald City Comic Con from official Walking Dead merchandise. The leather strap was made from 8 oz vegetable tanned leather cut, beveled, and dyed with a tan Waterstain and burnished with black Edge Coat and Gum Tragacanto. (See Those D@m# Edges) One end of the leather strap has two antique nickel snaps in order to attach it to the handle and the other end simply wrap ties around the hand hold. The red pocket cloth was an old car cloth for checking the oil that was already dirty and ready for stuffing in my pocket. It was almost like I'd been planing this for years. Knife, Sheath, & Belt
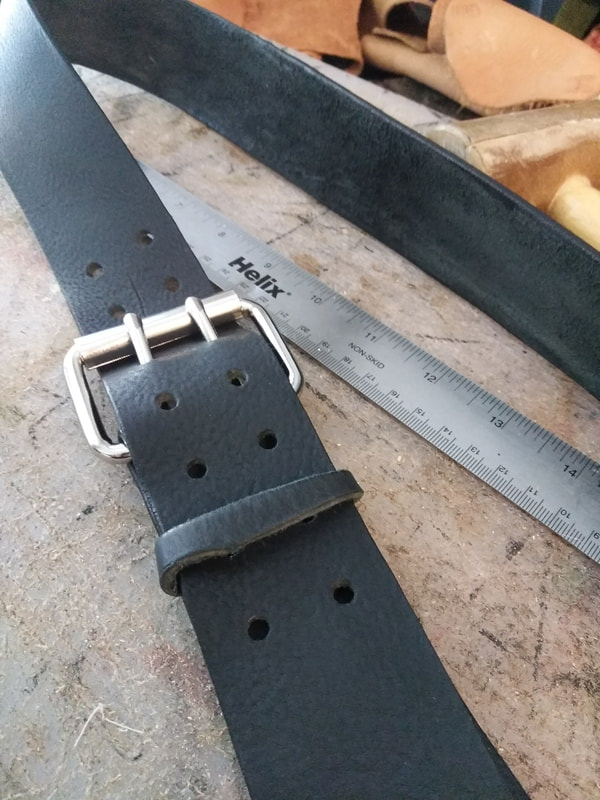
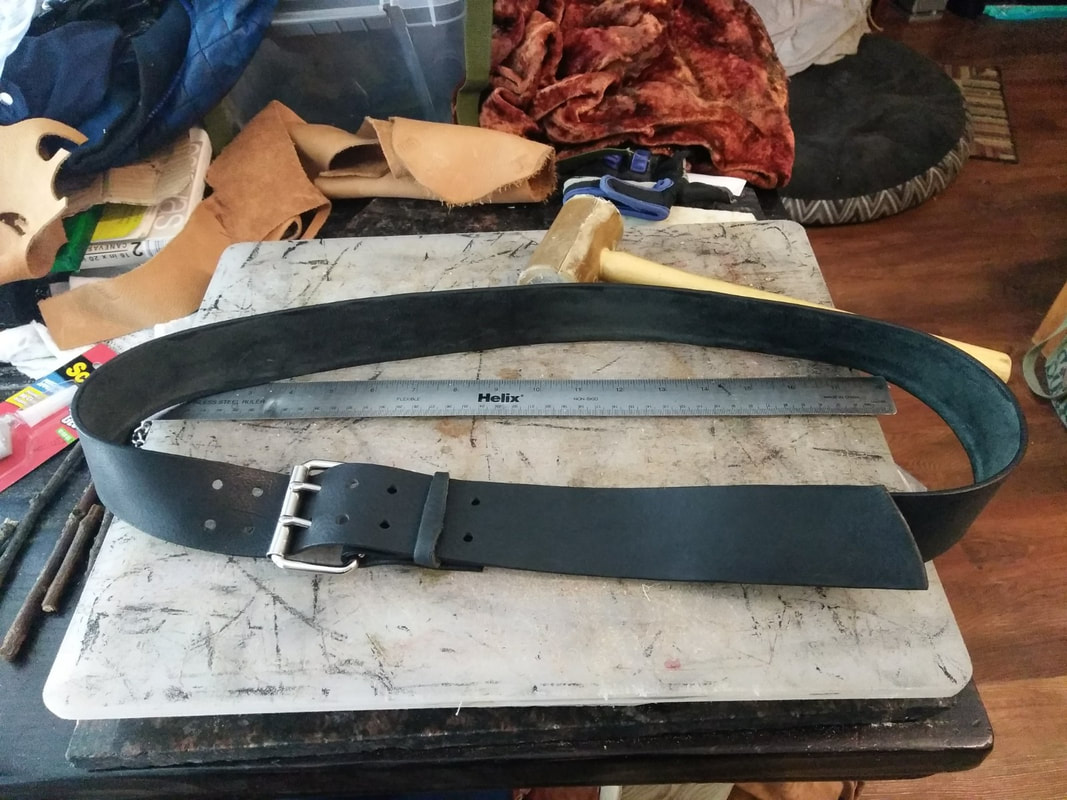
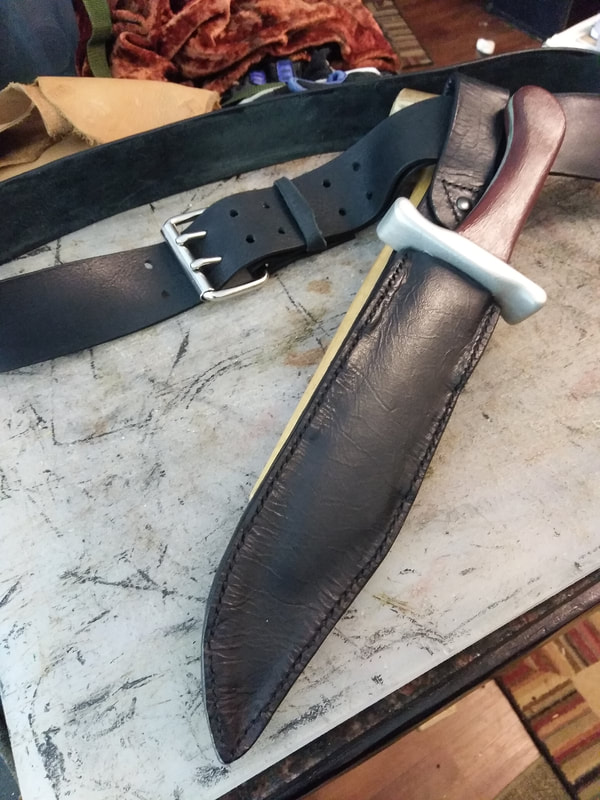
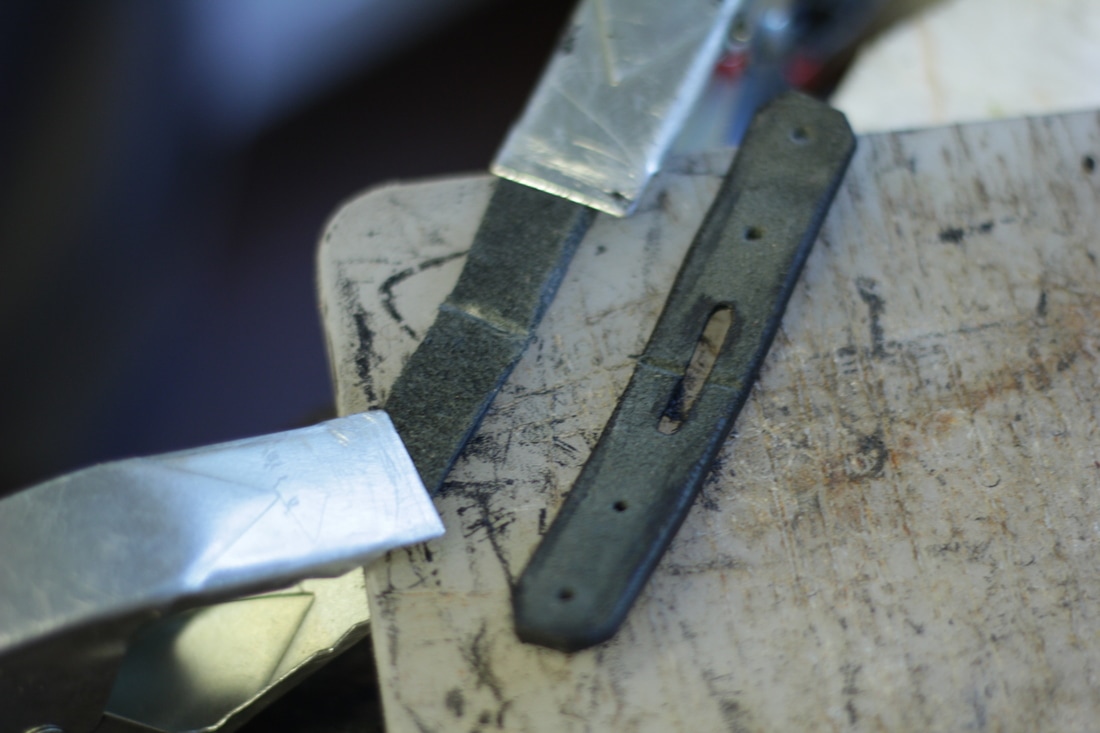
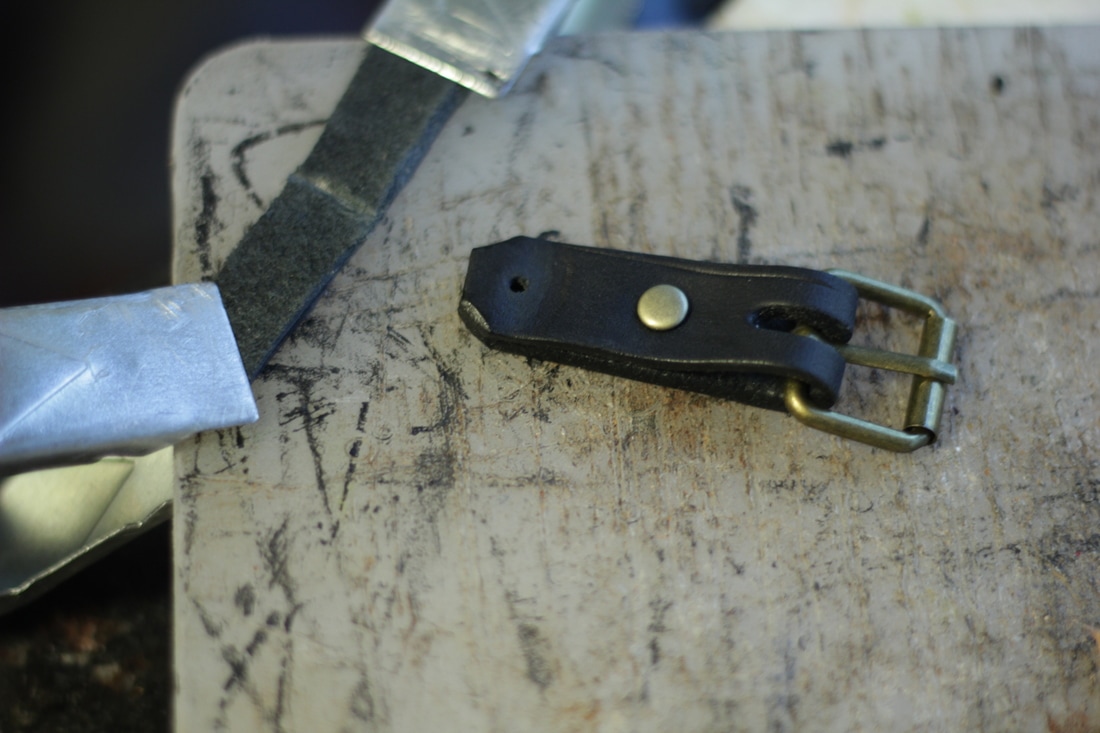
Daryl's black leather belt was made with black Austin double shoulder leather and a Tandy 2" nickel plated double prong roller buckle. Again, the edges were burnished with the same process mentioned earlier, and an oblong buckle punch was used for the double prong buckle. Medium antique nickel rivets attach the buckle to the leather, and Tandy leather Staples hold the keeper in tact.
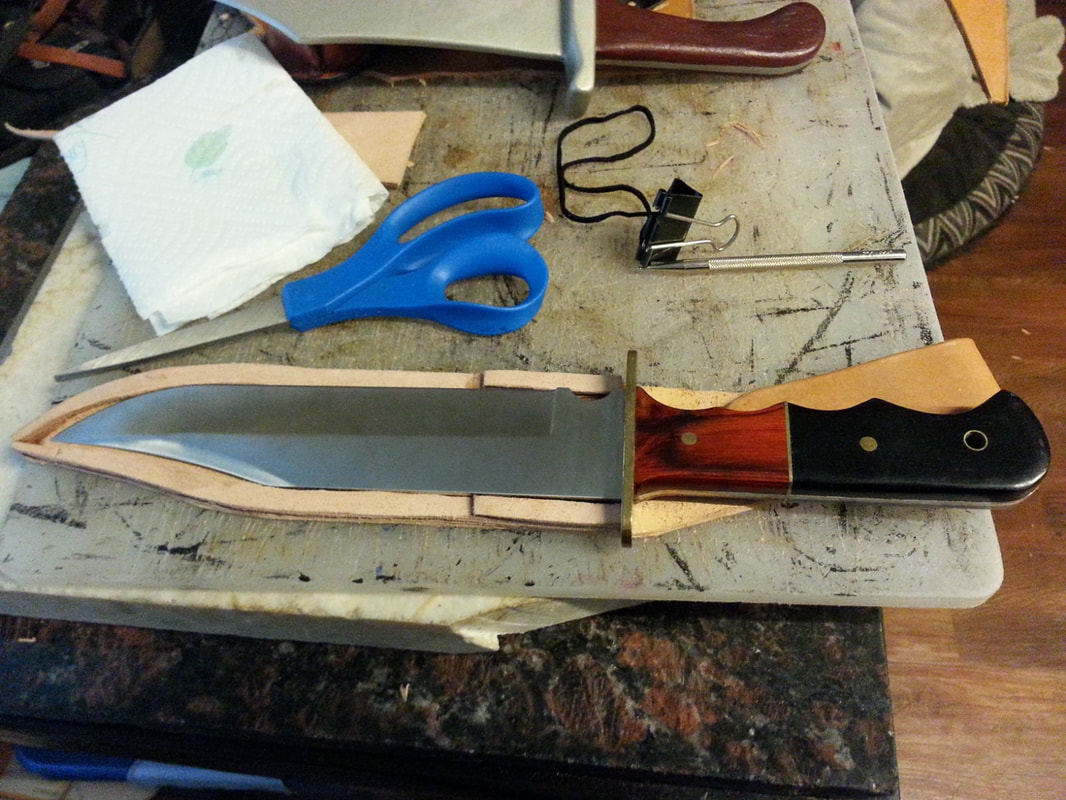
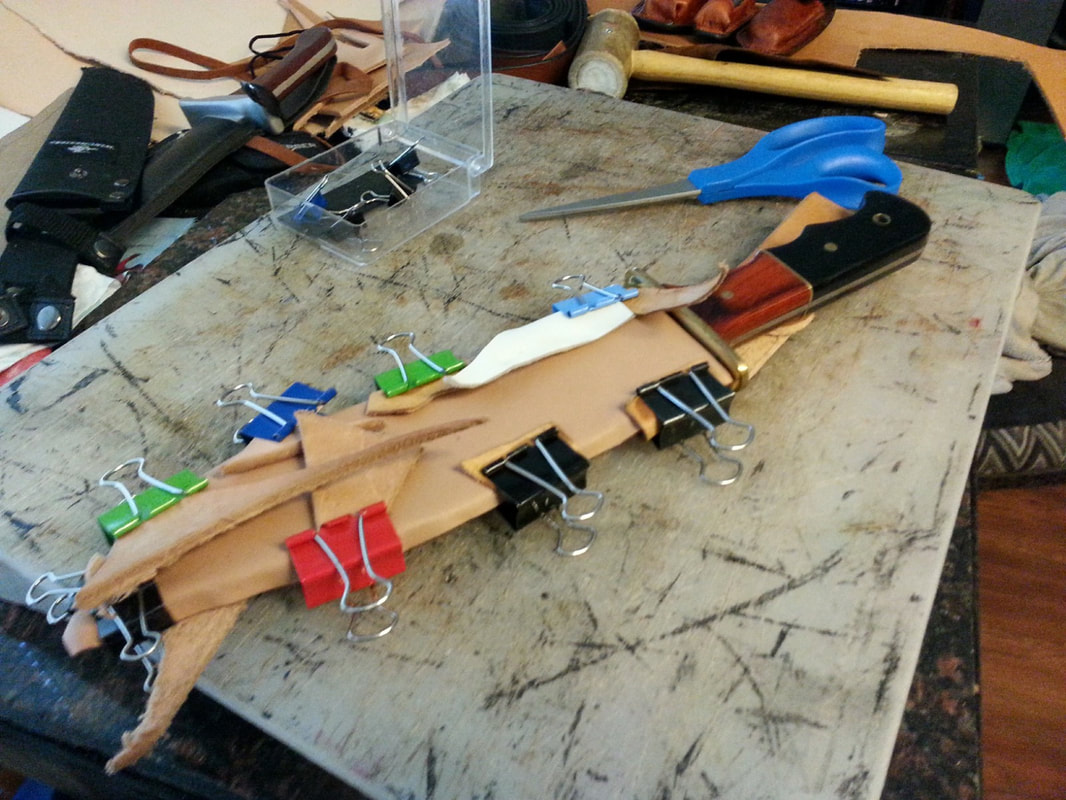
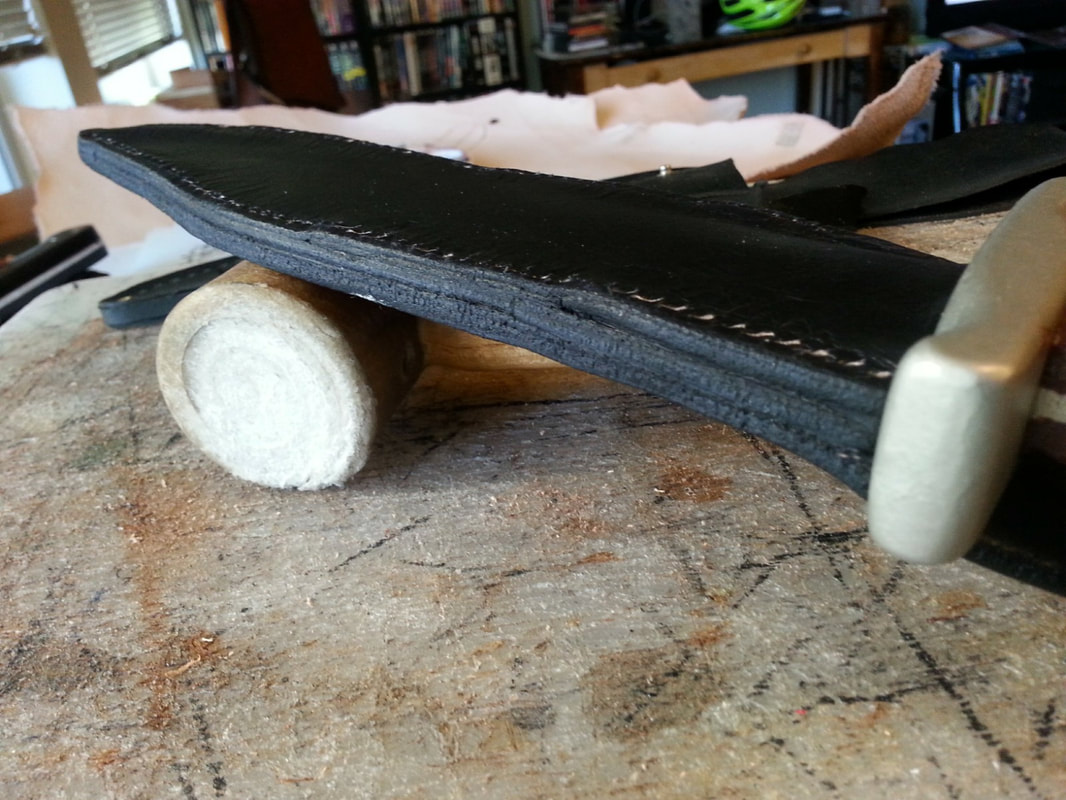
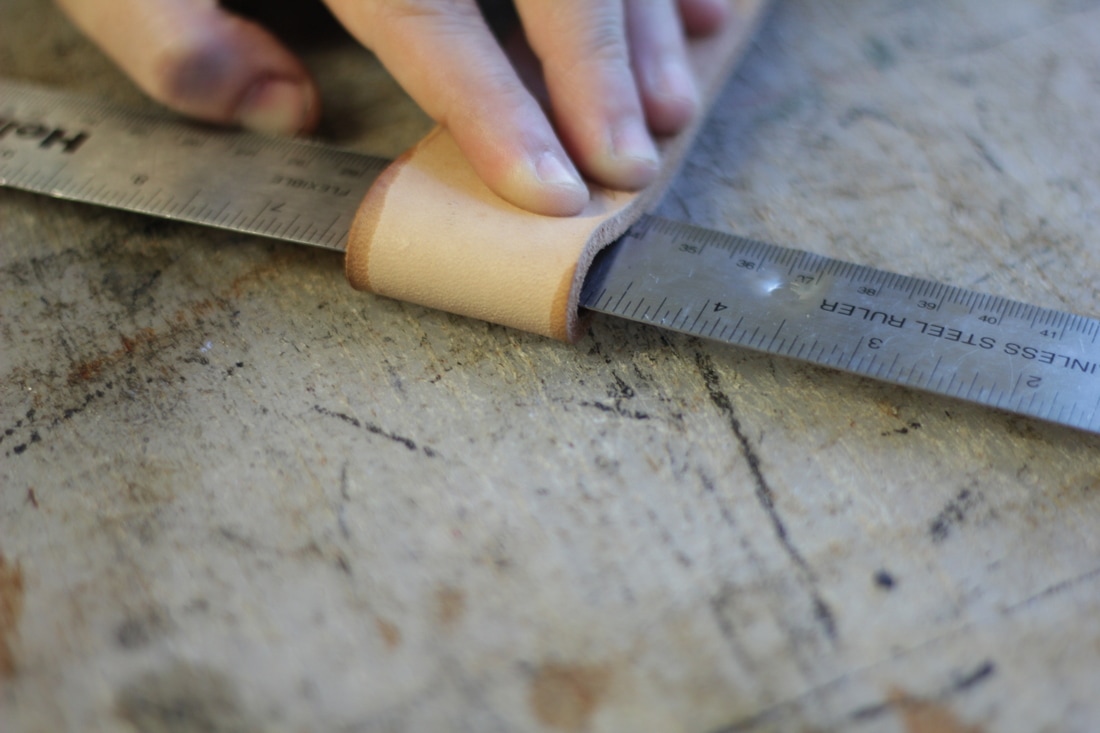
For Daryl's Bowie hunting knife I used a 9" Winchester Bowie that I already had, and I made a sheath to match Daryl's . But for Cons, I plan on using a wooden knife that my friend Michael Spidell carved for me in trade many years ago. He designed it to resemble my 9" Winchester. The sheath was put together with a 7-9 oz vegetable tanned leather for the base and belt strap, and a 3-4 oz vegetable tanned leather for the top of the sheath. All leather was stained with black Waterstain before being glued and then hand stitched with black waxed thread. A black double capped rivet finishes off this classic sheath, and Those Damn Edges were burnished like the others after being beveled and sanded. Makeup & Hair
In order to transform my face into Daryl I followed multiple YouTube videos on makeup tutorials, including a few drag queen videos. Basically I gave myself masculine lines with both brown and grey eye shadows and then I used mascara to create a stipling effect for his beard. A stipling sponge would have been much better, but I managed with the mascara brush. I also used my own long hair to create Daryl's shorter locks by twisting a pony tail in the back of my head to flop over the front of me, and pinning it in place with a bunch of bobby pins. I sprayed it with some mouse and messed it up real good. It looked silly from behind, but from the front it looked pretty authentic.  Me dressed as Daryl Dixon at Jet City Comic Con 2016 Since I first wrote this blog, I have purchased a wig and created a Daryl Dixon Wig Tutorial, Now I need to work on creating some foam arrows. I have decided to use foam so that there won't be any issues at future Convention events with the weapon being banned. Especially, since my plastic crossbow can actually fire projectiles around 30 feet or so. Having foam arrows keeps it super safe, and will give my hero an advantage against his foes! Which Walking Dead character is your favorite? Have you or are you planning to create your own Walking Dead hero? If so please leave a comment to share your own creation!
1 Comment
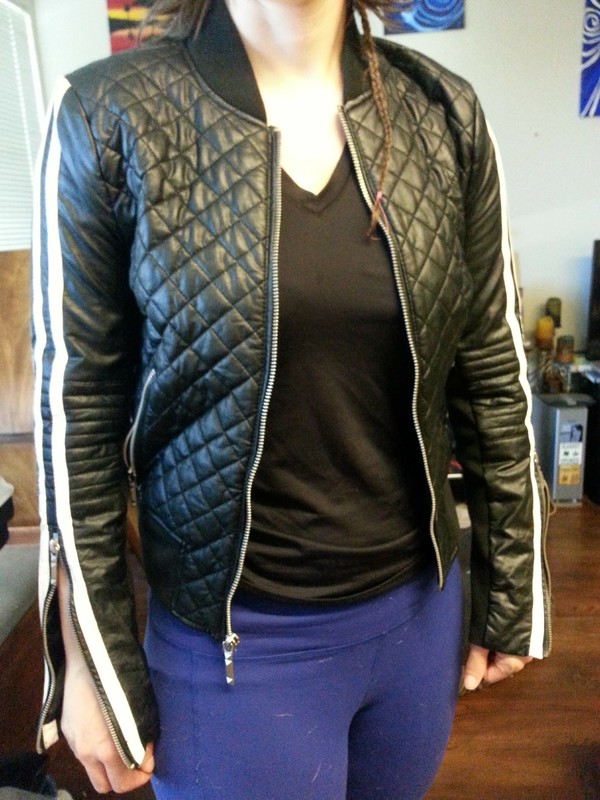
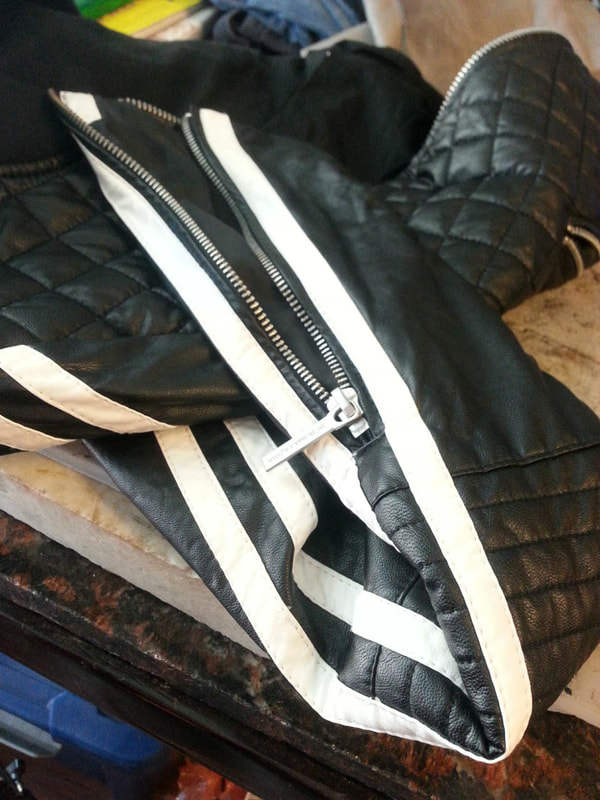
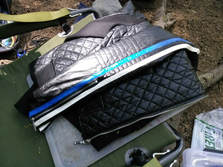
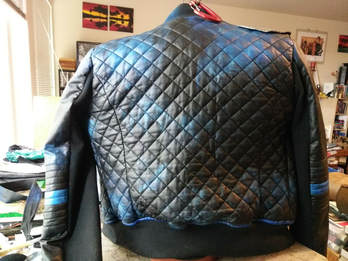
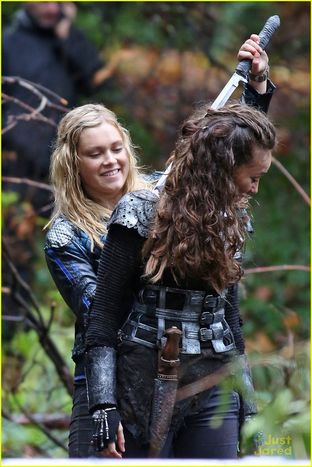
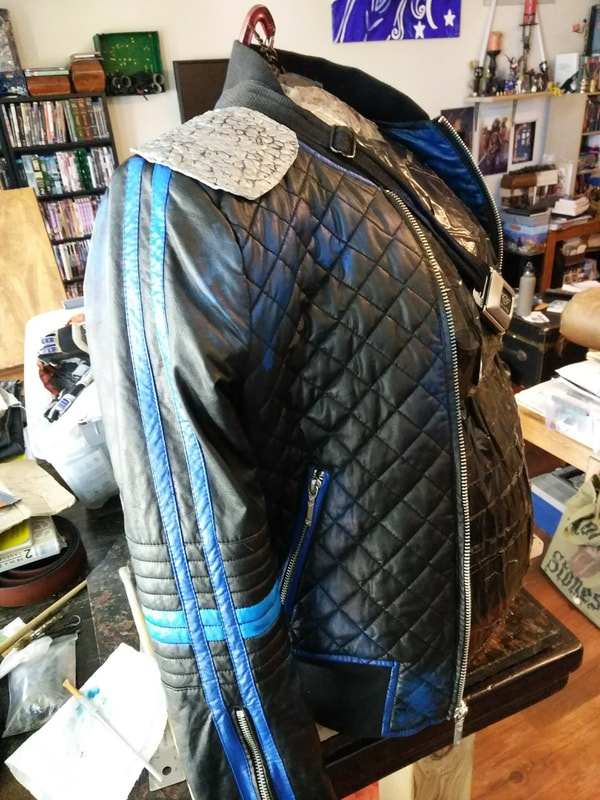
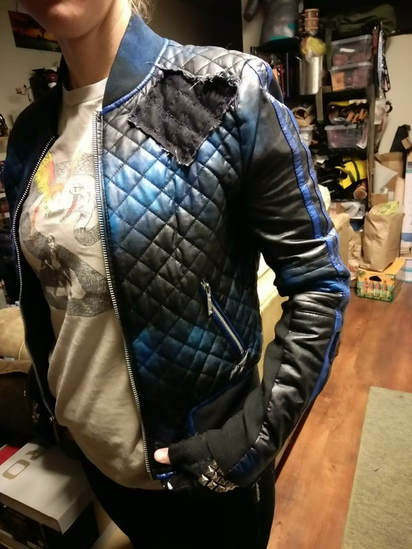
by Willow Enright  Clarke Griffin from the CW's The 100 Clarke Griffin from the CW's The 100 has more outfits than she does plot lines. It certainly provides a vast array of cosplay ideas to choose from when creating your own Clarke. Since I'm making this Cosplay for my girlfriend, Erin, it was her choice and she decided to go with season two's classic quilted bomber jacket with all the blue accents. We'll be adding other ensemble pieces to this jacket to create the whole Clarke Griffin for Erin as a Cosplay character, but today I'm going to focus on her bomber jacket since this really is the main piece.
I happened across the BCBG Maxazria Black Faux Leather Quilted Bomber Jacket on Ebay by chance. When I saw it I knew I had to snag it to save myself the hassle of building the jacket by scratch since it was the perfect base starting point. Of course I scoured the internet in search of several reference photos to use before I began to actually transform it. I attempt to get pictures from all angles if possible to be sure that my reference is accurate enough.
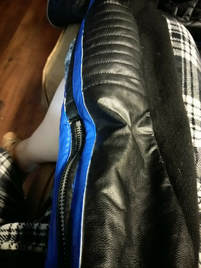
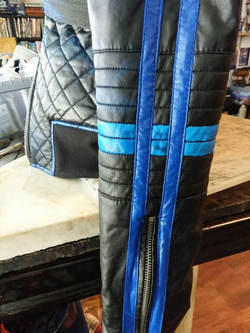
Since this jacket already had white accents where we needed to have blue ones, that's where I started. I used Angelus Blue Acrylic Leather Paint and craft paint brushes of various sizes to painstakingly make all the white areas blue. This took quite some time since you put on one coat of paint and then wait for it to dry before doing another, doing as many as are necessary to get the shade you want. I did 3 coats over the white until I was satisfied with the hue of blue. The black areas only required 2 coats to match the white stripes. For the horizontal arm bands on the sleeves I mixed Angelus Blue with a dab of Acrylic Heavy White to slightly lighten the blue to match the reference photos. The black faux leather only needed 1-2 coats of this color, especially since I wanted these arm bands to look more worn than the darker blue stripes. You can use a painter's tape when working on something this intricate to keep paint off the jacket and zippers, but I didn't simply because I knew that I would have to mess up my beautiful paint job in the end anyways. Once the initial transformation from white/black accents to blue ones was done I waited for it to fully dry, 24-48 hours.
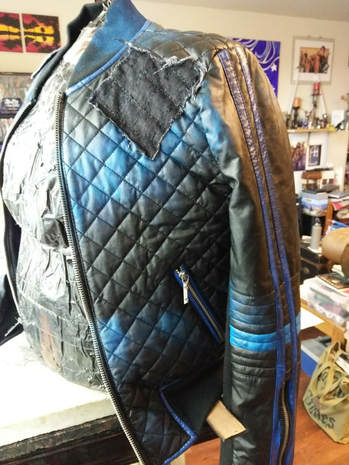
The next step was to add the blue highlights that appeared to be spray painted onto the jacket. For this step I again used Angelus Blue and Acrylic White only a very small amount on a sponge so that I could lightly dab it over the jacket, which I zipped over my body double so that I could see exactly where I was highlighting with the blue in comparison to my reference photos. I didn't blend the paint on the sponge but rather used a downward motion while dabbing with the sponge to mimic a spary paint can pattern. When I was done with the first pass, and while I waited for it to dry, I checked my reference shots again to see how accurate I was on the first blotching. I felt that it required more color so on my second blotching I used a medium amount of pressure to dab the same spots with more blue paint before leaving it to dry another 24 hours.
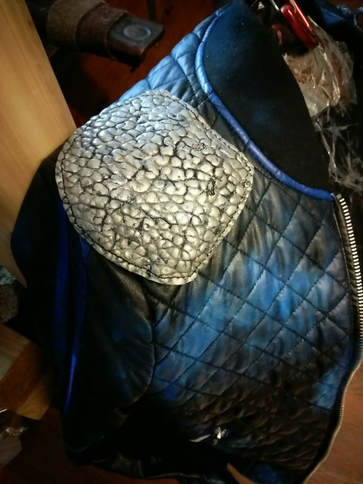
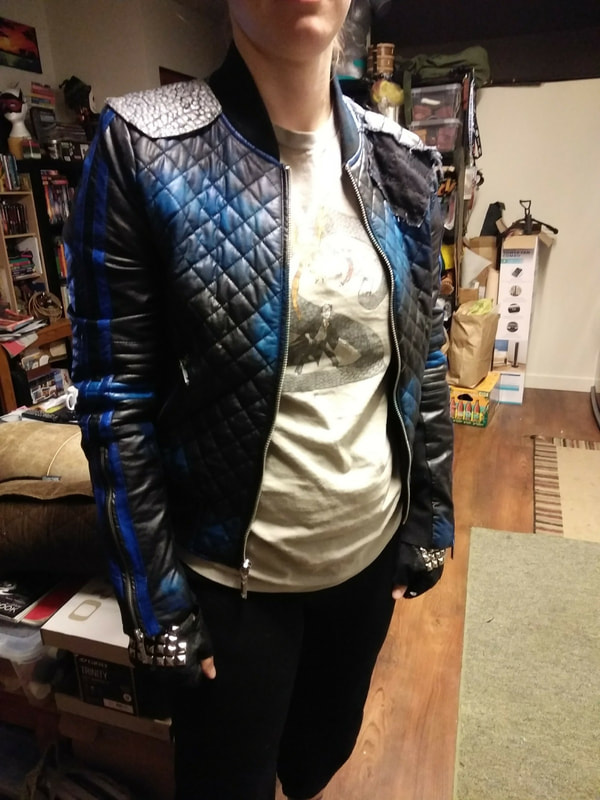
In the meantime I did some mild experimenting with different materials trying to figure out what would mimic Clarke's patches closely enough. For the left shoulder I found that using jean material would best match, only the scrap pair of jeans I had in my sewing scrap bin were blue. So, I took a good ol' Sharpie to the square of material transforming it into black denium. I left the edges to naturally fray, but colored them to match before hand sewing this patch into the diamond stitch pattern on the jacket. I realized after the fact that I didn't double check my reference picture, so my patch is diamond shape looking while Clarke's is actually a bit more square shaped... hence, the importance of checking your reference shots even when you think you know what you are doing. Alas. I wasn't going to undue all those hand stitches to turn it, so mine's a bit unique.
The right shoulder patch was tricker to mimic because whatever the material was that was actually used in the T.V. show is unknown to me. I first tried bubble wrap painted silver thinking that using some sort of alternative material would be more post apocalyptic, but it was too obviously bubble wrap. In the end I used a black Italian Lambskin with a bubbled texture that I painted with Angelus Silver. However, I was careful not to paint the leather fully, leaving the black leather in the cracks of the design black for a more weathered appearance. After it was completely dry this patch was also hand stitched onto the right shoulder.
Antique Black Leather Stain was used on a sponge to go over areas of the blue stripes to add some additional weathering before leaving it to dry fully yet again. The painted areas were then treated with Chamberlain's Leather Milk no. 3 to help protect and perserve it so that when Erin takes it into the woods to give it that final weathering effect all my hard work won't be undone.
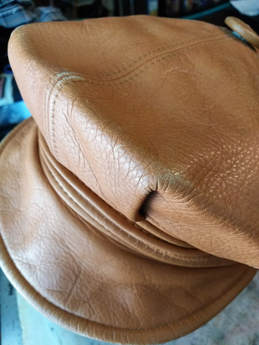
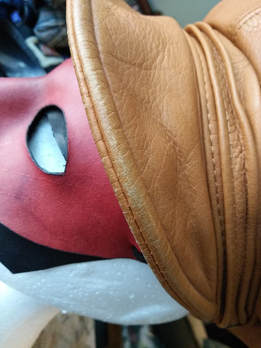
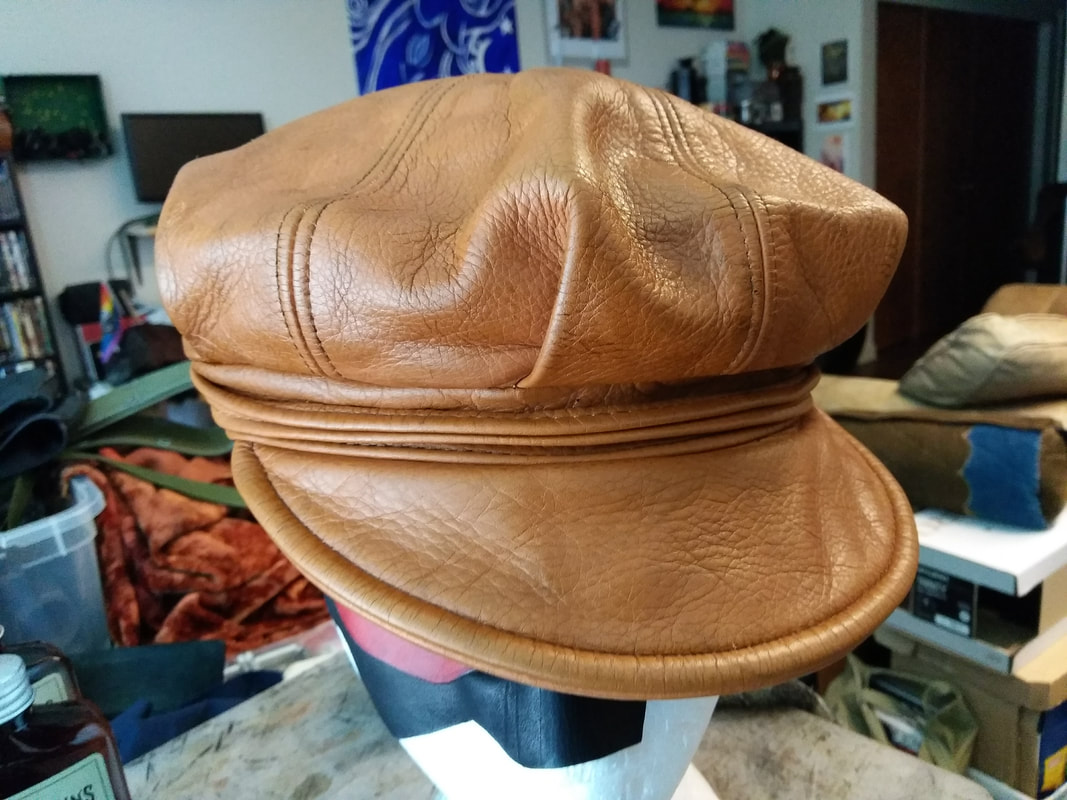
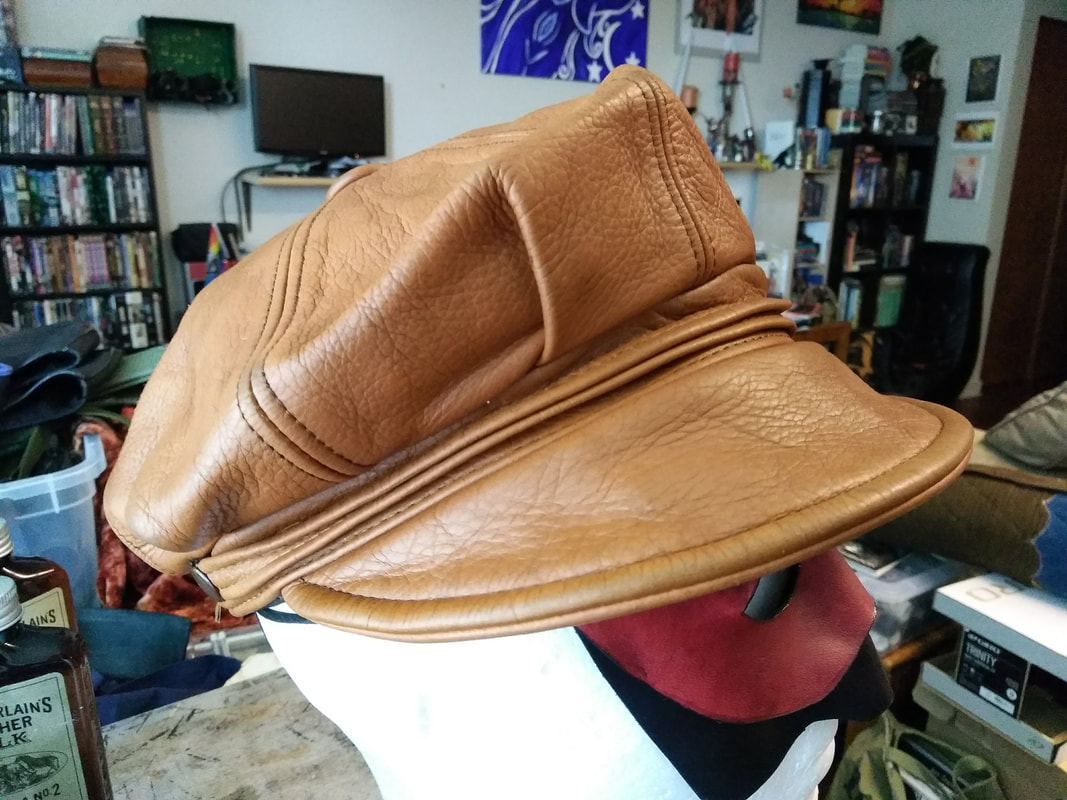
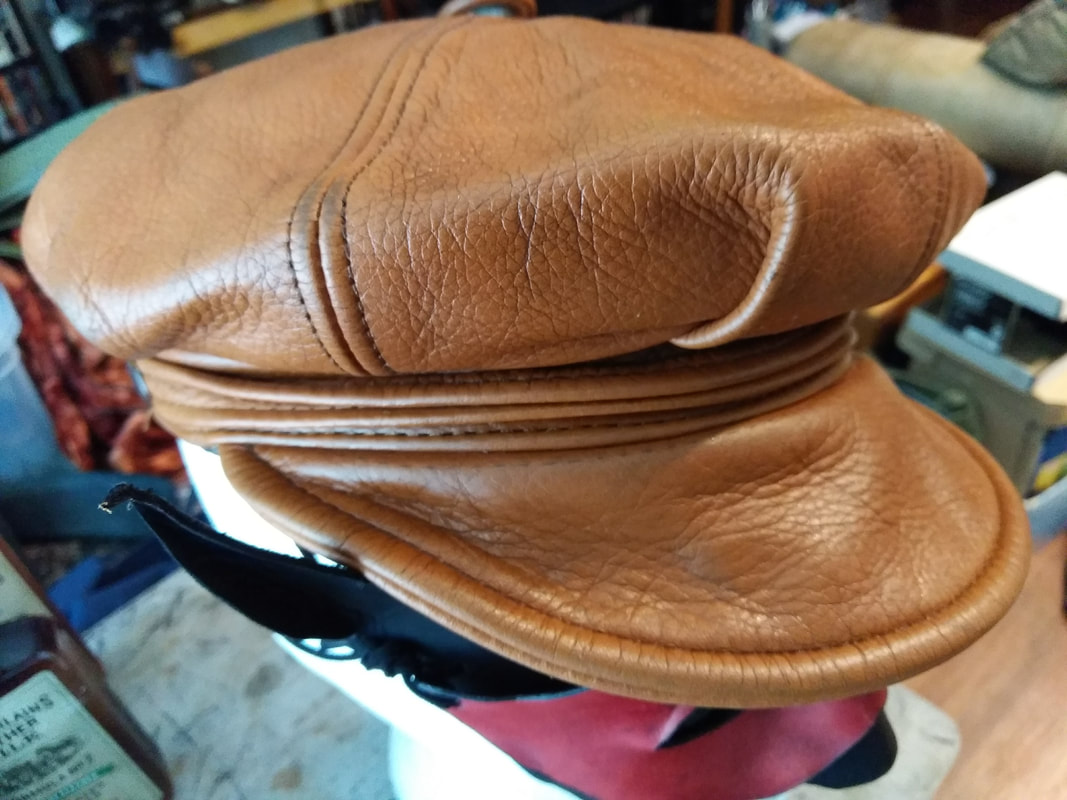
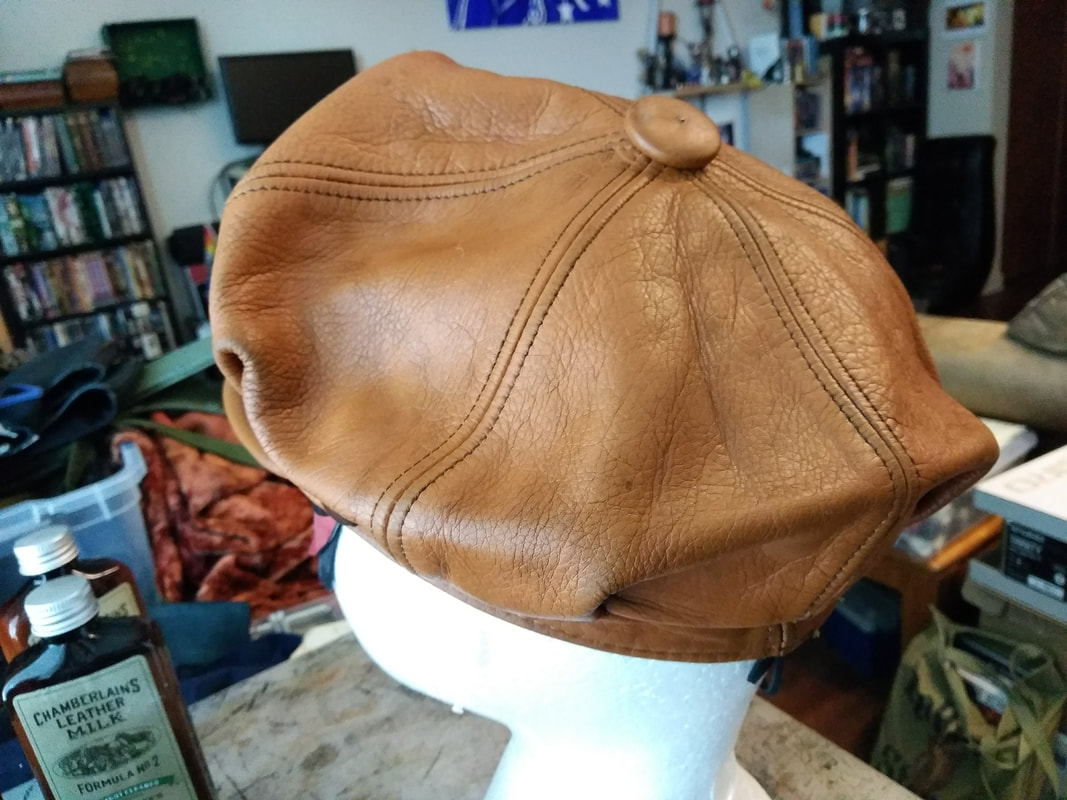
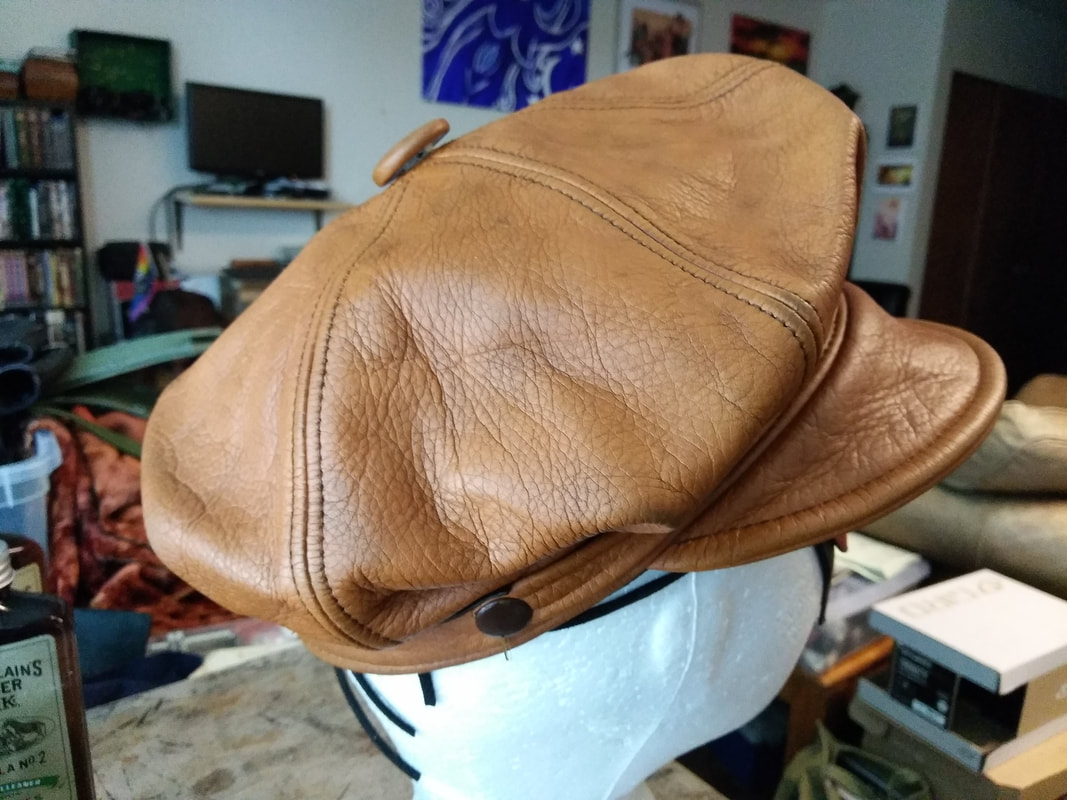
This is how I created Clarke Griffin kom Skaikru's post Apocalyptic bomber jacket! If you too are a fan of CW's The 100, which character have or would you like to do as a Cosplay? Stay tuned for more blogs as I will be working on more Clarke Griffin in the future, as well as Lexa kom Trikru! "Aai badan yu op en nou moun (I serve you but no other)!" by Willow Enright 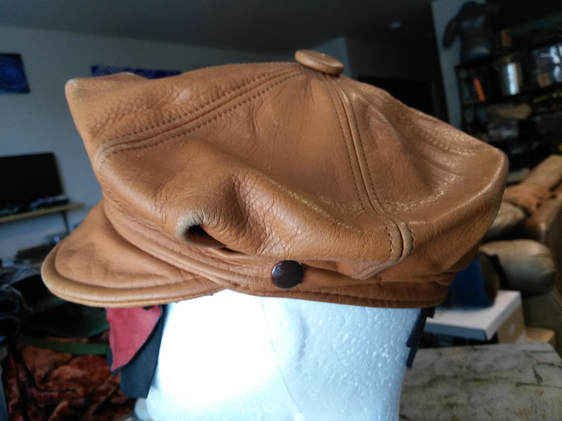 Second hand worn out cap Erin and I recently went second hand shopping and found a wonderful leather cap that was a bit down on its luster. We rescued it and I went to work on bringing it back to life. Below are the steps that I took to give this classic cap a nicely weathered flare.
1.) Clean the leather with a special leather cleaner. I used Chamberlain’s Leather Milk No. 2 formula. Use a sponge or the provided pad to work the cleaner in circles into the leather and let it dry. 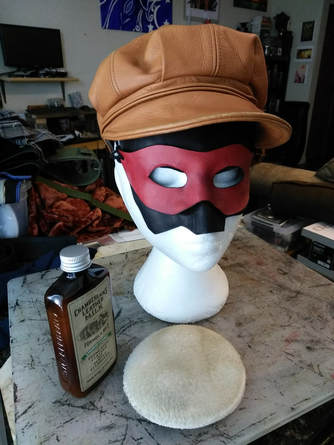 Leather is all clean! 2.) Condition the leather. I used Chamberlain’s Leather Milk No. 1 formula, conditions and rejuvenates leather, followed by Aussies Leather Conditioner. Use another pad to first work the leather milk no. 1 into the leather, leaving it to dry, before following that with the Aussie Leather Conditioner in the same application process but using another pad. Leave it to be absorbed before using a cloth to buff the excess conditioner off. Also buff in circular motions.
3.) At this point I had hoped that the areas rubbed down to the split suede would have been less worn out looking, however since they were still rather worn down I decided to give the simple cap a bit of color. I chose to use Eco-Flo Hi-Lite Chestnut to give the hat a more lived in feeling as opposed to the worn out look it still exuded. Add the hi-lite with a sponge in a circular motion followed by wiping the excess off with a cloth or paper towel. Leave it to dry.
4.) Finally, I applied Chamberlain’s Leather Milk No. 3 to protect the leather from further wear and damage. Again, use a different pad to apply the milk in a circular motion rubbing it into the leather. Leave it to dry, and afterwards you have a nicely weathered slightly retro cap!
by Willow Enright 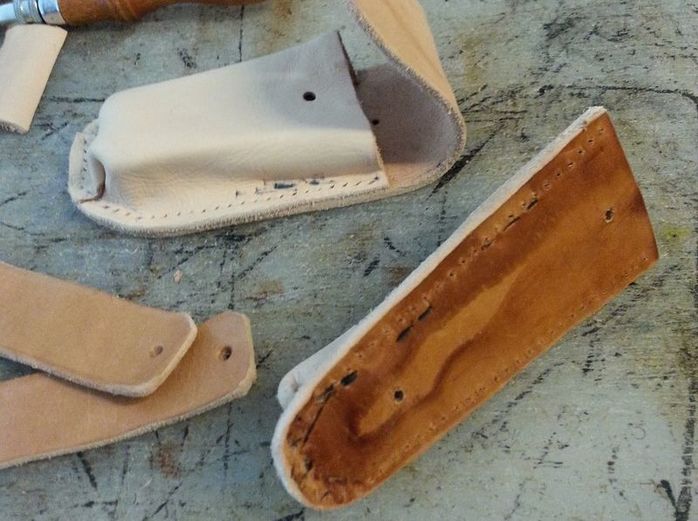 Glued, Wet Formed, Beveled, Sanded and Hole Punched Leather pouches. Supplies: Water Based Contact Adhesive (Eco Weld) Leather Plastic Knife or Glue Tool Clamps Paper Towels Wax or Parchment Paper Wet Work Cloth Stylus or Pencil 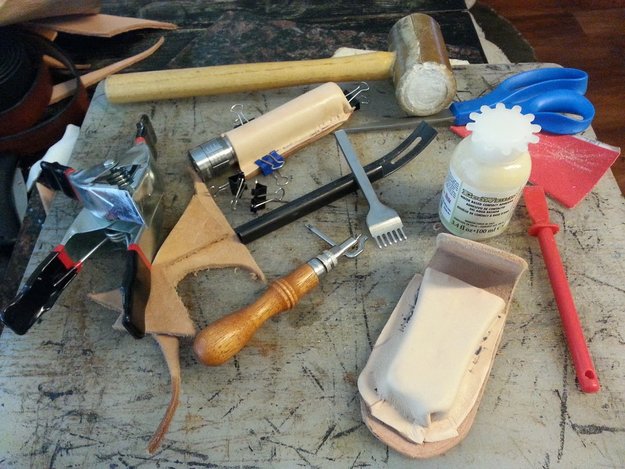 Water Based Contact Adhesive, Glue Tool, Clamps, Stitch Groover, Safety Bevel, Scissors, Mallet, Sewing Hole Punch When you first start working with leather you don't always see the benefits of doing something like gluing your leather before sewing it. Only, sewing thick pieces of leather together can be really tough. Especially trying to match up your holes in opposite pieces for the needle. However, there is a helpful technique of gluing your leather before punching holes that makes sewing thick leather much more enjoyable. The best part is that it's actually rather simple! 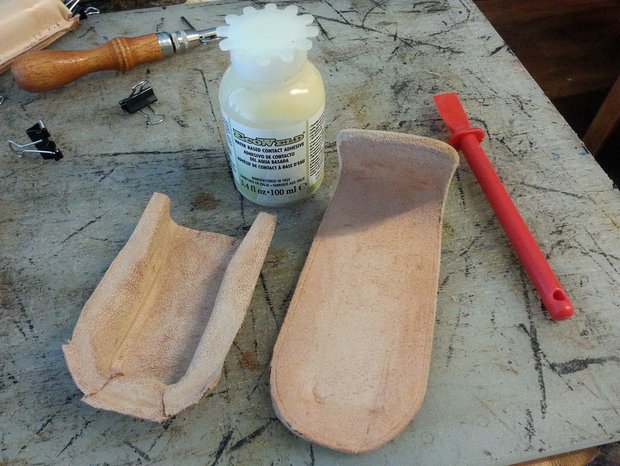 Water Based Contact Adhesive, Glue Tool, and Leather Project Start with your leather cut into the shape you want for your project. If you are simply gluing two thicker pieces of leather flesh side to flesh side (this is the side of the leather that would be pressed against the muscles of the animal) then you won't need to do much to prepare your area for gluing. However, when you are gluing the flesh side of the leather to another grain side be sure to use some sandpaper on the grain side of the leather to rough it up to ensure maximum gluing capabilities. The glue needs something to bind to and the grain side of the leather is simply too smooth to stick well. You can also use a sciver or safety bevel to rough the grain side up some. If your corresponding top piece will be wet formed over your object before gluing then check out my Wet Forming blog here. 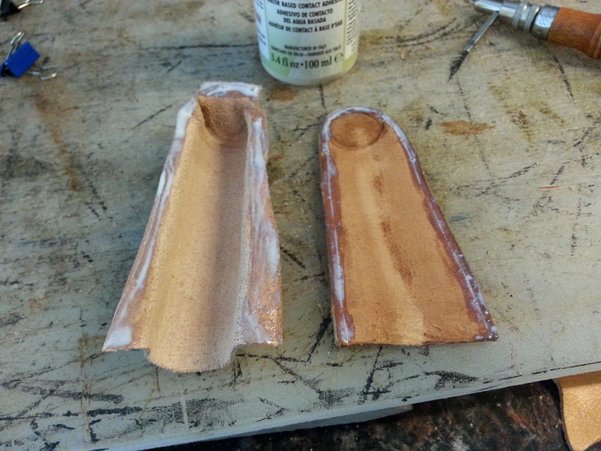 Contact Cement applied around leather edges Once you have your leather pieces ready to be glued, measure along the edge where you want to apply your glue. I use my stitch groover to mark where I plan to punch the holes for sewing. Then I apply the contact cement at least a quarter inch (1/4") on either side of the stitch line. Apply it to both surfaces and let it air dry until it is sticky enough to bond to itself and stay on its own. You can use wax or parchment paper to mark your cut off line which will ensure that you don't over apply the glue, or you can wing it with a pencil mark if you are comfortable. Either way, just be sure to not get any glue on your grain side of the leather. If you do then your leather won't absorb oils, waxes, dyes or stains in that place leaving a permanent blemish where the leather won't accept anything. I keep a wet work cloth handy at my work bench in case I get any glue on my hands. 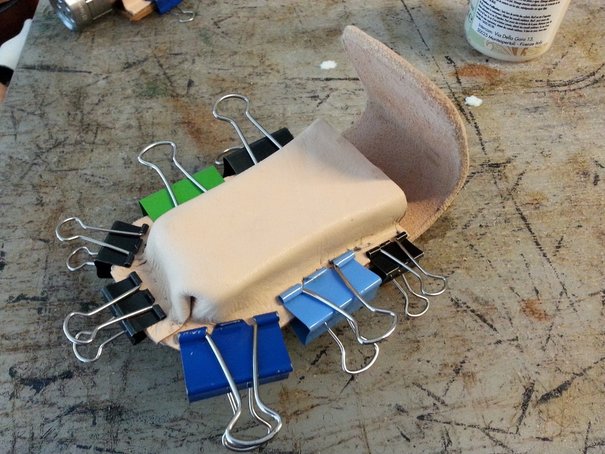 Clamped Leather pieces. I didn't use a cloth or paper towels to buffer my clamps since this project is for my girlfriend who doesn't care about markings. Once the glue has been applied to both sides of the leather it's time for clamping. If you want to keep your leather free of clamp marks, then use paper towels, scrap leather or a work cloth to keep your clamps from making marks in your leather project. Be sure to line up your leather pieces before you press them together, you only have a few seconds to move it before it starts to set. Use your cloth or paper towels to buffer your clamps and set them as evenly around the project's edge as you can. If you don't have enough clamps, spread them out as best as you can and then just rotate them every 5-10 minutes along the edge to ensure even pressure. 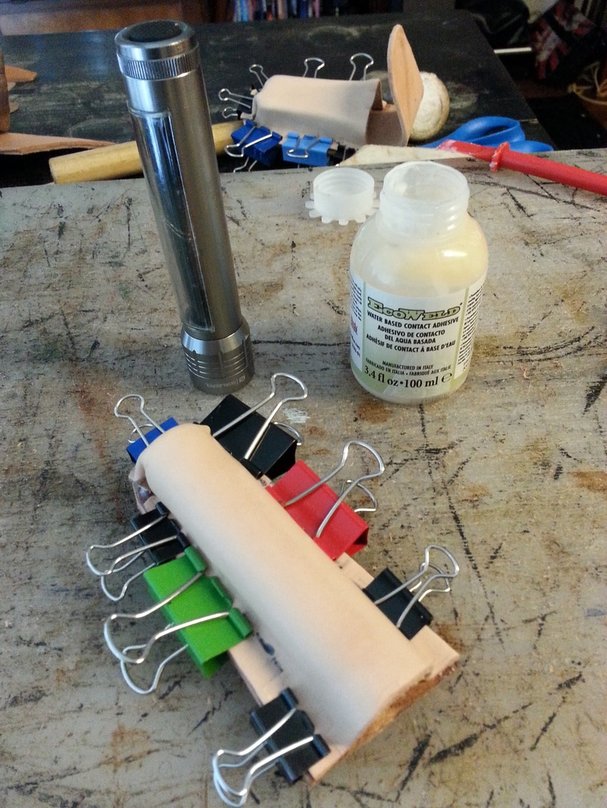 Clamped Flashlight Holder with Contact Cement. Leave your project clamped for a minimum of 30 minutes before removing the clamps, and then leave the project for 24 hours to completely dry. This will give the glue it's maximum adhearing potential. If you can't wait a full 24 hours before punching your holes then be sure to wait at least 6-12 hours for the bond to have started. Since this is a contact cement it is possible to punch holes as soon as 6-12 hours later, but for optimal bonding results it is recommended to wait a full 24 hours. Once your project is dry you can trim and bevel your edges for a nice smooth transition!
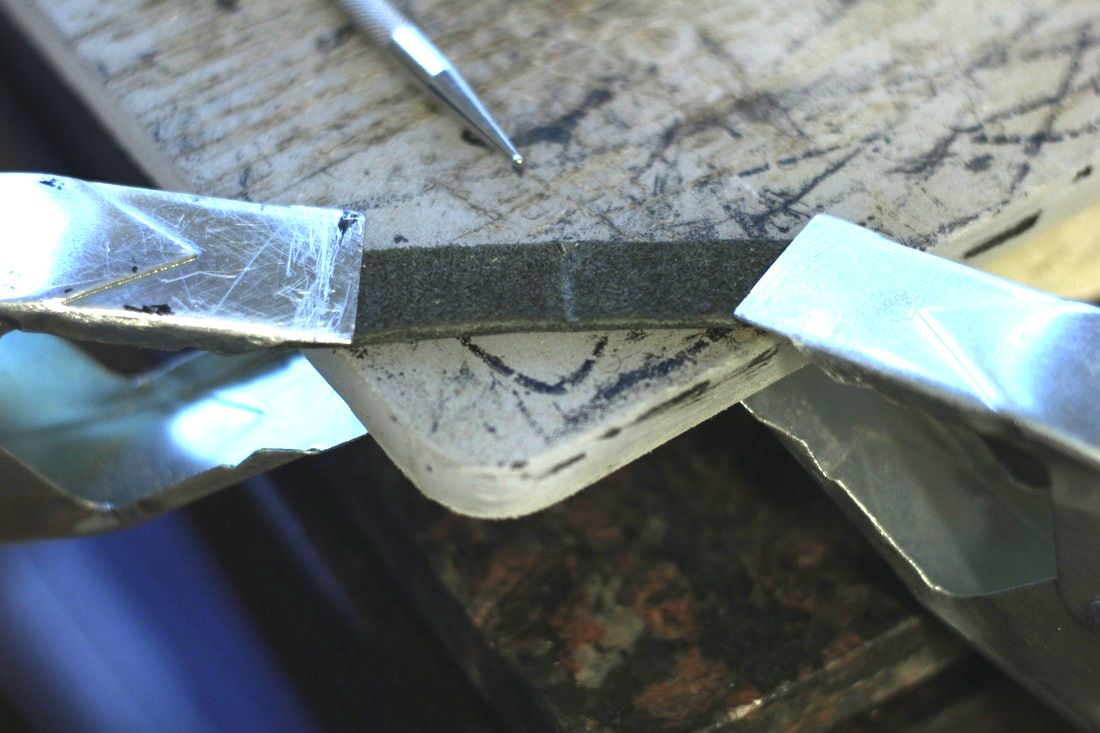
by Willow Enright 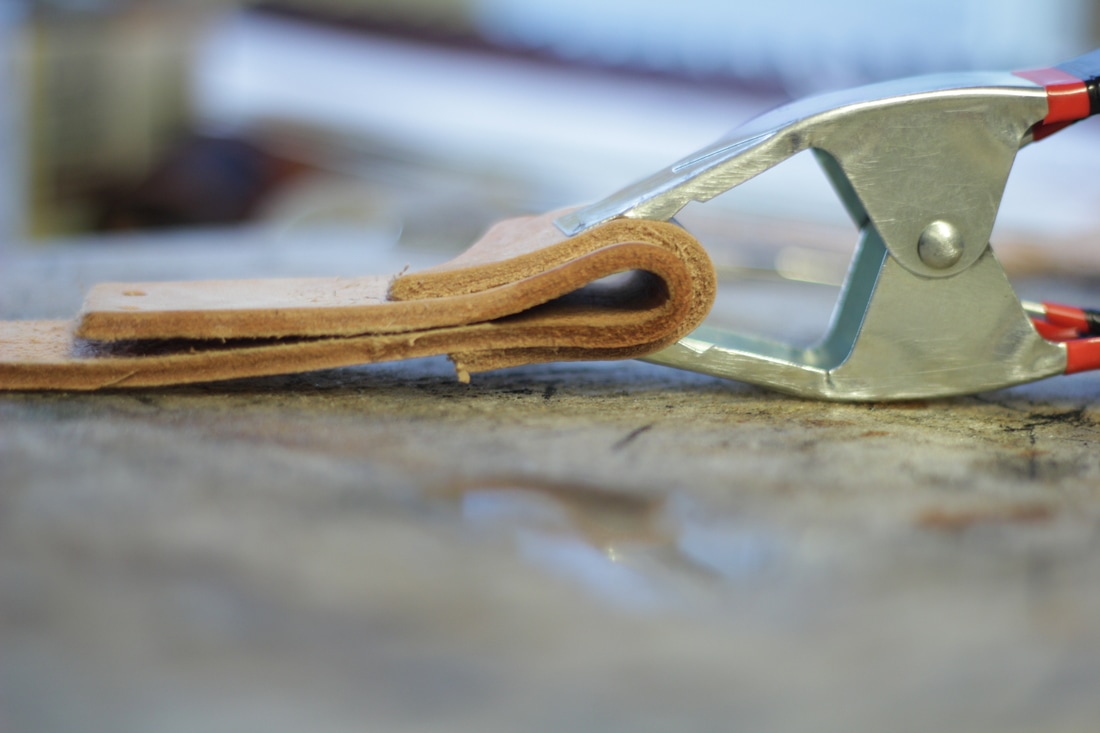 Wet Folding Leather using metal clamp and scrap leather. SuppliesCutting Board Clamps or Stack of Heavy Books Spray Bottle Scrap Leather Pieces and your Work Piece of Leather Stylus V-Gouge 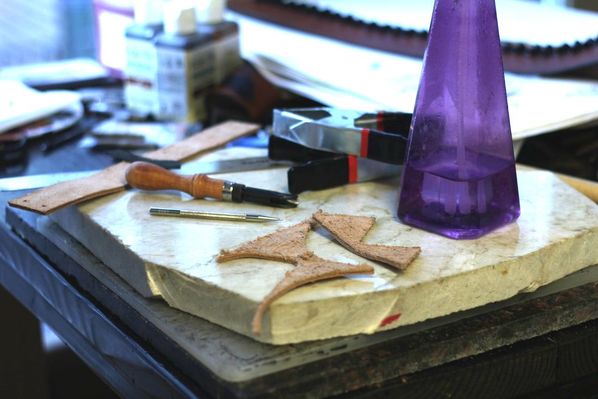 Supply List: Cutting Board, Clamps, Spray Bottle, Scrap Leather, Work Leather, Stylus, V-Gouge There are times when you need to fold your leather to get the best results. Making belts, wallets, art book covers, journals, or whatever else you might fancy. There are more than a couple ways to fold leather, however I'm going to cover folds with V-Gouging, and folds done by wetting the leather. One of the ways you can fold thicker leathers is by using a V-Gouge tool. You want your leather to be a minimum of 5-7 oz to use this method, otherwise it will compromise the integrity of the leather where it is used. The V-Gouge tool can be helpful when using a 8-12 oz leather with buckles, or making a satchel or messenger bag. The buckle area doesn't recieve extra wear so it's not as compromised. The satchel or messenger bag are meant to be glued and then stitched and gouging can allow pieces to fit together better while they are reinforced by the glue and thread.
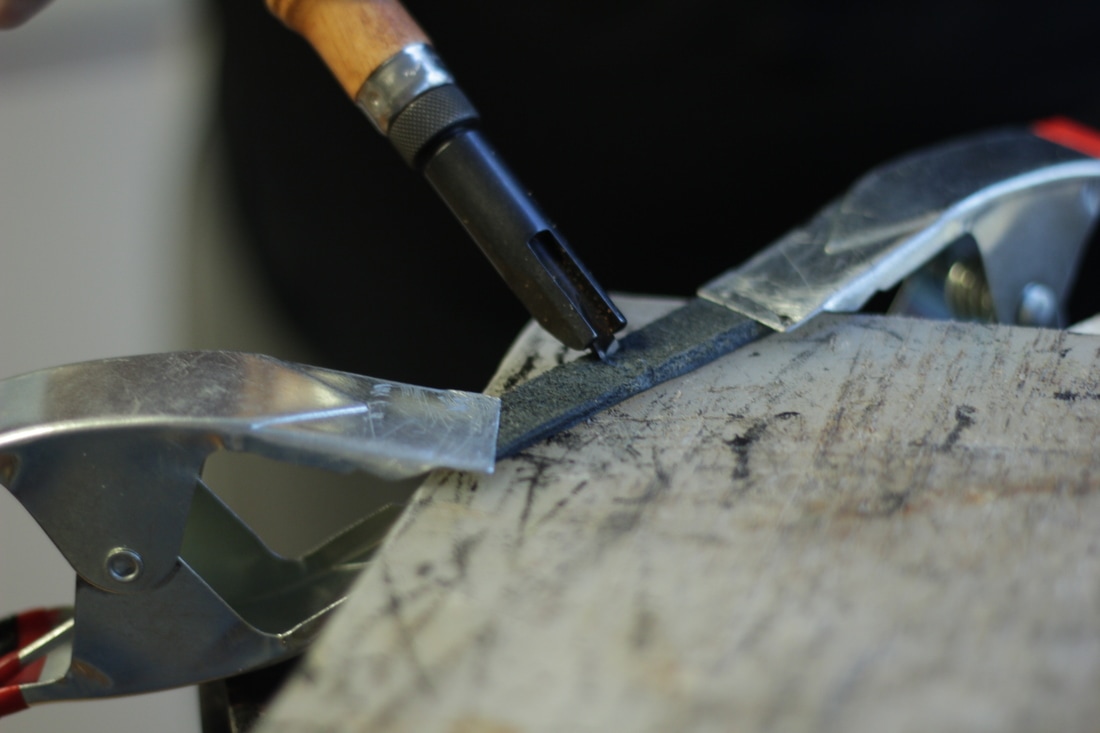
To V-Gouge your leather figure out where it needs to fold and mark it with a stylus. Then using clamps and a cutting board, secure the leather on either side of your fold before using the V-Gouge tool. You can adjust the V-Gouge width and depth to ensure a smooth fold. I recommend trying it on scrap leather first to ensure the size of the gouge that you need.
When you begin the gouge, place the tip of the V-Gouge a few millimeters away from the edge of the leather and be sure to stop the V-Gouge a few millimeters before reaching the end of the leather. This will help retain the integrity of the leather at the fold despite being gouged. If you are using this method for buckles, V-Gouge before you use an oval hole punch for the tongue of the buckle.
The other method for folds in leather is by wetting the leather. You can use this method for all ounces of Vegetable Tanned Leathers, plain or colored. Depending on the thickness of your leather, your folds will require different amounts of attention. Either way you will need a spray bottle, clamps or several heavy books, a scrap piece of leather, and a ruler or bone folder. Thinner leather will fold quite nicely while thicker leather is more work. Start by creating a line on the underside of the leather, or the flesh side. Spritz water from the water bottle along the line until the wet begins to soak through to the grain side, or front of the leather. If you are folding thinner leather 5 oz and under you can simply line your ruler up on the drawn line and fold the leather over the ruler. Use the scrap leather to create a barrier between the wet leather and your stack of books, remove your ruler, and leave it until the leather dries.
When you are folding thicker leather, 6 oz-11 oz, it is likely that you will need clamps to hold the thick leather in place better while it dries. Place a scrap piece of leather around your fold before applying the clamps or they will leave marks on the leather, but use as many clamps as you need to achieve the fold. Just make sure that your fold is clean and straight, otherwise it will dry in the wrong position. You can also use a combination method of a V-Gouge with a wet fold for the extremely thick leathers, 12-16 oz.
Regardless of which method you use, folding your leather can give you clean straight edges that don't require sewing. It will also place less strain on your rivets and let your buckles sit more flush. Using the wet forming method takes advantage of the leather's natural capabilities, and leaves you with a brilliant edge!
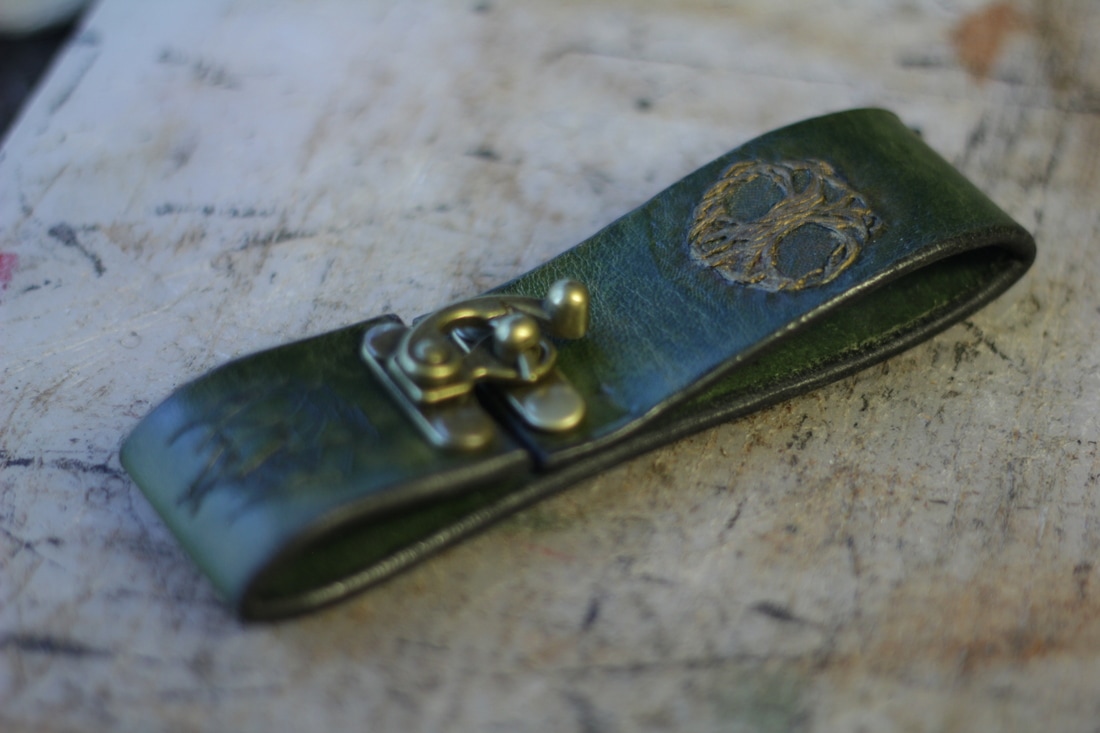
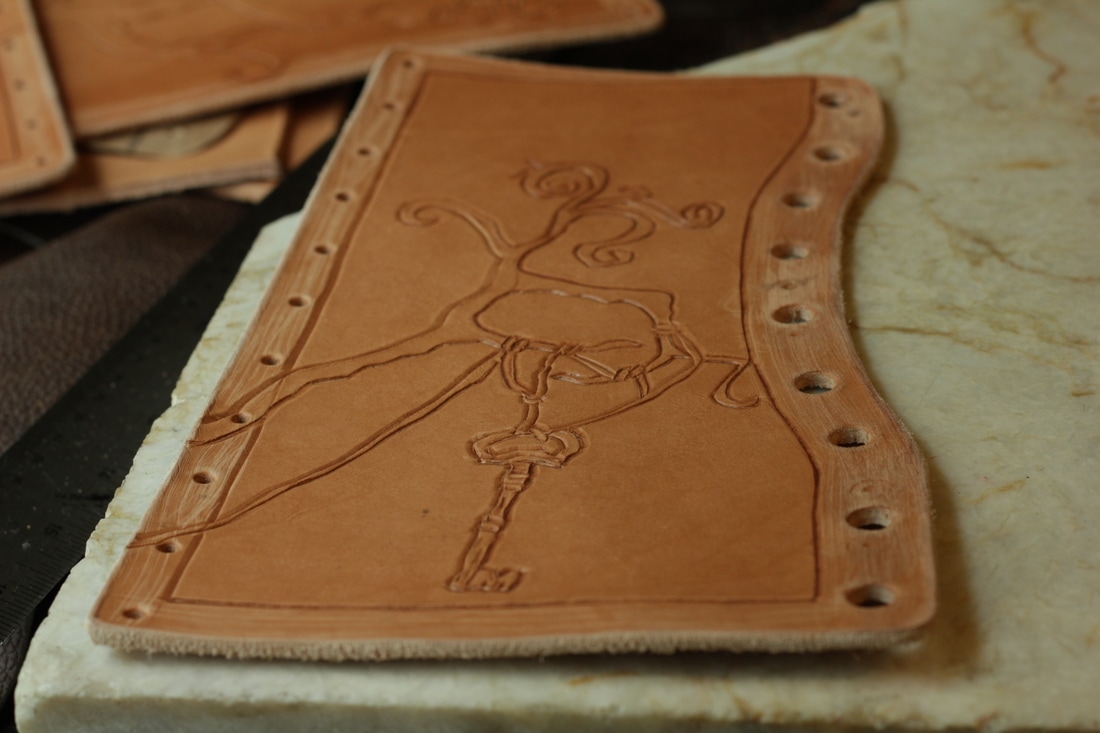
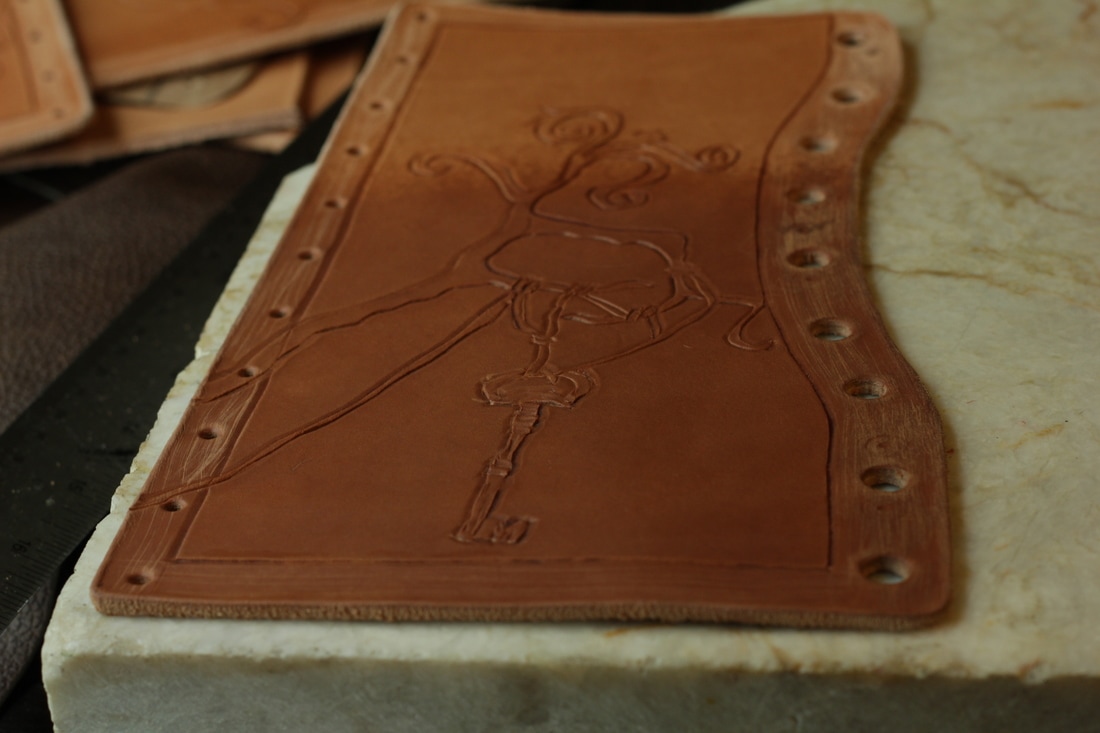
by Willow Enright 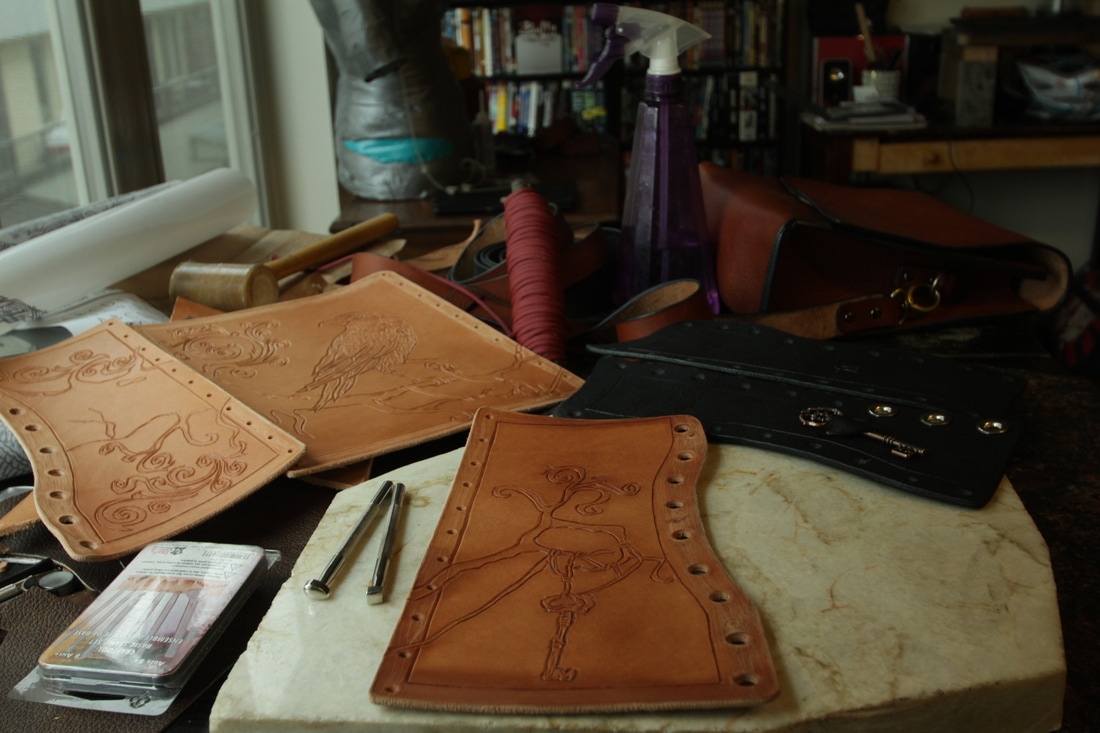 Leather waist cincher out of 7 oz Vegetable Tanned leather, carved and quick cased for tooling. Leather workers have different ways of achieving similar techniques when it comes to working with leather. On the subject of casing your leather prior to tooling designs into it you will find a variety of opinions on which method is preferred. Some say that you can only do it one way, others utilize what suits their style and needs. I'm going to cover what I refer to as the down and dirty method of quick casing.
Leather casing is basically the process by which you prepare the leather hide for stamping, carving, or tooling of designs into the hide. To do that you introduce moisture to the dry leather in order to open up the pores in the hide making it more malleable. The trick is to get the leather the proper amount of wet, and this is where the variation in opinions occurs. Proper casing takes an extreme amount of dedication time-wise, and most people don't want to wait overnight before working on a project, hence the down and dirty method.
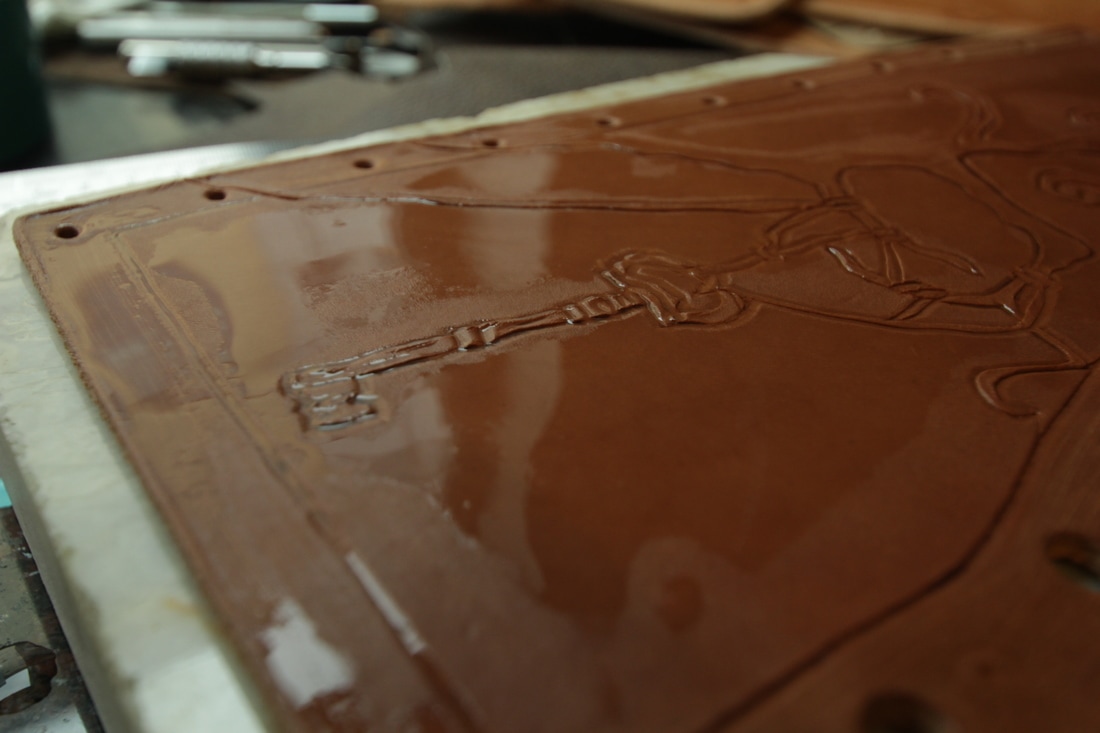
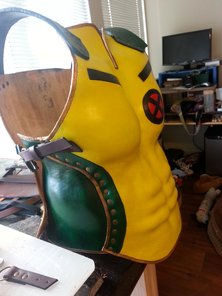
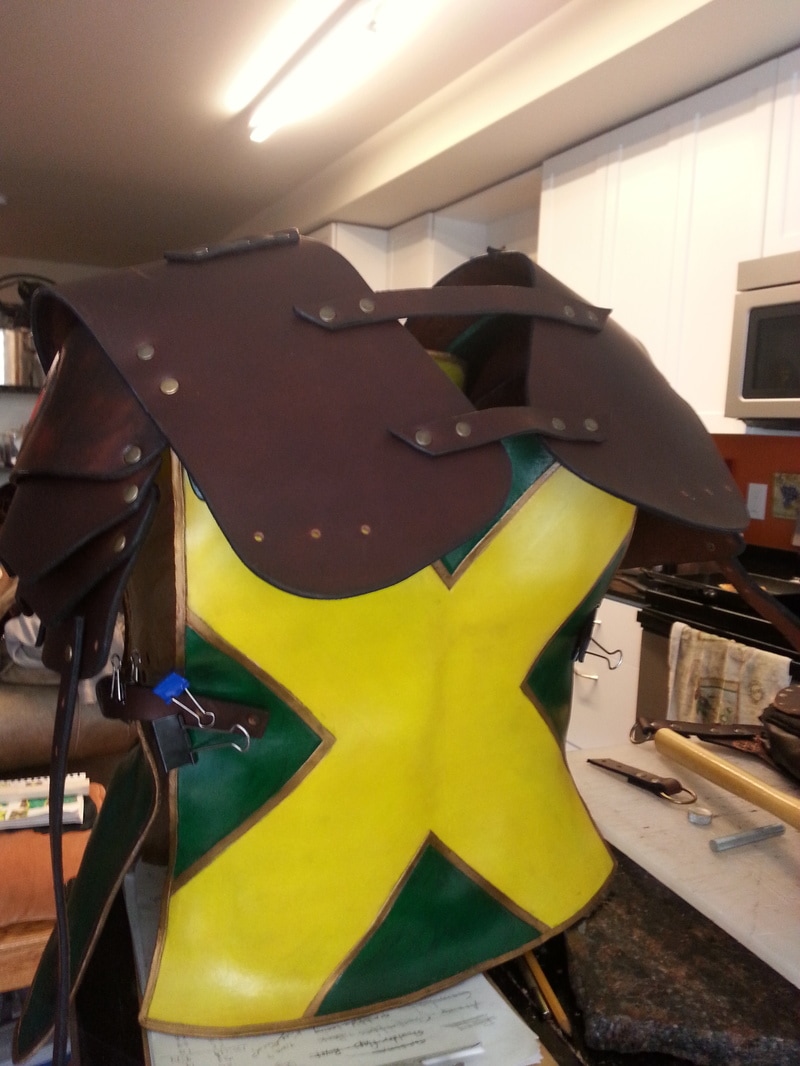
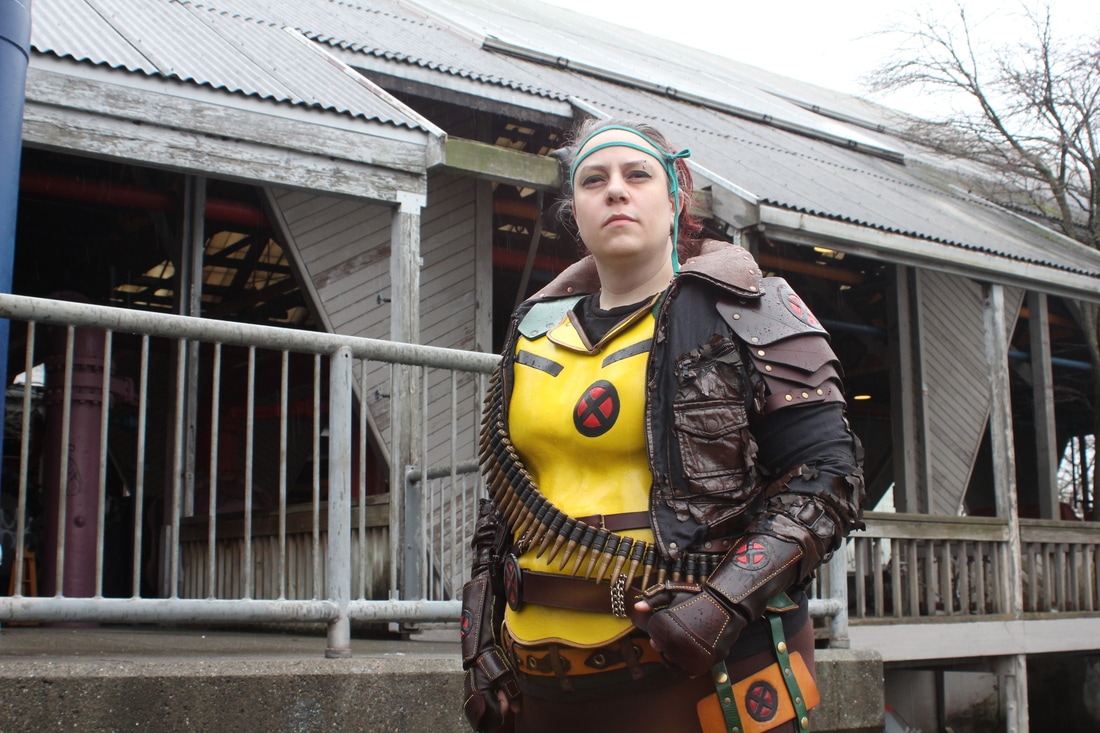
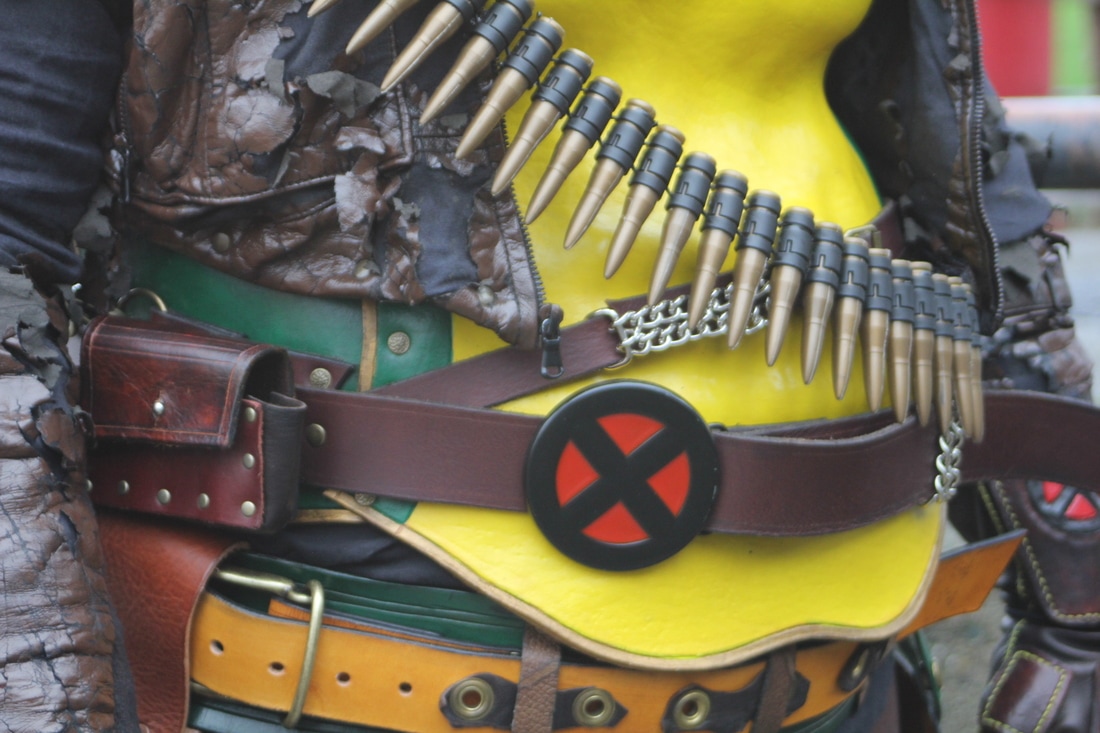
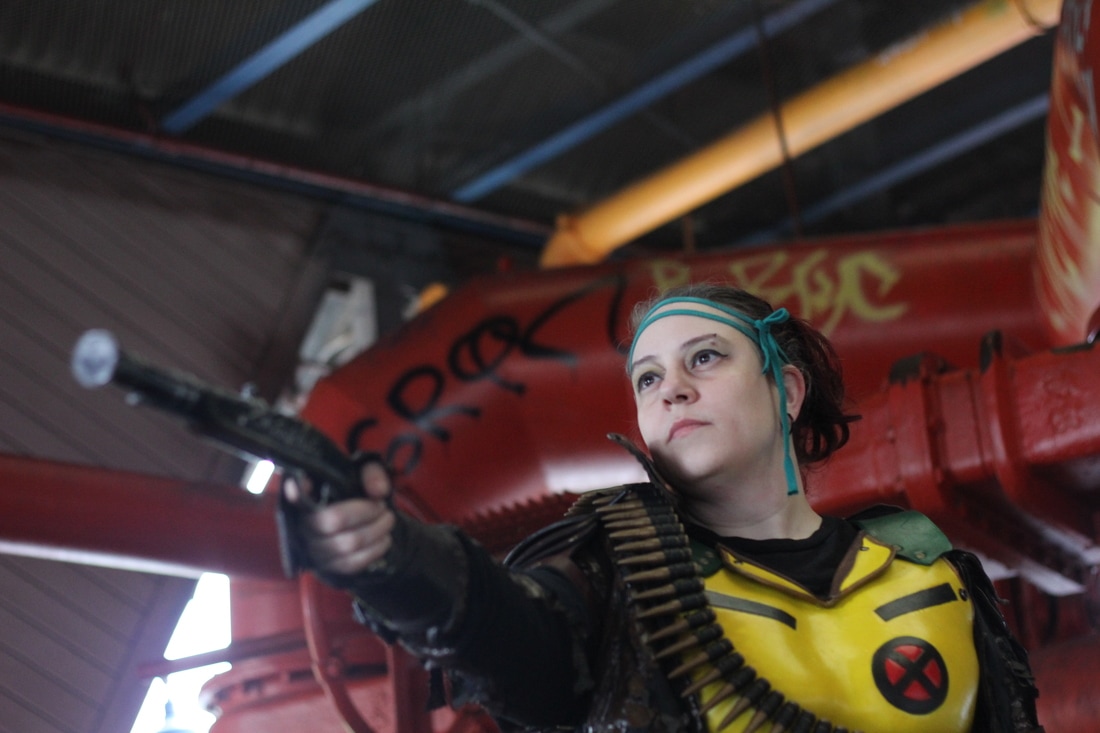
Using a spray bottle spritz your leather evenly until the entire piece has stopped absorbing the water, or little puddles begin to form on the leather's surface. Once that starts to happen flip your leather piece over to see if it has begun to soak through to the other side. As soon as you see that it has, stop spritzing and leave the leather to partially dry again. The amount of time necessary varies on the leather being used or the thickness of the piece. Basically, wait until the leather appears to have lightened in shade again but is still slightly damp to the touch. Once the leather is slightly damp but appears to be dry again either trace your design onto the leather with stylus and tracing paper, or free hand draw with your stylus. Use a swivel knife for better control over curves, and an exacto knife to get fine details, both will carve your design into the hide. I prefer the swivel knife because you can get a nice petina along the cut line if you hold the knife at a 45 degree angle and press hard as you carve. If your design is small or simple you should have time to continue to the next step without rewetting your leather. However, if your project is detail oriented or large you'll likely want to stop at this point in the process to respritz your hide as previously discribed, before waiting the appropriate amount of time again for it to achieve proper moisturization. 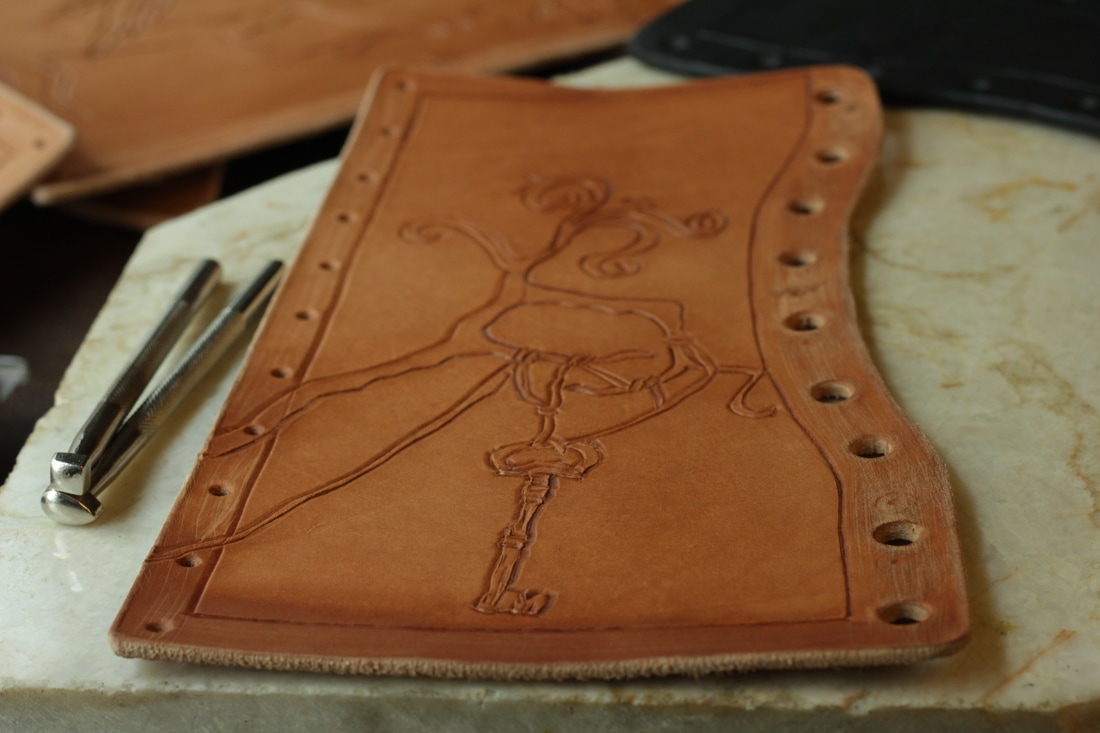 Leather almosts looks dry again, but is slightly damp to the touch. Now, you can tool away! Last but not least, tool or pound out the design, this can be done with a variety of tools depending on the outcome you want to achieve. I mostly use the square beveler and small background stamp from the Tandy 6 piece Craftsman Tool set. There are stamps with designs and letters, embossing rollers, and a whole plethora of inividual tools for flower viens, backgrounds, edges, ect. A lot of awesome tooling work can be done with the 6 piece set. The square beveler is great on any edge where there is enough space to fit the tool, and the small background stamp tends to be good in the places too tight for the square beveler. Again, the tools used depend on what you want to do. 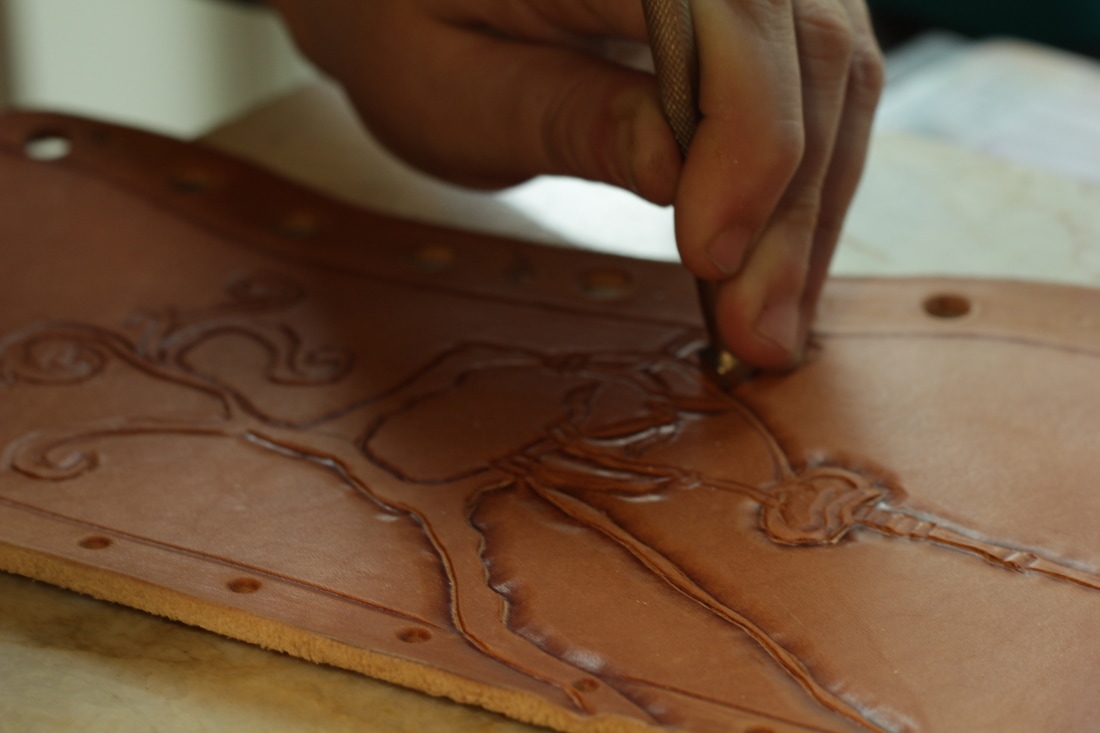 You can see the lovely patina starting to appear around the tooled edges. by Willow Enright 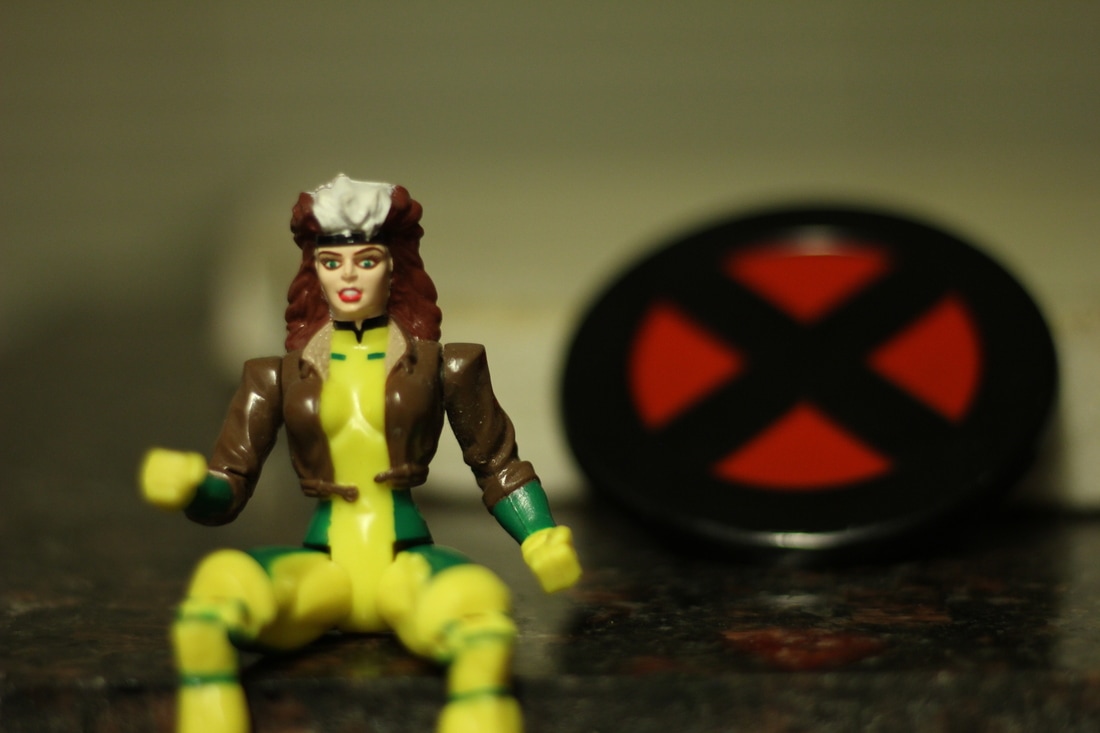 Rouge Action Figure in the foreground with an X-Men Belt Buckle in the background We all grow up with an assortment of childhood memorbilia surrounding us. Comic books and graphic novels were among mine, one in particular was X-Men. One of my favorite comic book characters is Rogue, or Anna Marie from Caldecott County, Mississippi. There was just something about a sweet Southern Belle kicking some major ass that spoke to my sensibilities. As a grown up, I decided that I wanted to create a unique take on the Rogue Cosplay, and came up with an armored Post Savage Land Rogue. It's an apocolyptic take on the mutant after her stent in the Savage Land. The creation of my armored X-Men mutant Rogue has gone through two stages previously with a third stage in developement. When developing a cosplay character it is common to have to adapt or add to your costume to enhance the end result for the optimal cosplay experience. This particular cosplay allows for maximum fun because my additions are purely my own creations, except for the double belt, and the traditional yellow and green body suit which I plan for the third stage.  Erin in her Wonder Woman outfit and Willow in her Rouge Armor (Round One) First StageIn the first stage of my armored cosplay I found that the following three items really worked out pretty well for me. The two piece Chest Armor, Armored Gauntlets, and my double Belt w/Pouches. Both the Gauntlets and double Belt with pouches turned out the first time without needing any adjustments. The Chest Armor required a bit of trimming in the neck line, I reformed my collar so that I could have full range of motion for my neck, and a bit of trimming at the bottom of the front plate since I wanted to be able to sit down. What I kept...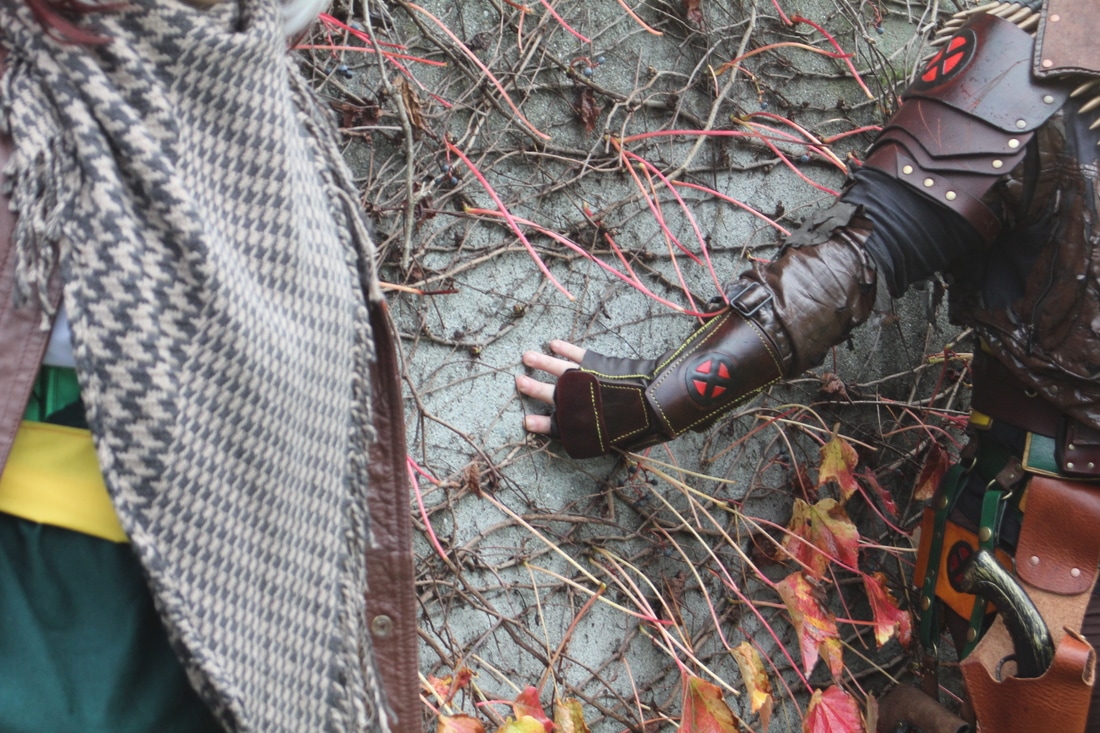 The tailor made Rogue fingerless gauntlets The Guantlets were created from a traced pattern made from an outline of my hand. I created the template with both a front and a back, I also included an additional inch for the depth of my hand. The 3-4 oz Chocolate Brown Deerskin was chosen for ease of hand sewing and for comfort and flexibility. The added armored pieces were 7-9oz Veg Tanned Leather so that I could use the Wet Form process to mold them into armored sections that would fit my knuckles, hand, and wrist. Each piece was dyed and or tooled before being hand sewn onto the fingerless gloves.  The Double Belt with pouches as realized in the second attempt at Post Savage Land Rogue The double Belt with Pouches were made from 8-9 Oz Rustic Brown Water Buffalo, 3-4 oz Chocolate Brown Deerskin, and 7-9oz Veg Tan Leather. The belts are rugged and sturdy, and designed after the classic double belt that Rogue wore with her traditional costume. I acquired an X-Men buckle, along with some silver chains to use as belt keepers to add some extra Rogue flair. The pouches are made with a thiner leather for the sides and then dyed veg tanned leather for the front and back, and each closes with a small button stud.
The front and back plate for the Chest Armor were both created with the 7-9oz Veg Tanned Leather so that I could use the Wet Form process (Click the link to see more). I am going to cover both my first attempt as well as my later adjustments, just for ease of storytelling. Each piece was cut and designed prior to being wet formed using a duct tape body double. After the wet form process was dry the leather was painted with Angelus Leather Paints. The sides are held together with straps made of 8-9 Oz Rustic Brown Water Buffalo, and squeeze clasps and 3/4" buckles. Orignially the neckline was too tall, and made moving my neck and head difficult so I trimmed and constructed a new collar from the pieces removed. They were riveted and then sewn with a section of Utility Side. The bottom of the front plate was trimmed to allow me to sit down in the armor. What Didn't Work...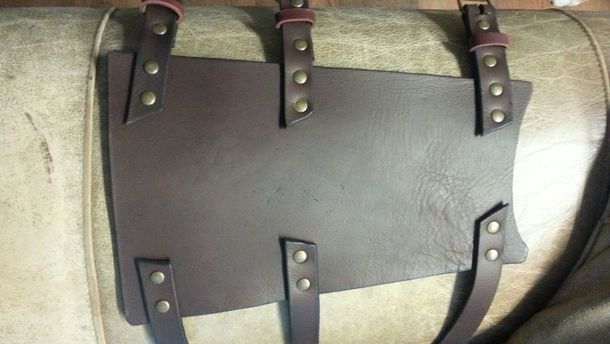 Plain brown shin guard laid out on a couch armrest The Shin Guards simply blended in too much with my brown pants and black pants and ox blood boots. They were constructed as a simple, single piece shin gaurd with three sets of straps and buckles for each to hold them to my shin. They were made entirely from 8-9 Oz Rustic Brown Water Buffalo, and each strap and buckle were riveted, with the base of each shin piece curved for comfort.
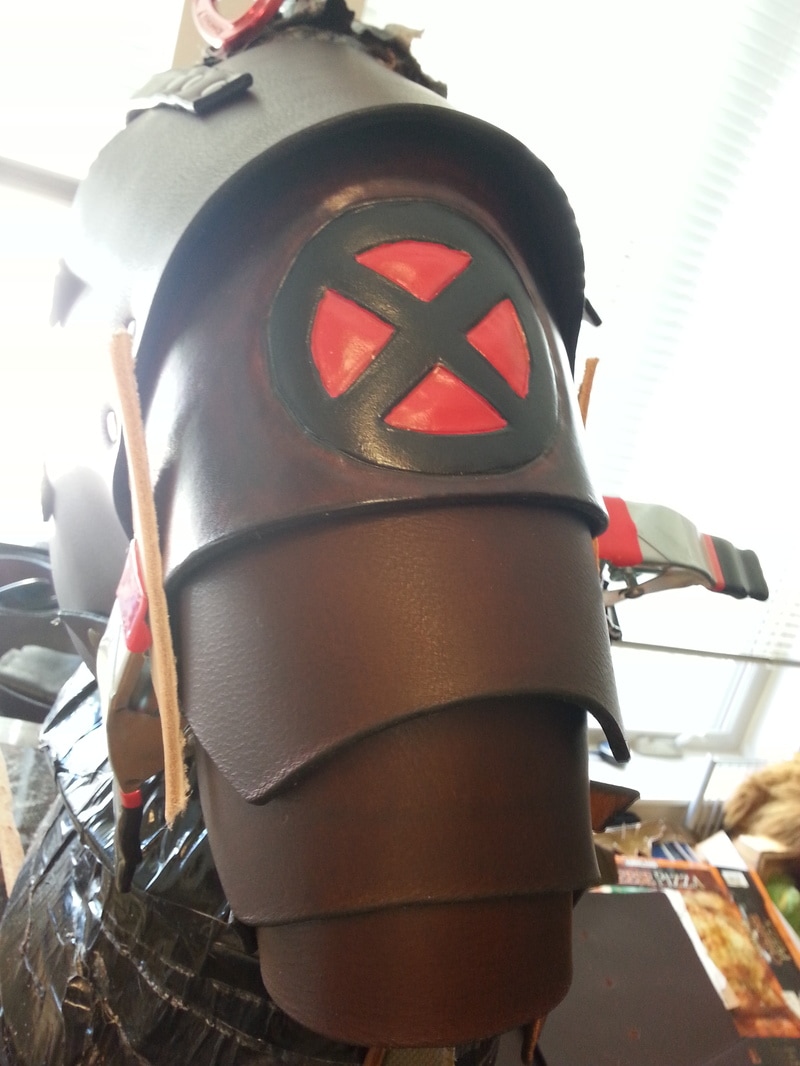
The Shoulder Pauldron was made from 7-9oz Veg Tan Leather, and 8-9 Oz Rustic Brown Water Buffalo. The Veg Tanned section was for the shoulder pieces where the X-Men symbol was carved and tooled and then wet formed around my arm. Each piece was riveted to the next, including the shoulder joint which should have been made with a moveable connector such as a chicago screw. Originally I planned for the Shoulder Pauldron to look like a half leather jacket, but instead it turned out more like football padding making me into a Teenage Mutant X-Men Turtle, Rogue in a half shell.
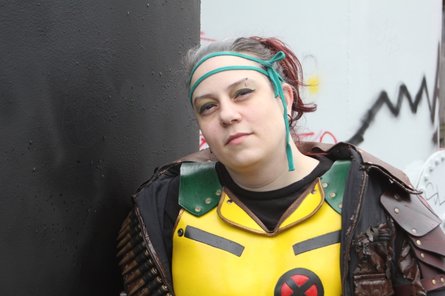
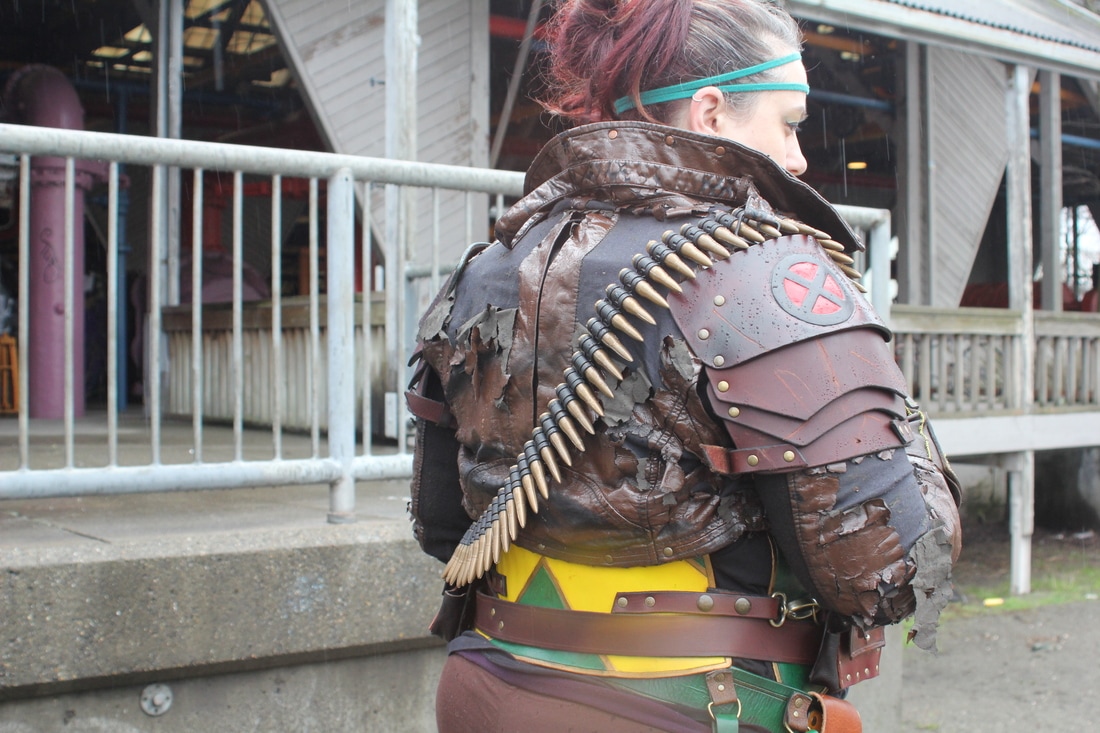
Because I wasn't as pleased with my first attempt at a Post Savage Land Rogue, I didn't take as many photos of me in the finished costume. Instead I went back to the drawing board to create something worth writing home about. You can see my second attempt at Rogue in my next blog due out on Feb 4th. by Willow Enright  Post Apocolyptic Savage Land Rogue As I stated in my former blog, Rogue is a childhood hero that I have always felt a connection to. Instead of paying homage to Rogue through an amazing interpretation costume, I initially created a crossover Mutant that didn't do justice to either properly. I am, of course, referring to my first attempt which turned out more Teenage Muntant X-Men Turtle, Rogue in a Half-Shell. On the second attempt I tired to stay closer to the classic character costume rather than simply armor it up. The Second Stage involved the addition of the second hand faux leather jacket in combination with the dismantling of the Shoulder Pauldron, creating the Sugah Stick Holster, and the Armored Shin Guard additions.
Unfortunately, the second hand jacket wasn't actually leather like I had thought and when I used the Krylon spray paint to color it brown, it disintegrated. This gave the jacket a severe post apocalyptic look however which looked authentic. I also shortened the jacket and riveted it so it would be a half jacket. As well as added the utility side leather to the collar to cover some of the disintegration and for additional standing up collar flare. The Shoulder Pauldron was dismantled at the shoulder sections and the side sections were riveted to the leather jacket. This gave the more classic Rogue jacket look, only armored. Very awesome!
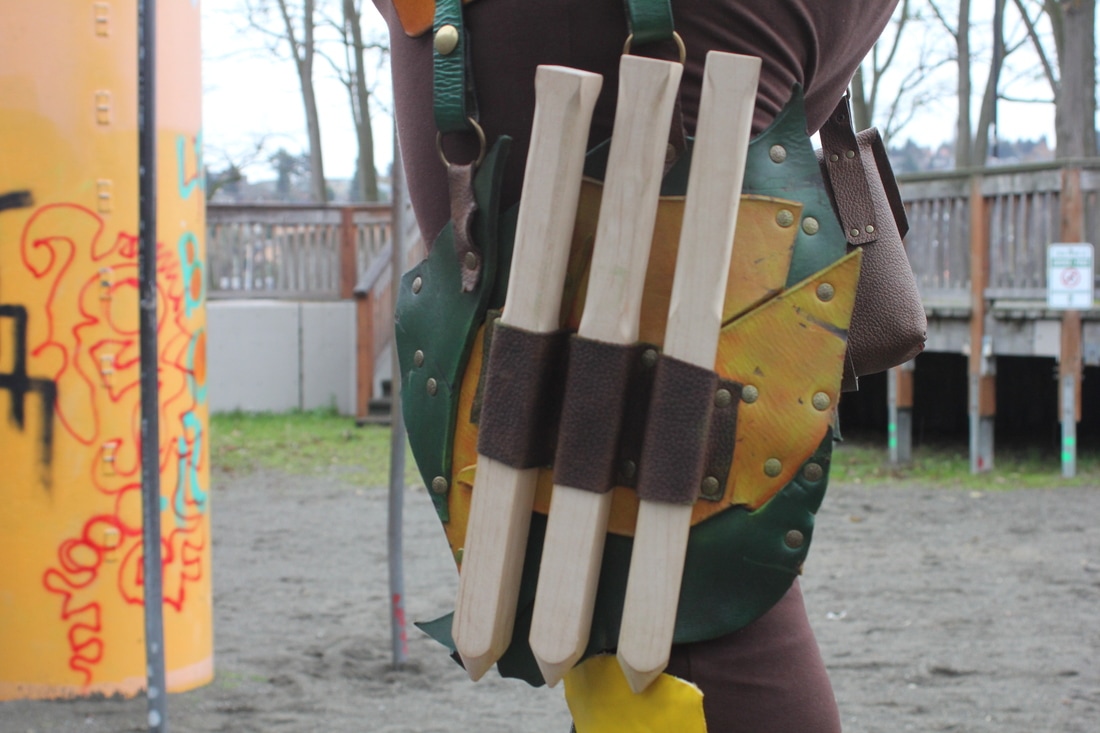
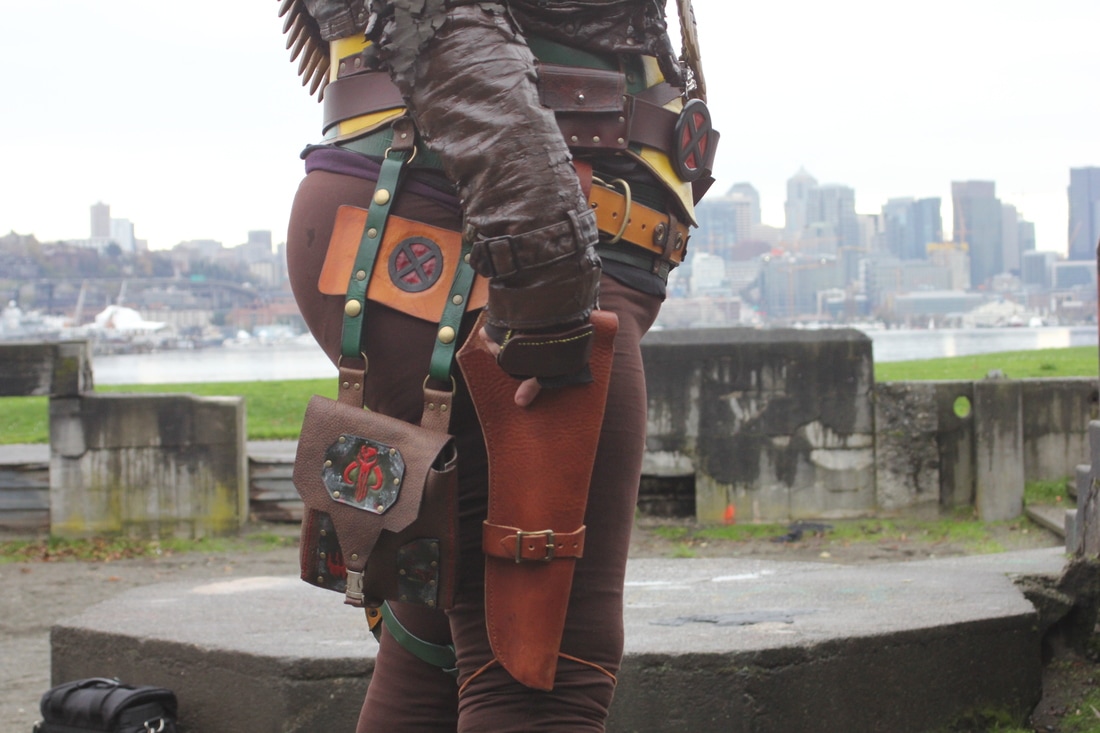
The Sugah Stick Holster and Belt were made with 7-9oz Veg Tan Leather, and a 3-4 oz Chocolate Brown Deerskin. The holster was riveted together from various scraps of the veg tanned leather that I had left over from other projects. The three wooden stakes were from a Buffy the Vampire Slayer cosplay that I never put together, and they needed reappropriating and Sugah Sticks seemed perfect. They are secured to the holster with the deerskin. I dressed up the belt with some grommets and multiple deerskin keepers, and added some d-ring connectors so that I could hang bags and the Sugah Stick Holster from the belt. The holster also has two leg straps which keep it around your thigh, and close with a 3/4" antique brass buckle. The colors were acheived with Waterstains and Angelus Acrylic Leather Paints.
The Shin Gaurd armored additions were done with a 3-4 oz Veg Tan Leather. This allowed for the traditional color of Rogue's yellow boots which made them more distinct, especially after adding the two green striped straps to add to the classic comic book look. The sections were riveted to the 8-9 Oz Rustic Brown Water Buffalo shin guards, and colored with Angelus Leather Paint. The foot sections were wet formed over my boots to hold shape.
Planned 3rd Stage: New Leather Jacket for Shoulder Pauldrons Shoulder Bandolier for Bullets Additional Leg Armor or Hip Bag Traditional Yellow and Green Body Suit In honor of one of my childhood heros, I've enjoyed creating my original armored Post Savage Land Rogue with it's apocolyptic take on the X-Men mutant!
by Erin Bishop 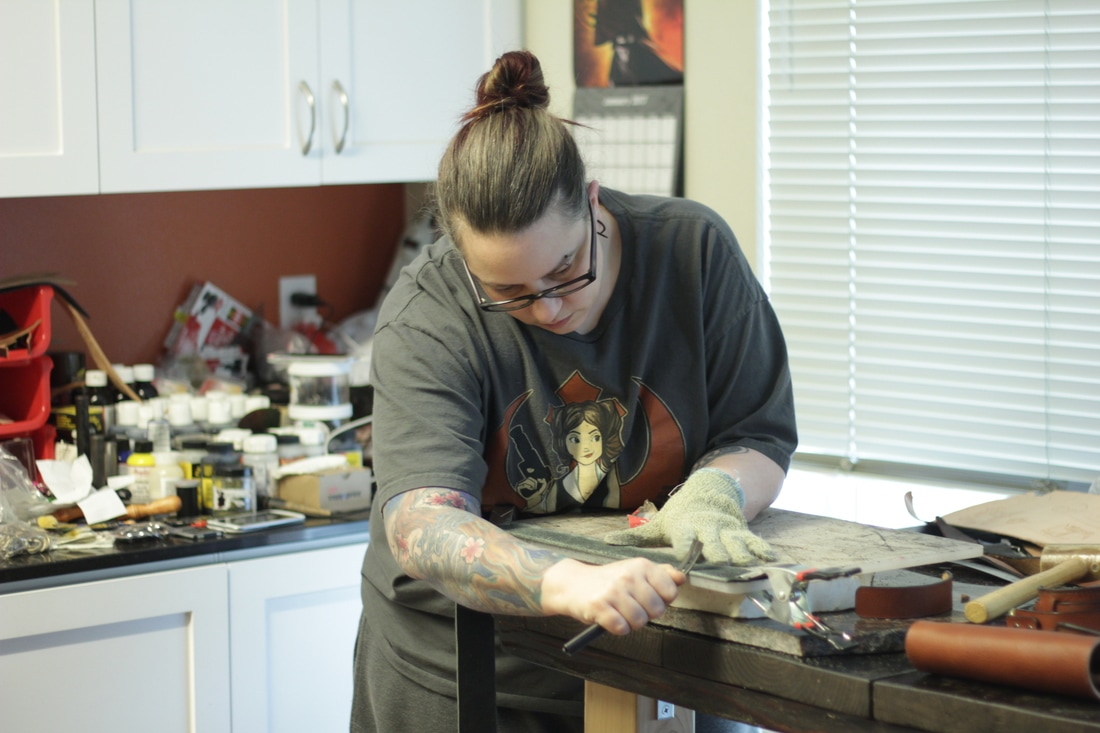 Willow standing at her workstation beveling a black leather belt. First and foremost, the term small business is being used so frequently that I believe that one must first clarify what they mean by “small.” So, what is a mirco-business? A mirco-business is company that has one or two people working for it and that it is not physically located at a shop, but is a booth, a website, or a corner of a local consignment shop. In other words really small. There are many things that an owner of micro-business must constantly juggle and attempt to balance: pure supplies vs finished products, saving for bigger equipment vs buying supplies, working vs free time, and last but not least physically building and socializing. Word of mouth is the best way to get known, but what do you do if no one is talking about you? Start a conversation through social media. If you have a business and haven’t started at least one social media account for the business, follow these three points for success. 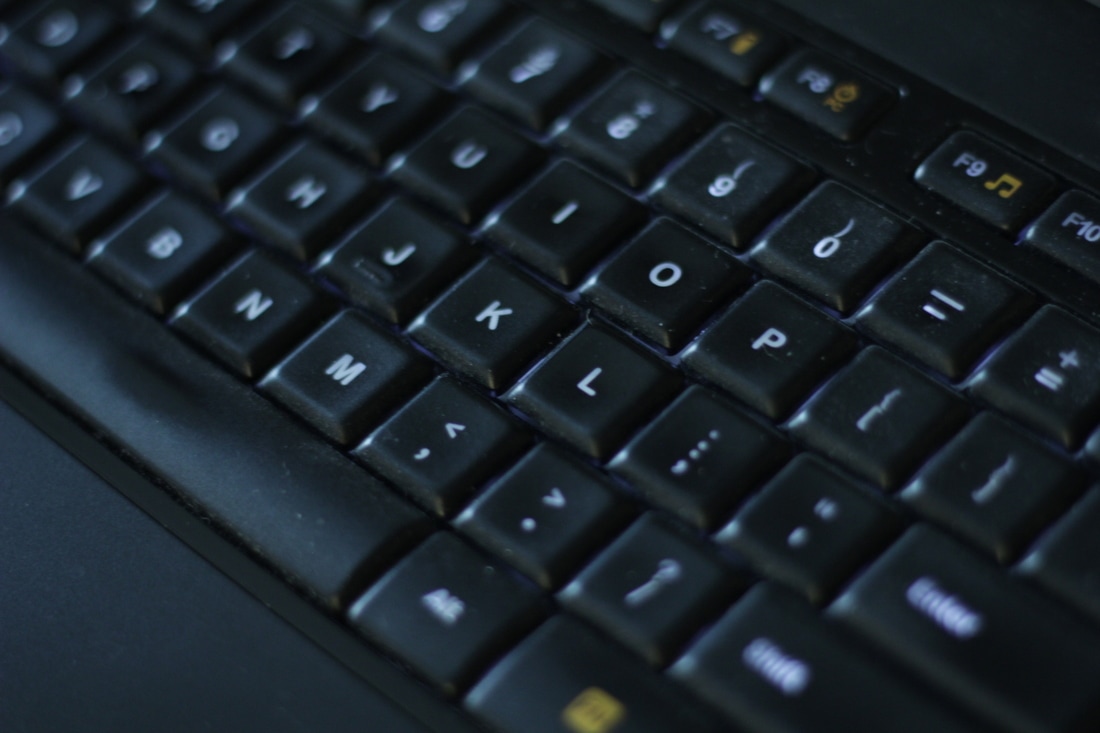 A black backlit keyboard.
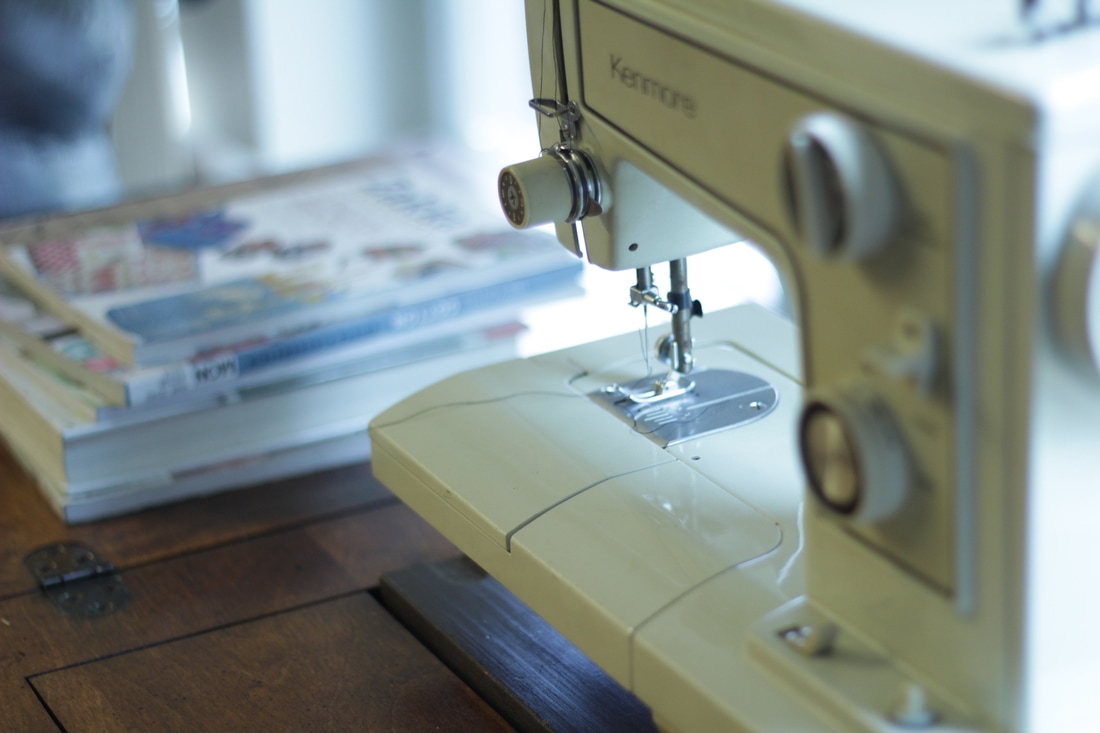 A Kenmore Sears sewing machine 1970's vintage. Once you have these basics down and you feel comfortable, it’s time once again to become uncomfortable. Branch out into new social media sites, start blogging, join groups, and make new goals. Your business isn’t growing if you aren’t reach out and exploring new avenues. Don’t be discouraged by others or feel like you aren’t measuring up, no one knows your life or your micro-business like you do.
by Erin Bishop 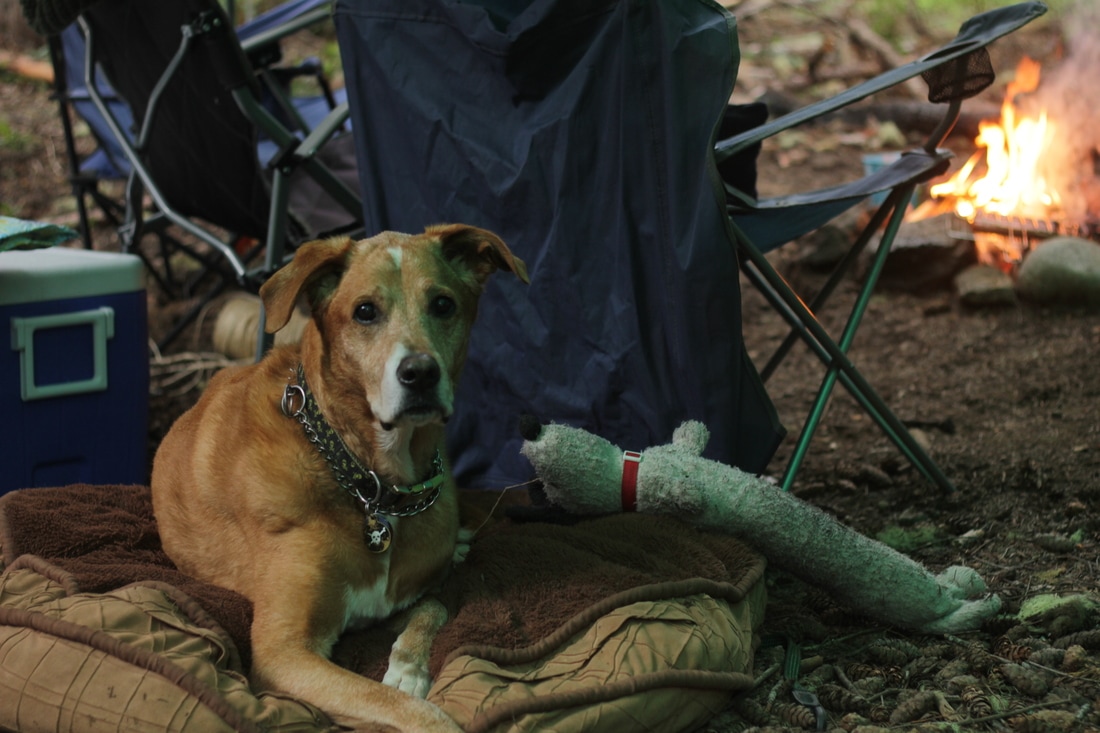 Dante Doodiekins and his Snoopy hanging out by the fire, while camping out in the woods. The boy scouts have the motto of always being prepared, but how does one prepare for life? Simple answer: You don’t. You do the best you can and hope for the best. How does one focus when life becomes overwhelming? You can hunker down and try your best, wait for a better time, or fall back on already prepared materials.  A close up of Mr. Dante Doodiekins on his last camping trip. I miss you buddy. “Life happens when you least expect it.” - Jane Harvey Barrick Back in October of 2016, my twelve year old Rhodesian Ridgeback/Labrador Retriever starting feeling ill and shortly after had to be put to sleep. Thankfully, Leather Works by Willow’s Facebook page didn’t need my attention because I had planned out what posts were coming out and when. I was able to fall back on my planning and I could wait for a better time to compose more cheery posts. Other than the emotional turmoil, the hardest part was focusing on two upcoming panels for comic cons. I had to hunker down and focus on what I felt like I couldn’t. Looking back, I know that I could have done a better job, but I did the best that I could at the time. I was used to working on a project for two-three hours then taking the dog outside to pee, but with all that was going on I could only focus for ten to forty-five minutes. My long focus became short and erratic which I sure showed in my work, but I had obligations that I had to attend to. 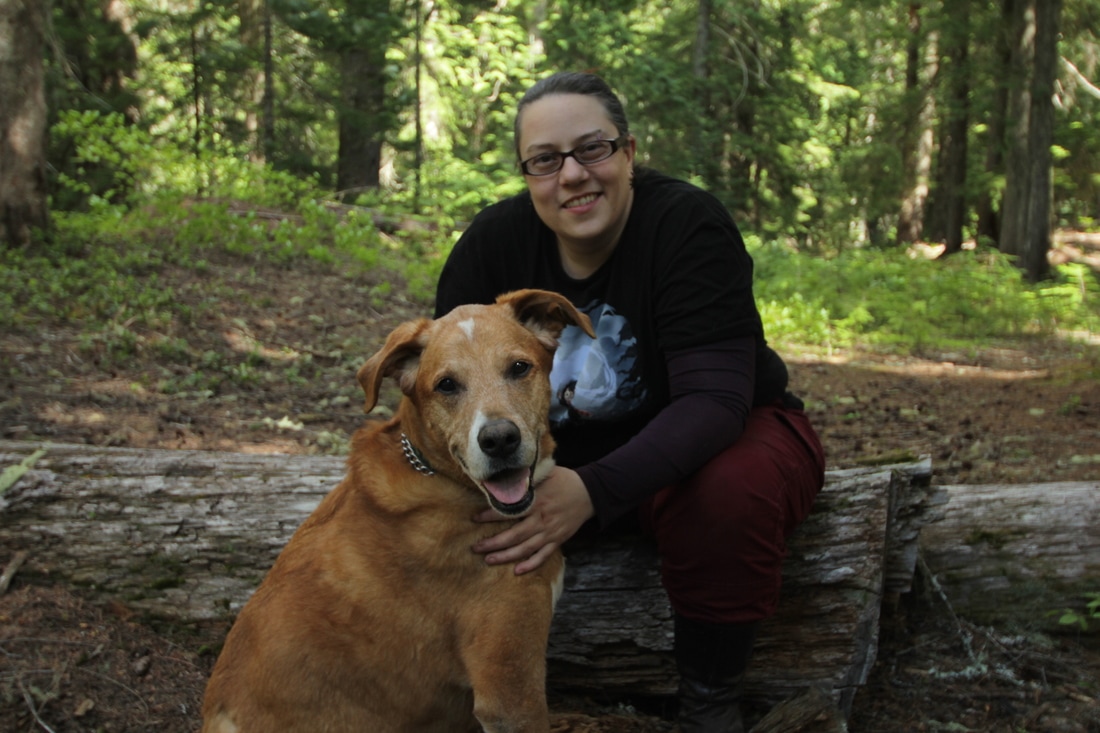 Willow and Dante camping outside of Leavenworth, WA. “If you fail to plan, you are planning to fail” - Benjamin FranklinMy girlfriend had a harder time, he was hers from four weeks until his dying breath. She was responsible for writing blogs, she would sit down and start writing a blog one or two days before we released each blog. When he’s sickness and subsequent death came upon us she had to wait for a better time, she was unable to hunker down and she hadn’t planned ahead. I also had to put some of the more outgoing social media efforts aside as I dealt with his death. I eventually feel behind when we got a puppy, because puppies need a lot of attention. They pee everywhere until, you understand, that they are telling you, that they need to go out. Not to mention the constant checking on them, because you hear a riping noise coming from the bedroom, and you know that they brought their toy squirrel in there, but you’re not quite sure that they don’t know, not rip up your bed. A few months later, I am back to scheduling my life so that I may have a life. 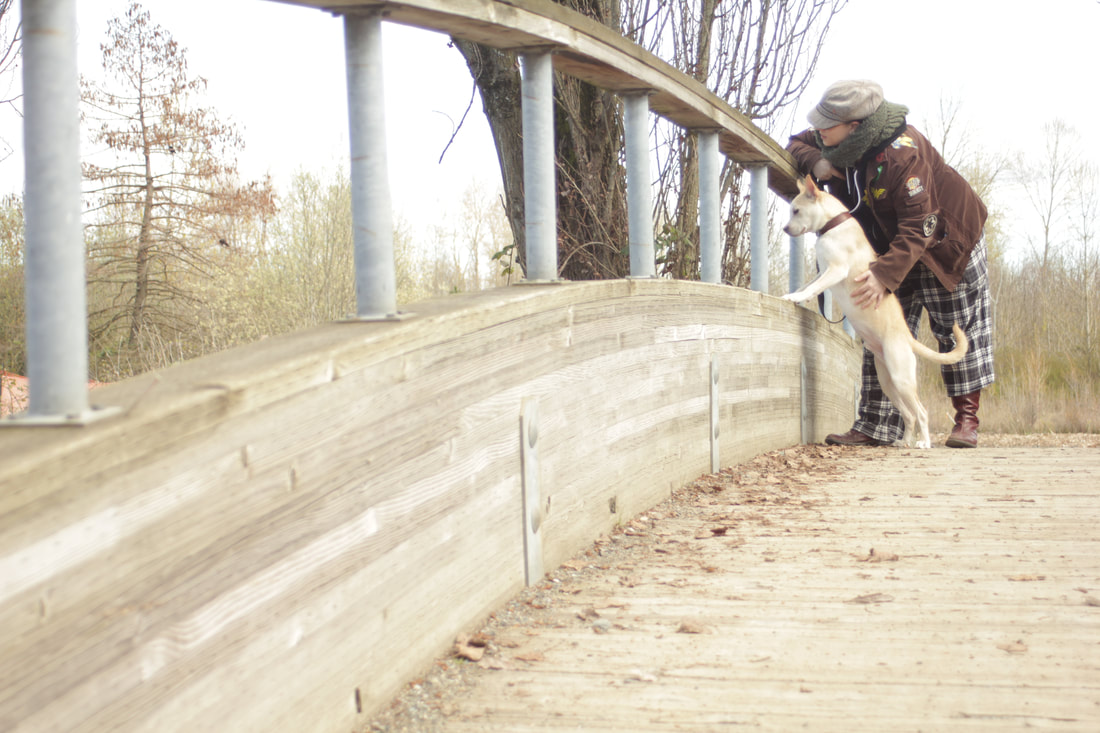 Willow and Lando at Seattle's Urban Bay Natural Area. Plan for a LifeI already briefly covered planning for the future, but this is where the real life saver comes into play. When you plan more and further out, you’ll be able to handle more of life’s little unexpected journeys. I sit down at the end of the month with Willow, and we plan out what we are posting, tweeting, writing on the blog, copywriting for Etsy, for the next month. We discuss which items, posts, tweets, and blogs that we want to promote. We also talk about any events, promotions, sales, or contest that we want to be apart of the following month. We make a to do list that helps shape what we are doing today, so that tomorrow will be easier.
I recommend planning your 140 character tweets for a month out of planned content. I recommend writing as many blogs as you can, but a good minimum is two out. If you have to write product descriptions, I would have about 3-5 depending on the frequency of the release. I have planned what I am going to work on and on what day from now until OCTOBER, and I use the to-do list as a road map when figuring out how far out I need to plan, and what I need to do now. Then when that’s all done it’s time to relax watch some TV, go swimming at the lake, or party with your friends, because you already did what you needed to do. |
Willow EnrightI started crafting out of leather in 2011, and now I am making it my life's work. I am writing this blog to help myself remember some of the small steps in past projects, sharing my triumphs and failures, as well as my love of leather. Archives
November 2017
Categories
All
|

|
Cosplay DIY (Blog) |


 RSS Feed
