|
by Willow Enright 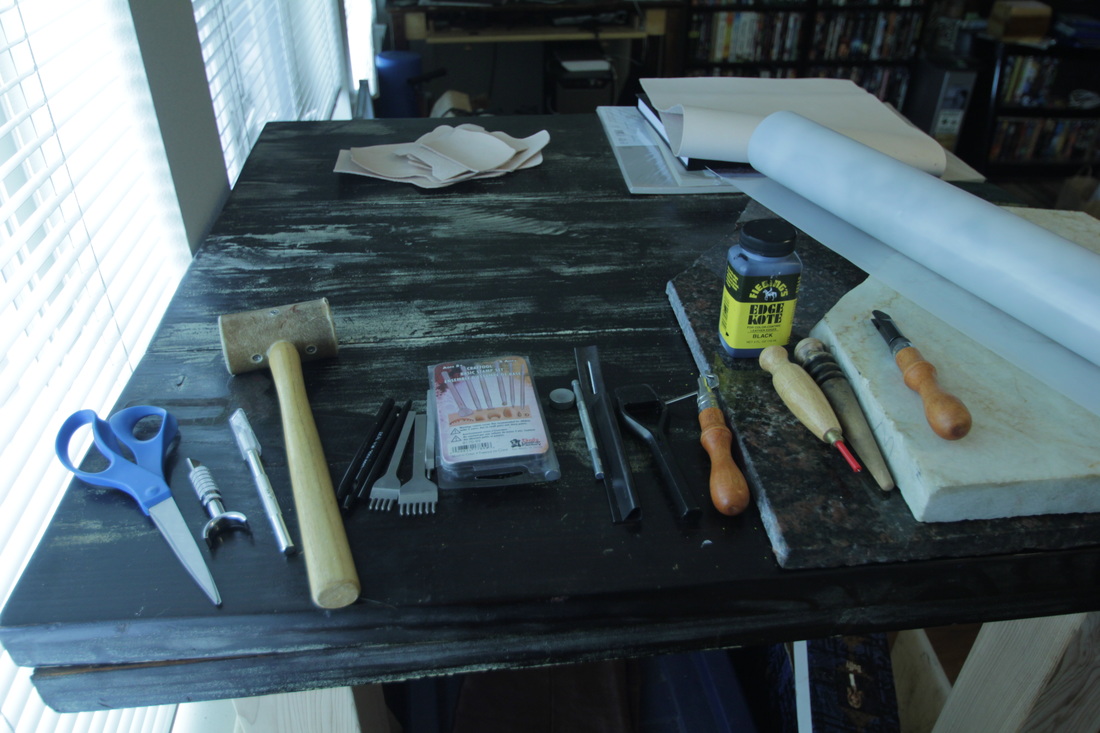 One of the hardest things to figure out when I first started working with leather was which tools to invest in. I wasn’t able to afford all of the things on this list all at once. I had to build my tool arsenal up slowly, in fact, I’m still building it. Knowing some of the basic tools that you’ll need and why, will help you feel more confident about investing your time into doing the leather work. I’m going to discuss ten basic tools and seven bonus tools that I find useful in my projects. 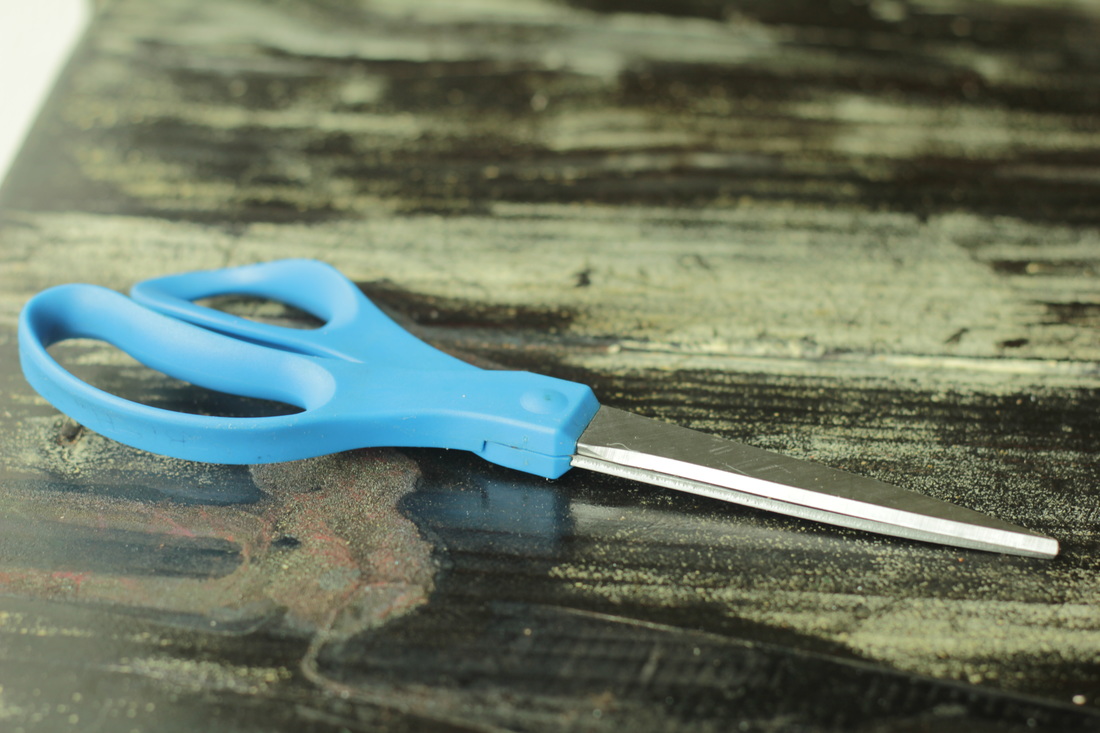 1) ScissorsI started with my everyday household scissors since I was cutting 2-4 oz leather. I find that as long as they are sharp they will work for the 1-5 oz leathers. I have Cutco scissors that will cut through a penny, but the blue handled office scissors work the best. Scissors are great for thinner leathers or trimming difficult edges. 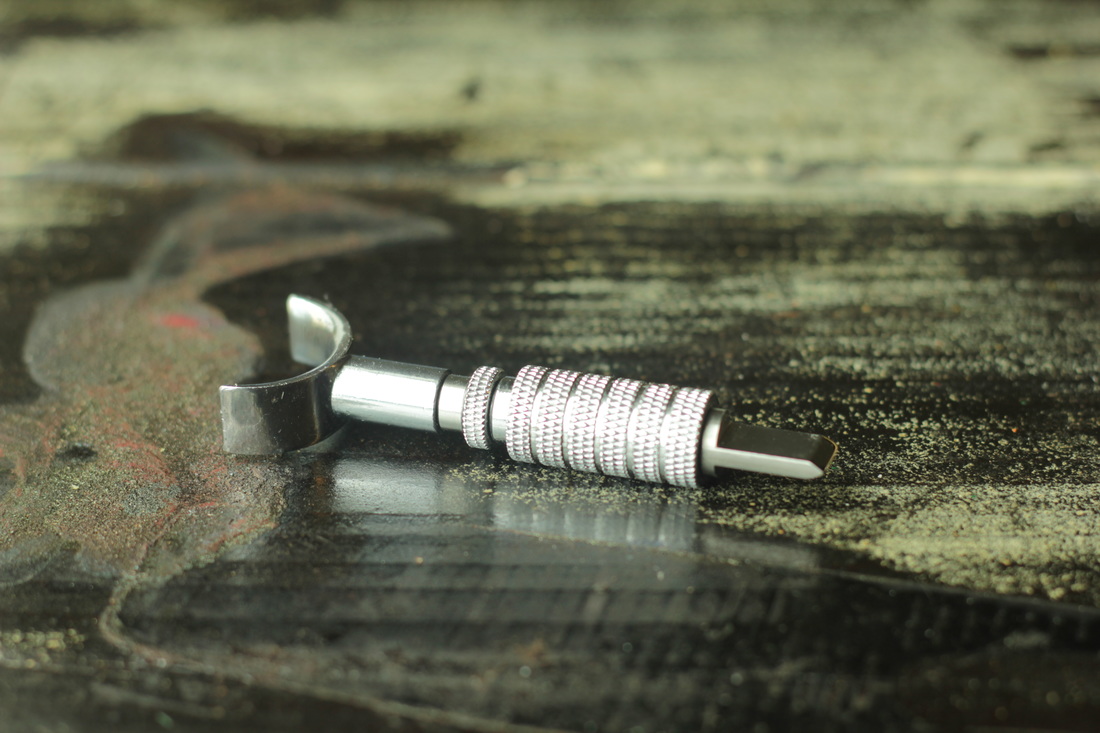 2) Swivel KnifeWhen you are using hides that are 6 oz or more you want something that will cut through thick layers. Some leather workers use a head knife, but I prefer the swivel knife. It is more versatile in that you can use it to cut large sections of leather such as a belt, or use it with detailed tooling designs. You can also keep it sharp by getting some jewelers rouge and using some cardboard or a scrap piece of leather to strop it each time you use it. 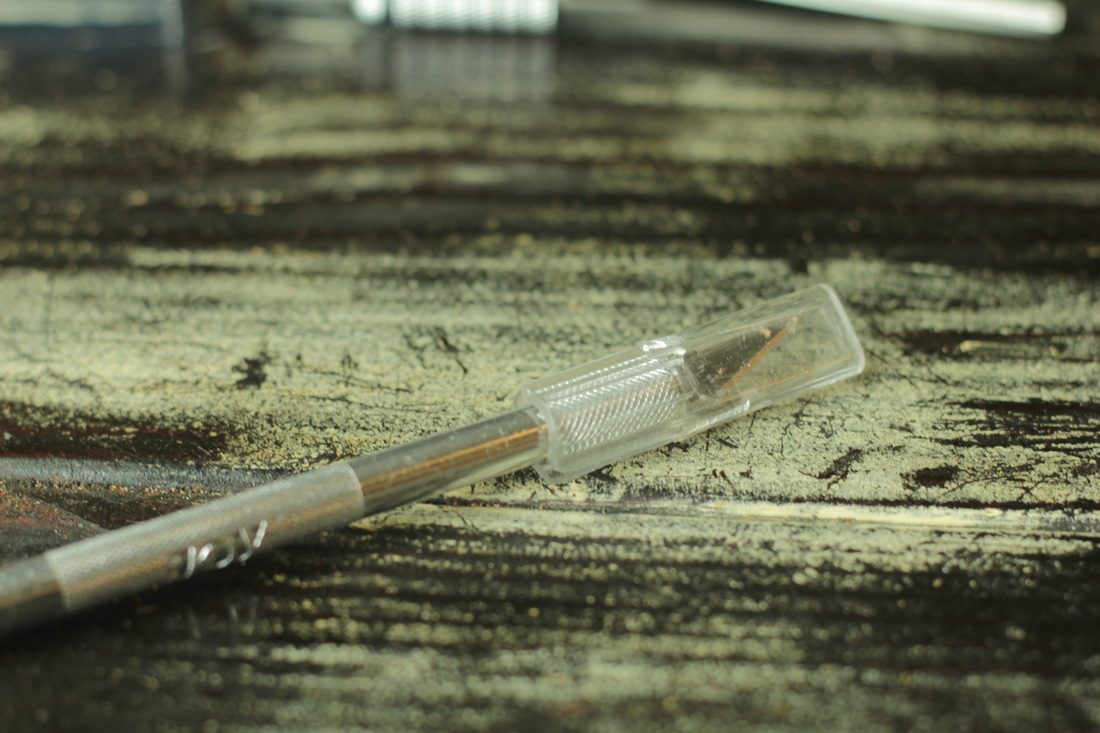 3) Exacto KnifeThis thin sharp blade can be very useful for small carving details. I find it extremely helpful in extracting corner cuts from a hide, leftover belt punches, or pretty much any time I have a limited amount of space but have to cut. 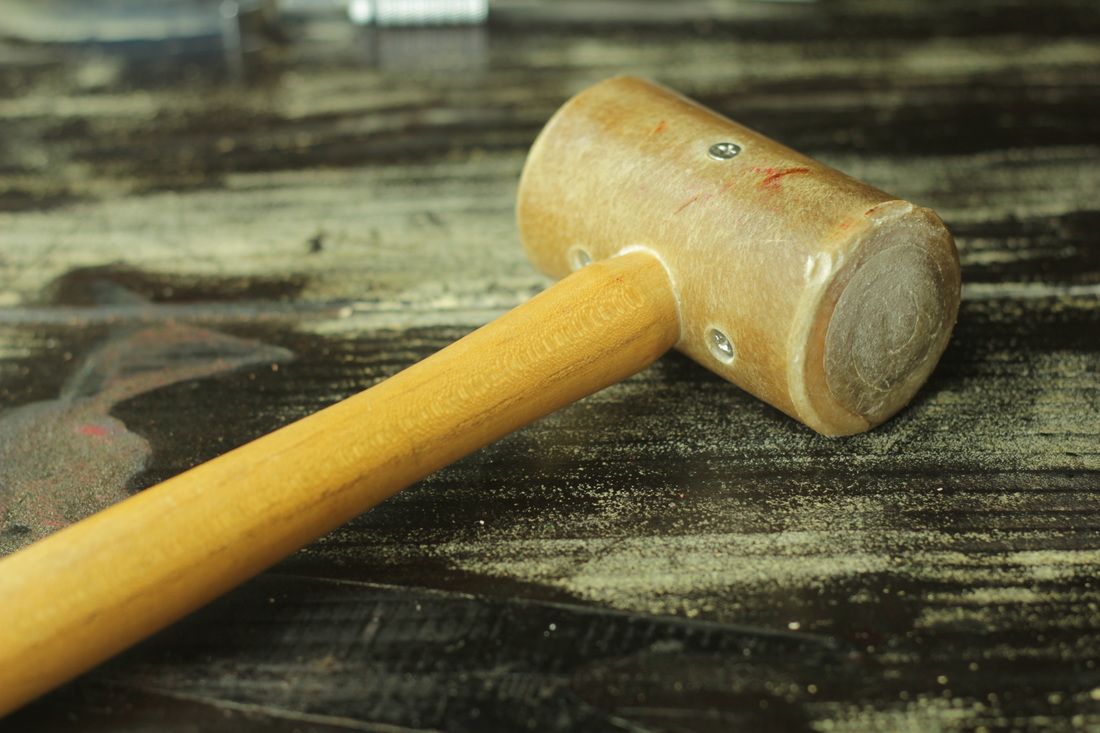 4) Raw Hide MalletSome people prefer poly headed mallets to the raw hide one, but as long as you don’t use a wood mallet or your household hammer you are good. The hammer is loud and will damage the ends of your stamps and other tools, and the wood mallet doesn’t provide enough weight to make nice rivets. I love the raw hide mallet because it isn’t too heavy but it gives a good solid pounding, and it doesn’t overly burden my elbow or wrist. 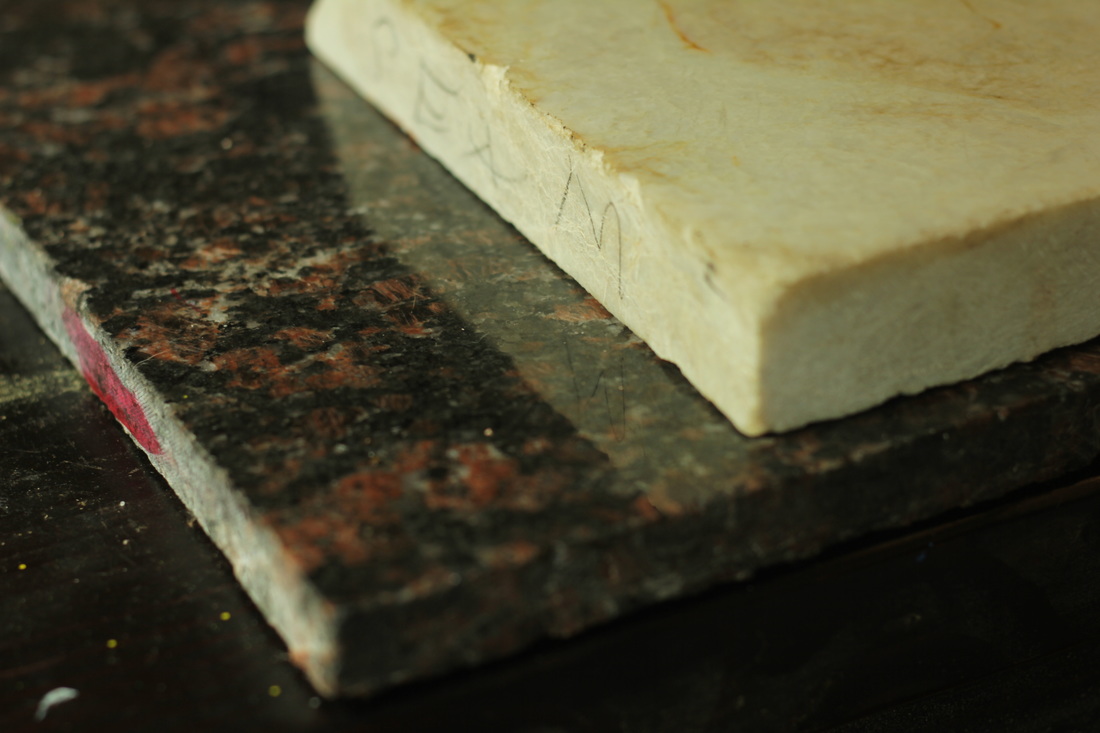 5) Stone SurfaceYou can purchase a granite slab, but I would recommend finding a place near you that cuts counter tops. They usually have scrap pieces for free or a reduced fee. Having a stone surface will give your rivets a more solid pounding. Using a wood or plastic surface by itself absorbs too much of the impact. 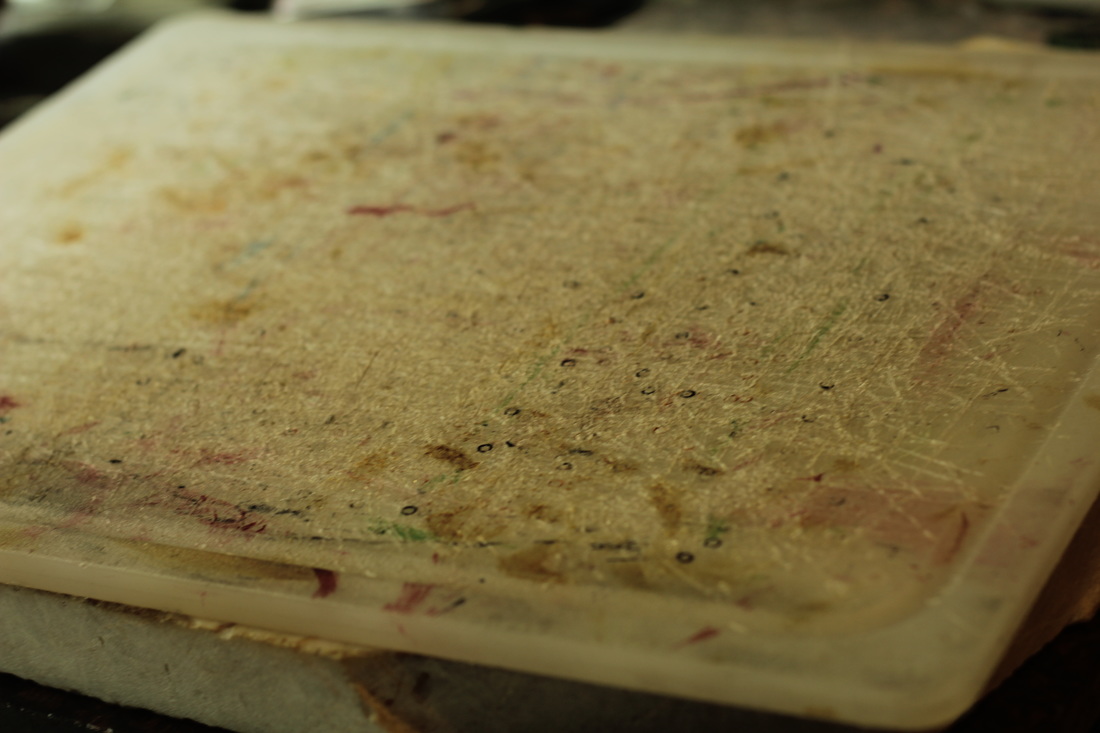 6) Cutting Mat6) Cutting Mat Having a surface to cut on that won’t dull your blade additionally is always good. You can use a self healing mat, poundo board, or a plastic cutting board. This can also come in handy when you are trying to decrease the amount of noise you are making while pounding. I place my cutting board between two pieces of granite to help absorb some of the sound without losing the solid surface that the stone provides. Note: don’t punch holes, cut, or have any sharp implements make contact with your stone surface, because it will dull your blade so fast it will make your head spin. 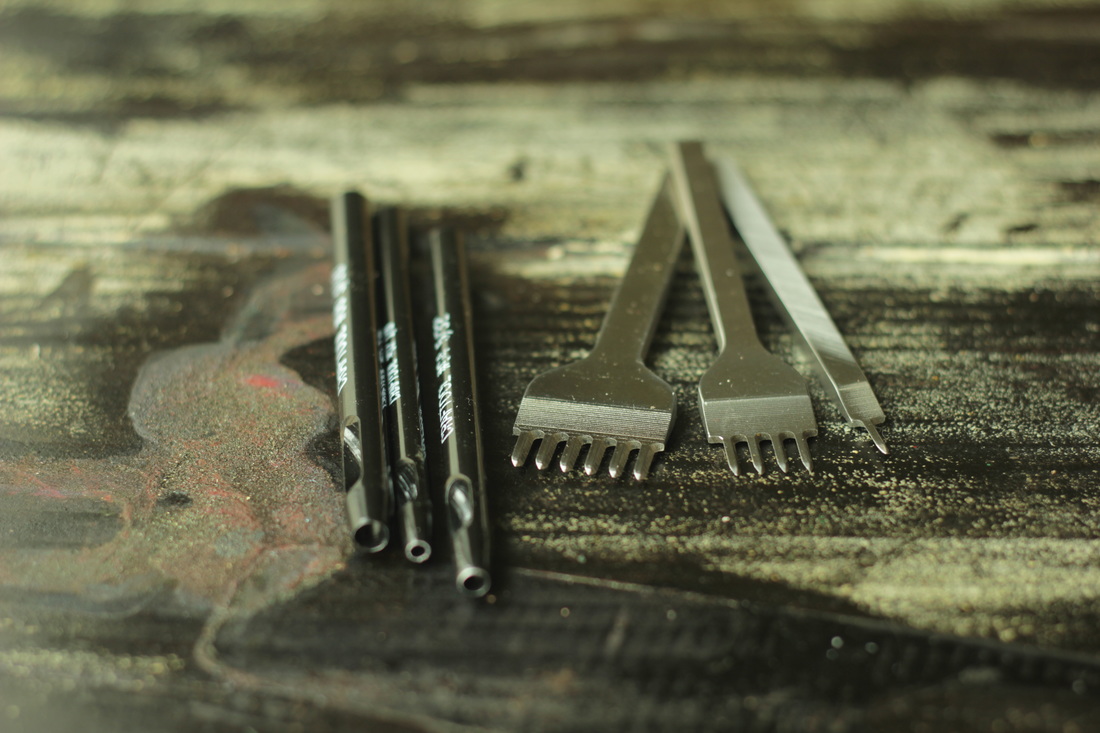 7) Hole Punch/Stitch Hole SetsIf you plan on using rivets or doing any stitching then both of these items are a good investment. I prefer the individual hollow punches for pounding a solid clean hole instead of the rotary ones. You can get more force behind the mallet swinging at the hollow hole punch than you can generate with just your one hand squeezing. The stitch hole punches usually come in sets of one, two, four and six punches and are very helpful for stitching through thick leathers. 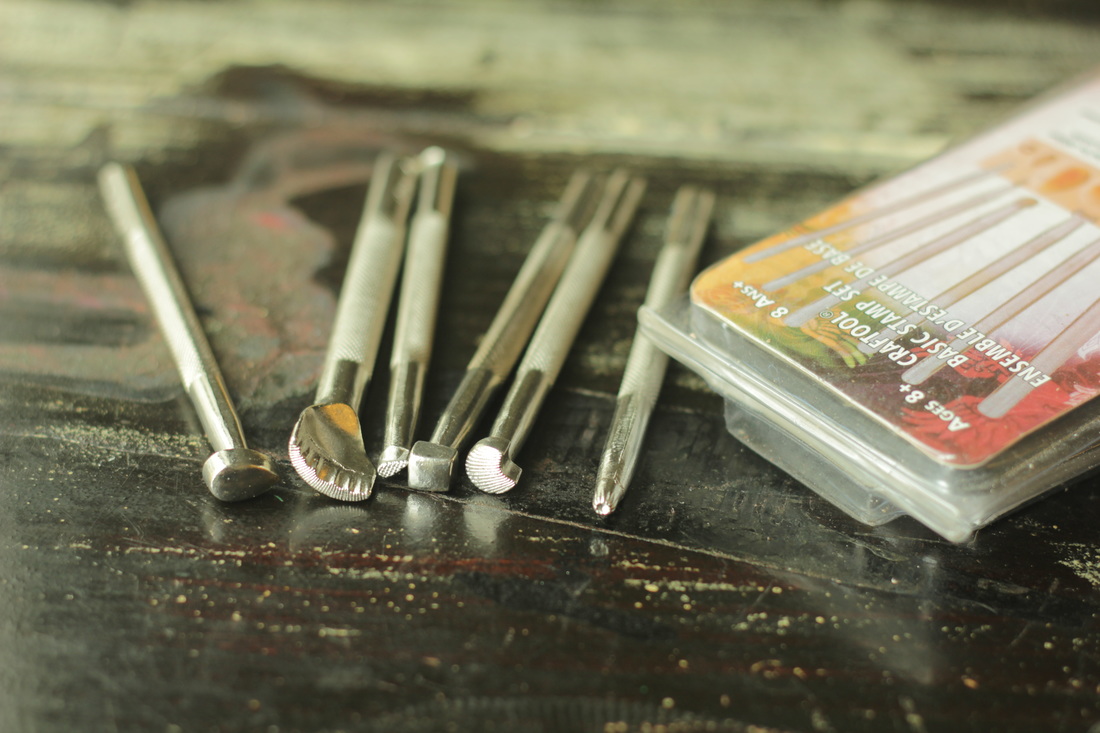 8) Six Piece Craftool Basic Stamp SetIf you plan to do any tooling you will definitely want to invest in a set. This one comes with a small sunburst circle, a background stamp shaped liked a tear, pear bevel, sea shell background, square bevel, and flower vein. You can actually use these six tools to create many beautiful designs. 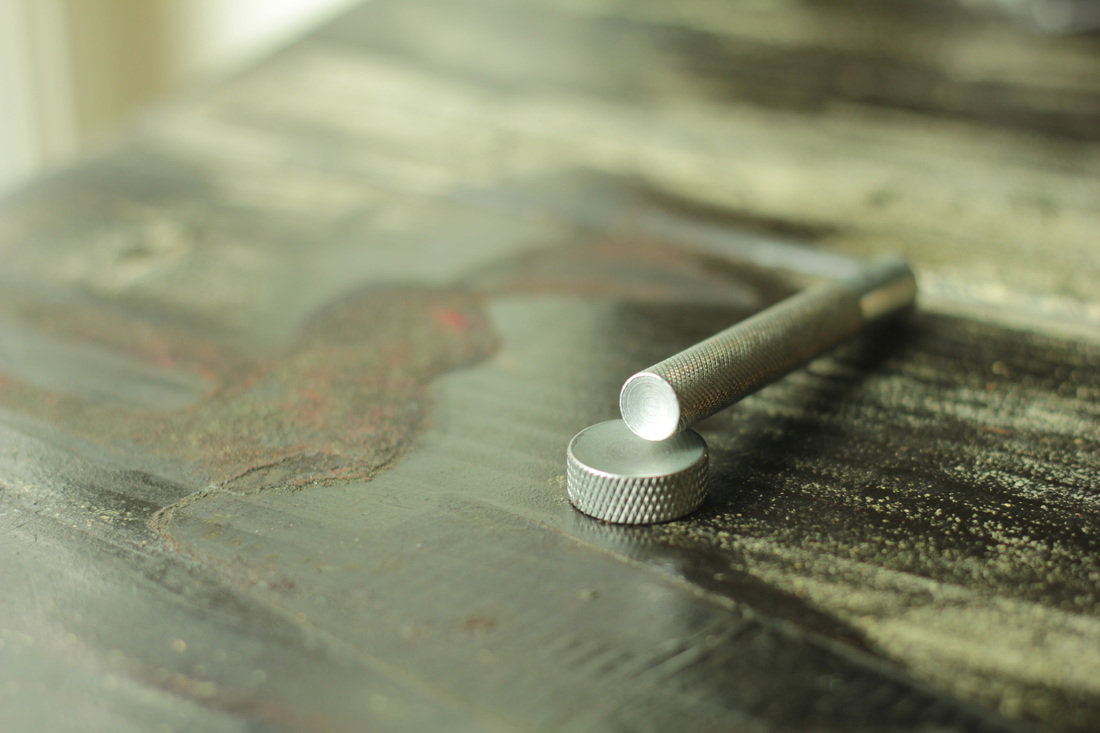 9) Rivet Setter & AnvilIf you plan to set any rivets you’ll need this set. The domed anvil helps you to keep the dome shape that some rivets have and the setter also has a domed side to give your rivet a nice tight fit. Using rivets can add shiny to your leather, as well as serve the function of holding pieces of leather together. 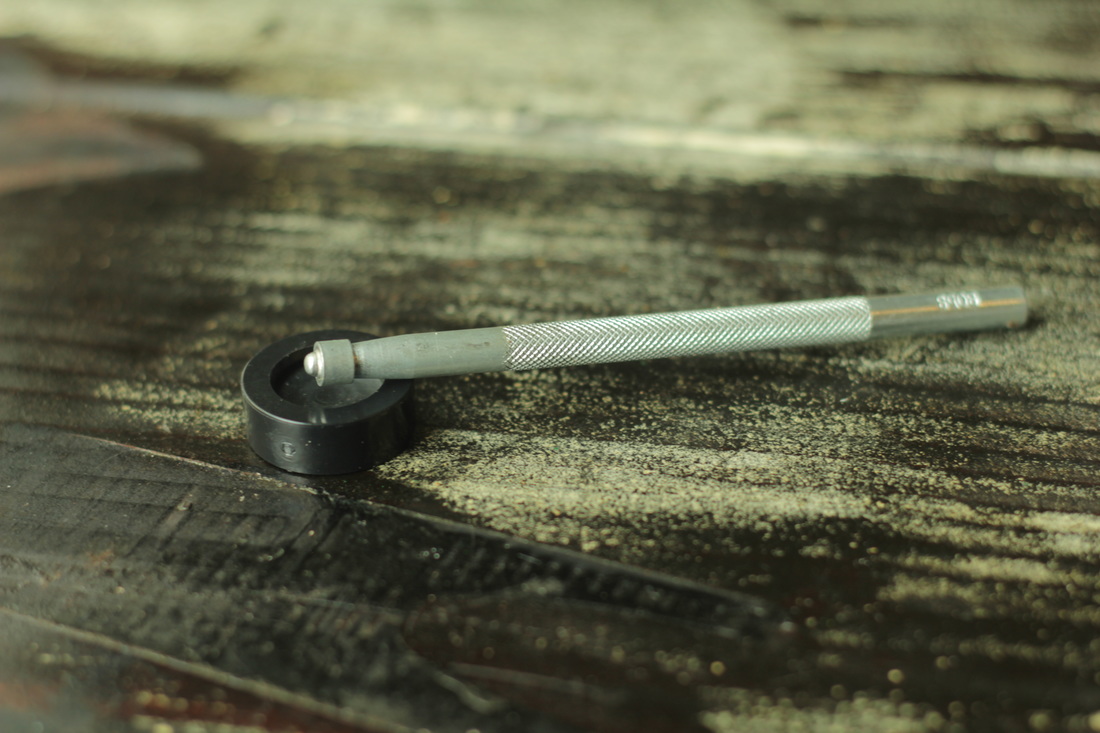 10) Snap SetterThere are several sizes of snaps and if you want the variety of different sizes then you should purchase a multi-size set. Otherwise, choose which size you like and be sure your tool and snaps match. Setting snaps can be tricky since you have to first pound down once or twice, then around in a circle to create a lip with the stem, then down again over the bed of the snap. However, they are extremely helpful for closing things such as bags, bracelets, and belts where you want to be able to showcase your buckle collection. Bonus Tools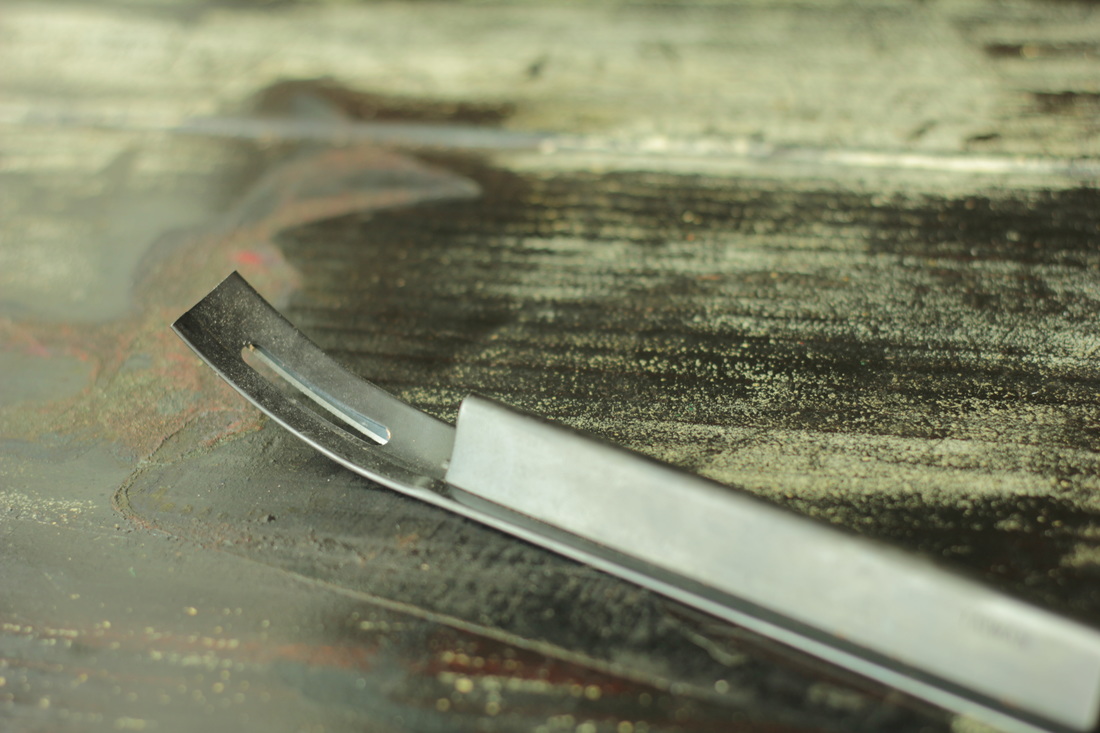 BevelerGetting the safety beveler was one of the best bonus tools to acquire. It’s shaped to prevent cutting leather too deeply and skives leather easily. You can also splice leather lace safely and with precision. I find it helps give belts, straps, bags and journals an extra nice edge. 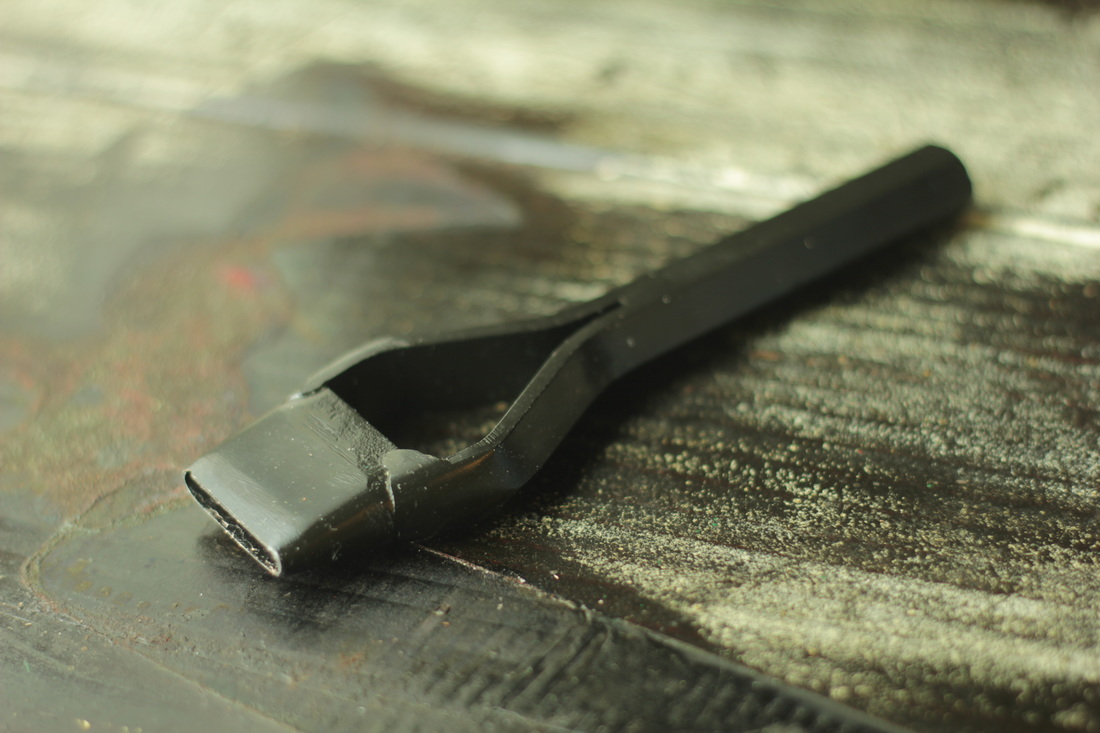 Oblong Hole PunchThis is used for making belts. I haven’t found another use for it yet, but it’s a time saver when creating belts. You can get various sizes, but I use the 1” one for various sized belts, preferring to just use the same punch more than once on the same belt when they are larger than 1” in width. 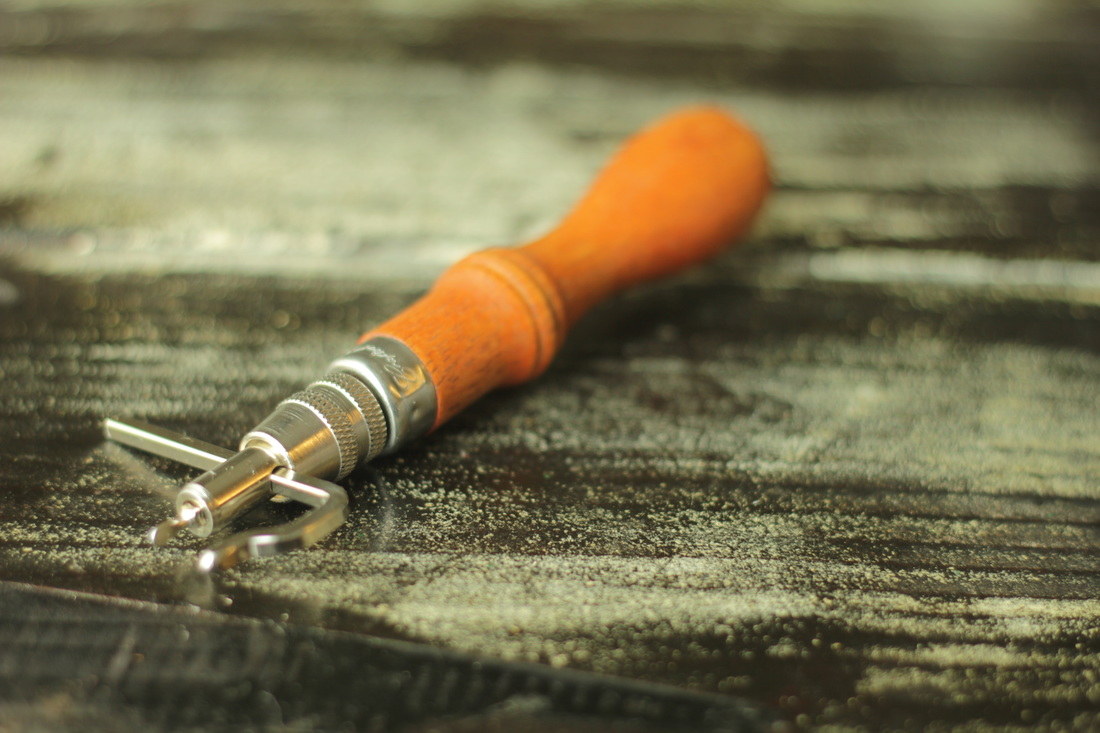 Stitch GrooverI love the stitch groover for two reasons. One, you can create straight stitch lines which really improves the end look of your stitch. Two, you can use it to create different width borders up to one and a half inches. This is great, especially around rounded edges where using a ruler isn’t possible. 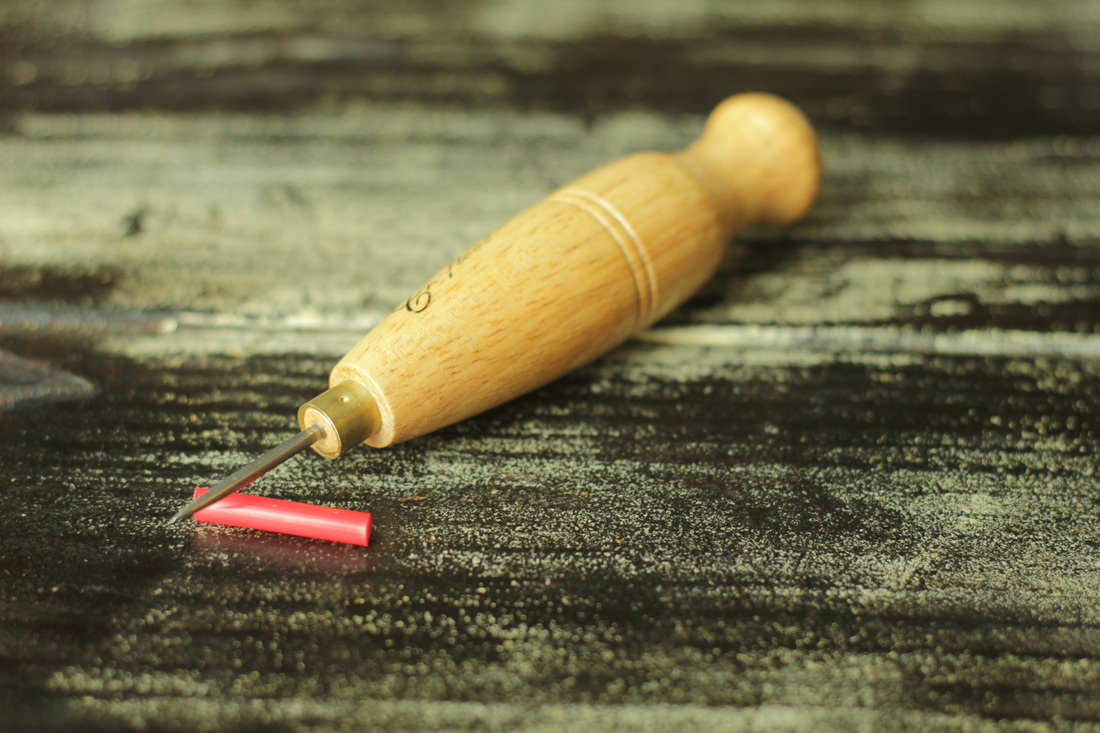 Stitch AwlBeing able to free hand poke holes into thinner leathers can save you time, broken needles, and finger soreness. Sometimes trying to get your dull thick leather needle through the layers of leather can be very difficult. Especially if you are using an oil tanned leather where the oiled hide will make your punch holes disappear. The stitching awl makes sewing easier and is worth the investment. 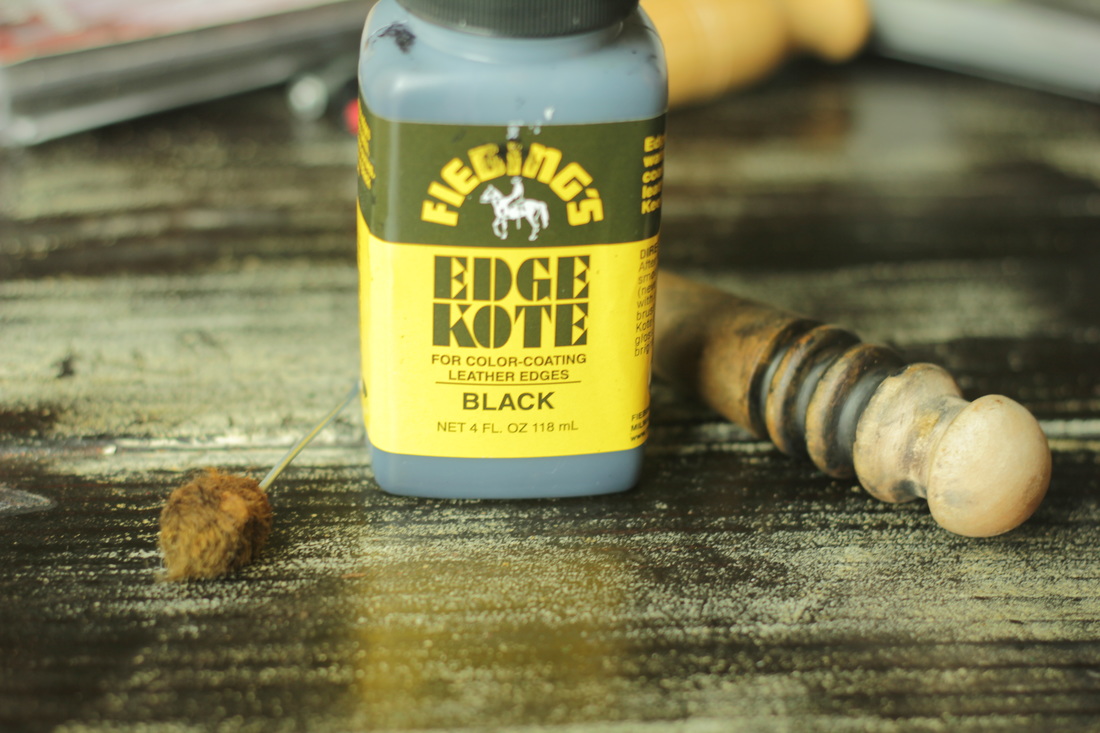 Wood BurnisherThis simple piece of rounded wood has various thicknesses for smoothing out the edges of leather. It takes some elbow grease to get the job done but it really makes your edges look rather smart. You’ll also want to get the Black or Brown Edge Coat with this tool. You will paint the edge with the edge coat and once it’s dry you’ll re-wet the edge with water, and then run the wood burnisher over the edge until you create a nice smooth finish. 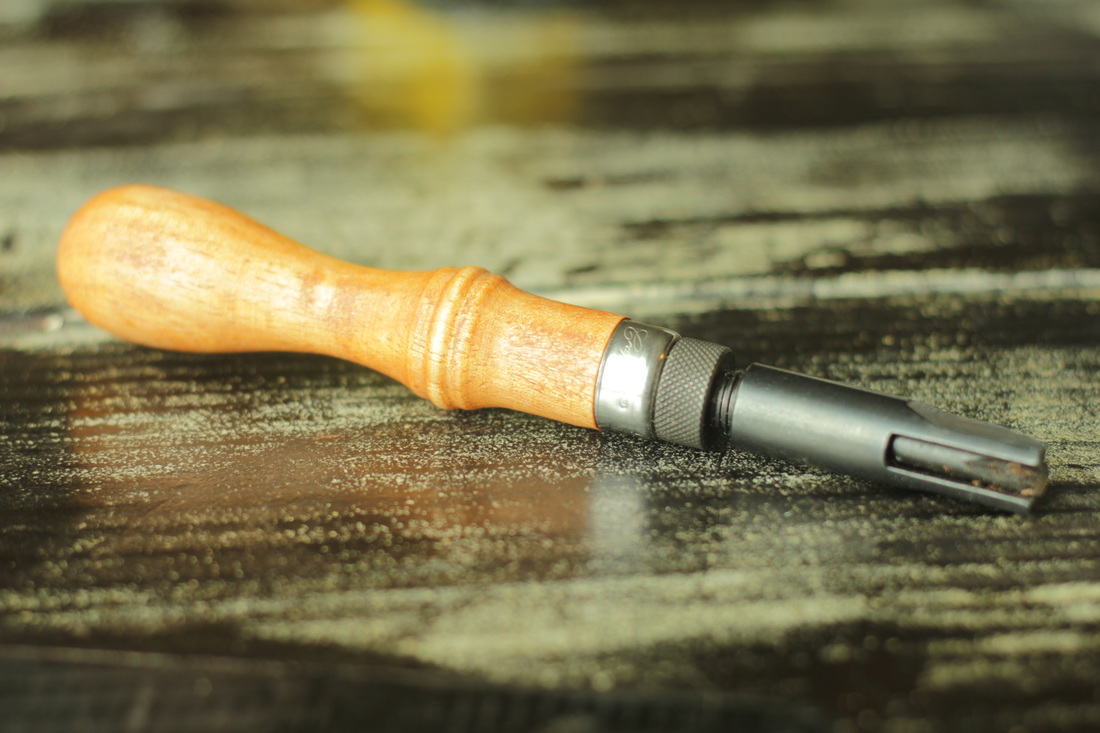 V-GougeThis tool makes the creating of belts easier. Usually a good belt is made with a 7-9 oz leather, and when you fold it over for the belt buckle the fold can be cumbersome, or create additional pressure on the rivets. The V-Gouge allows you to create a v-shaped channel where the belt buckle will fold so that the leather will set more flush together.  Stylus & Tracing PaperI put these two items together because they go hand and hand. While the stylus can be used without tracing paper. For example freelance drawing, marking holes to punch, and temporary marking where to use the V-Gouge, I mainly think of this tool as my tracing pen. Since neither of these two tools leave a lasting impact, it allows me to design with less mistakes.
1 Comment
by Willow Enright  This is the Sophia Handbag Kit #44314-00 from Tandy. Don't be fooled into thinking you'll get the pattern for the bag layout, you will only get the tooling pattern for free. One thing that I have been asked for in the past few weeks is for patterns. “Where do you get your patterns?” “Can I have that pattern?” “Do you have a pattern for that?” Most of my patterns aren’t directly taken from one place or another, nor do I start off with a perfect pattern when I craft them myself. I will do more research on how to transfer my original cardboard patterns into digital copies that can be shared around the world, but for now I will share a few sites that have free downloadable patterns that you can start downloading and making, today! First and foremost Leather Craft Library, this site is brought to you by Tandy Leather. Most of their free downloads have to do with the tooling patterns that they show on an item, and aren’t a layout for how to construct the item. That being said they show you what tools it would take to duplicate the process, this means that in order to perfectly copy the pattern, you have to go out and buy a bunch of Tandy tools. I see what you’re doing Tandy. A.k.a. feeding my leather addiction, and creating new fuel for the fire that fills my soul and empties my pocket book. 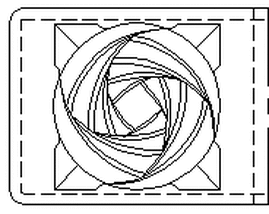 This is the LC-521b pattern from Outside the Box Pattern. Outside the Box Patterns is a great way to look for free patterns. They tell you how large the image is, and what is the best item to place that tooling pattern on. You can open the pattern on a new tab on your browser then click the download button, it’s that easy. No wondering if that checkout chart will let you get away without paying a dime. There’s no tricking me into thinking that your messenger bag pattern was actually going to give me a layout pattern for said bag, only to give me the tooling pattern on that bag instead. What you see is what you get. I like this straight forward method of sharing. Elk Tracks is a nice one if you want to create buffalos and other western themed tooling patterns. I downloaded a few. I really like how they show you the pattern then the finished tooled product for a side by side comparison. I learn really well this way having to look and study at what’s happening and then experiment and try something, leaving me to figure it out on my own. I learn best this way, but this may not be the way you learn to each his own. 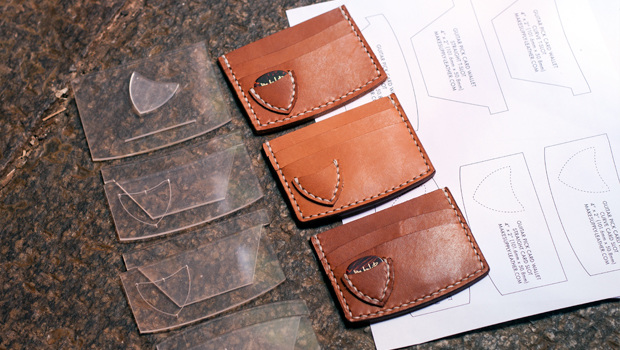 This is the Leather Guitar Pick Wallet template, pattern, and finished product from Make Supply. If you are a beginner Make Supply is a great place to start making wallets. Not only are the patterns free, but they have video tutorials that compliment those patterns. For those that want a more permanent template that will hold up to repeated use you can purchase the acrylic templates for a fee. One site that really caught my attention is Leather Craft Pattern, but this site isn’t the greatest if you’re only searching for free patterns. I went onto this site found many free patterns that I would like to look at with a more in depth eye, only to be asked for payment greater than $0.00 at check out. Meaning you have to buy something in order to get the free patterns.  A screen shot of Leatherworkers.net forum for free templates. I would stay away from pattern sharing forums like those on leatherworker.net. More than half of the links listed on this forum are so old they are dead ends. If you are up to challenge then this site is fine. I find it to be more frustrating than helpful. Don Gonzales Saddlery doesn’t have a great selection, I liked the skull pattern. This site is much like Outside the Box Pattern, with its straight forwardness.  This is a finished Glock 42 Avenger Holster Pattern from JLS Leather. If you are looking for patterns for your 2nd Amendment support piece, aka a gun then, JLS Leather is the site for you.
I hope that this list of resources is helpful to you, and will fuel your creativity. I look forward to seeing what you make with this knowledge and hope that you share by leaving a comment below. The inspiration for creativity should always be free, and leather crafters need to share their knowledge. by Willow Enright 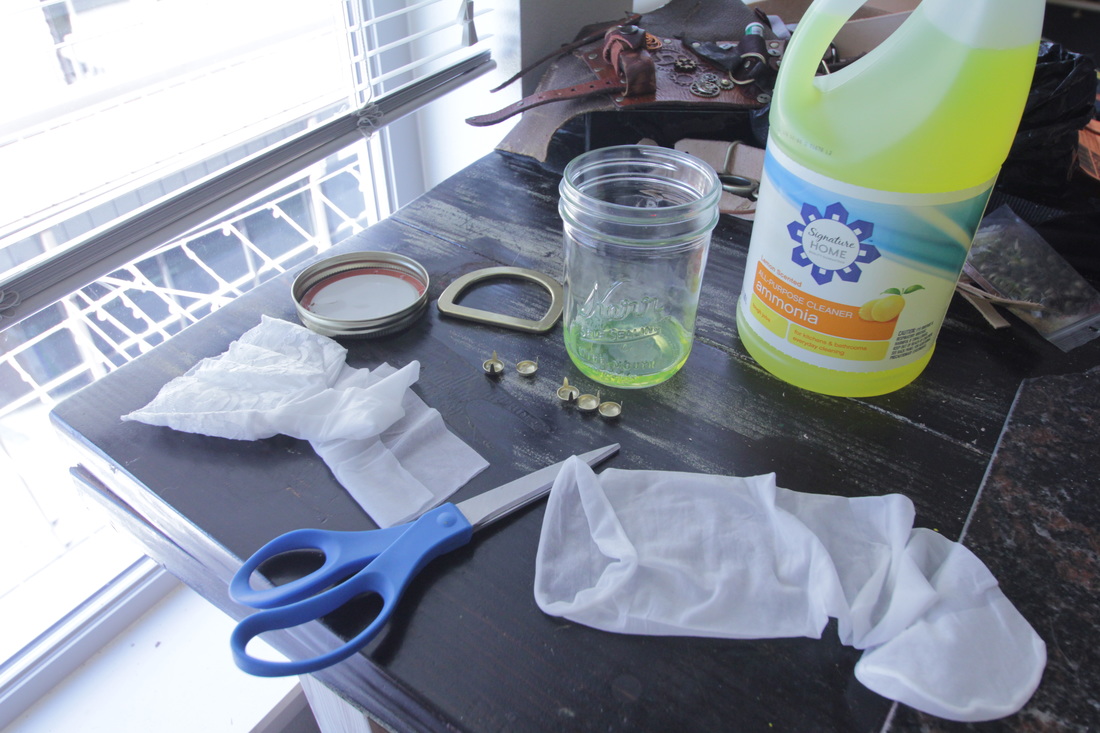 All the items needed to antique brass: ammonia, a mason jar with lid, nylon pantyhose, and of course your brass items. Please read the following article with a posh British accent: Creating Steampunk accessories can be difficult, especially in today’s society where everything is made with machine perfection. While shopping for antiqued brass items I ran into a problem, they only had brass. Steampunk costumes aren’t necessarily supposed to be new and shiny. They are supposed to have a more lived in feel where you believe that this is something that gets worn on the regular, well kept but worn all the same. What is a retro-futuristic fan to do? Buy the brass, and distress the frak out of it. Now the question is...how? I found one out of several ways to distress brass. This particular way didn’t specify time or whether it would work with solid brass or brass plating. The only item that I had to buy was ammonia, which was tricker since no one in the stores had any knowledge about the cleaning agent. You might have to buy a pair of pantyhose, or a mason jar with lid, but those three items are all you need. 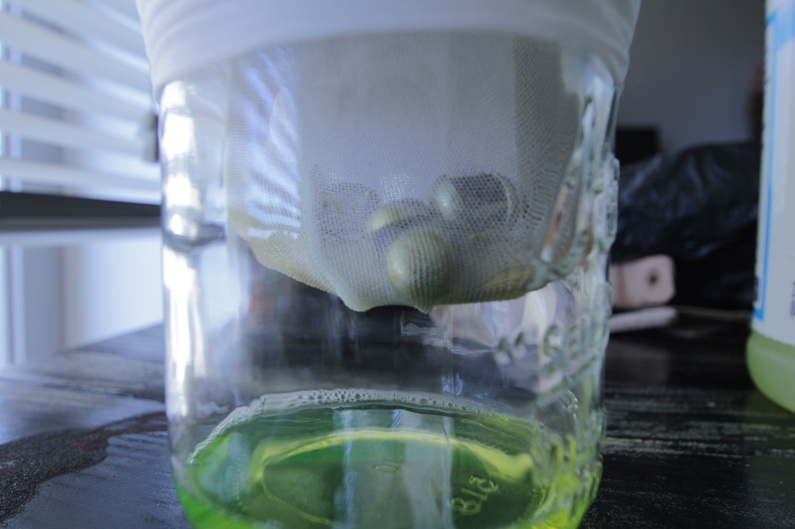 Brass plated spots and solid brass D-ring suspended over the neon green ammonia. Pour a small amount of ammonia (a thumb width) into the bottom of the mason jar, make sure that your pair of pantyhose and brass items aren’t touching the ammonia. Once you have your brass suspended over the liquid, grip the pantyhose to keep from slipping, then place the lid over the odorous substance. You’ll thank me for this step, once you stop reading this article and try it for yourself. 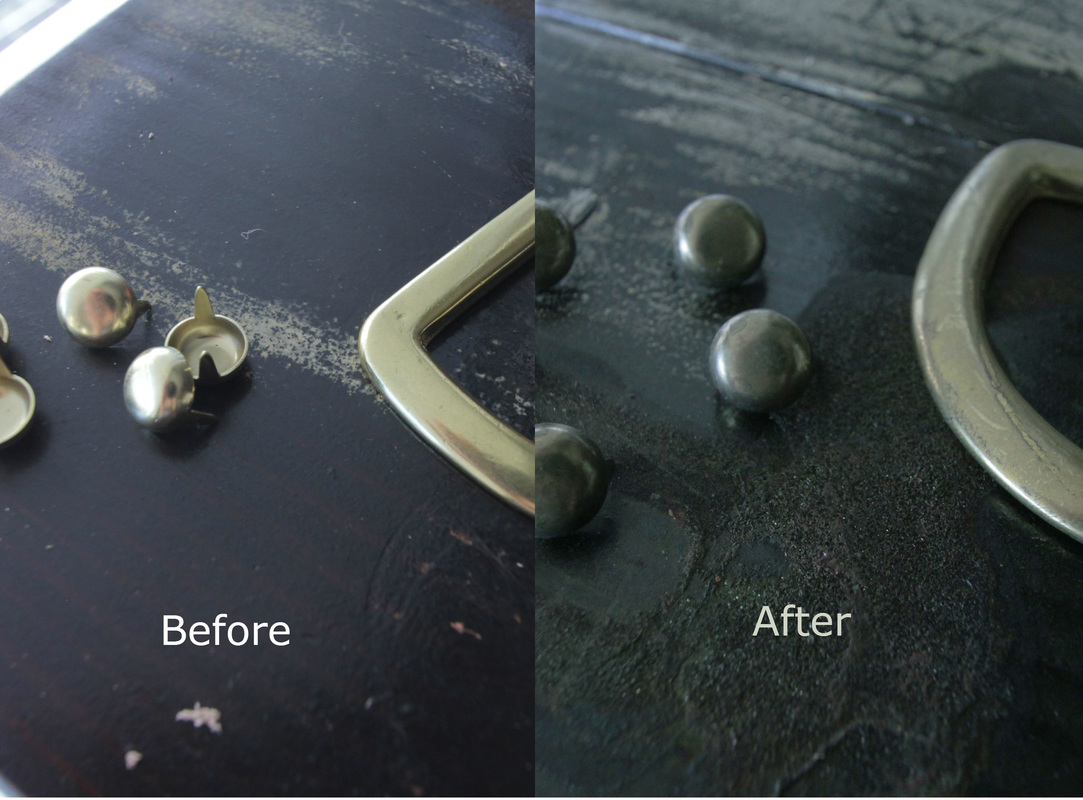 Spots twenty minutes in the ammonia filled environment. The D-ring took an additional two hour and forty minutes. I will now break down the differences between solid brass and brass plating. You’ll notice from the above photo that just after twenty minutes in that ammonia filled jar, that the five brass plated spots were done. I later learned that not all brass plated items are created equal. I wanted to duplicate the results from the spots, with a pair of buckles, unfortunately one of these buckles shed the entire brass plating, creating an antiqued nickel buckle. Another surprise came when I tried to use the same ammonia the next day on fifteen brass spots. Apparently ammonia looses it’s potency after oxidization and fifteen takes longer five, approximately an hour and fifteen minutes. Now as for the solid brass D-ring, you’ll notice from the photo below that the antiquing process on the solid brass D-ring isn’t as pronounced and it spent 3 hours in the jar to achieve the final result. 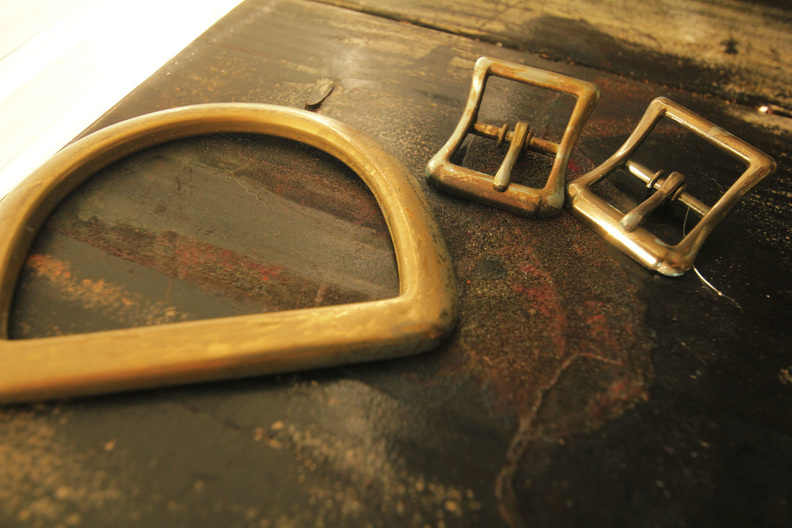 The final look of the D-ring and brass plated buckles. What can we conclude from this? Well, you’ll need fresh ammonia for the more dramatic results, solid brass needs to spend more time in the ammonia filled environment, and the antiquing process is not an exact science. My advice is use five to ten minute increments depending on the amount of control you want to use over the variation desired for brass plating. For solid brass check on it every hour. You’ll also need to take into consideration how large your item is, larger items will take longer and smaller items will be done quicker. And if you have read this whole article in a British accent congratulate yourself, you’re ready to live in a world that Jules Verne would have been proud to create! 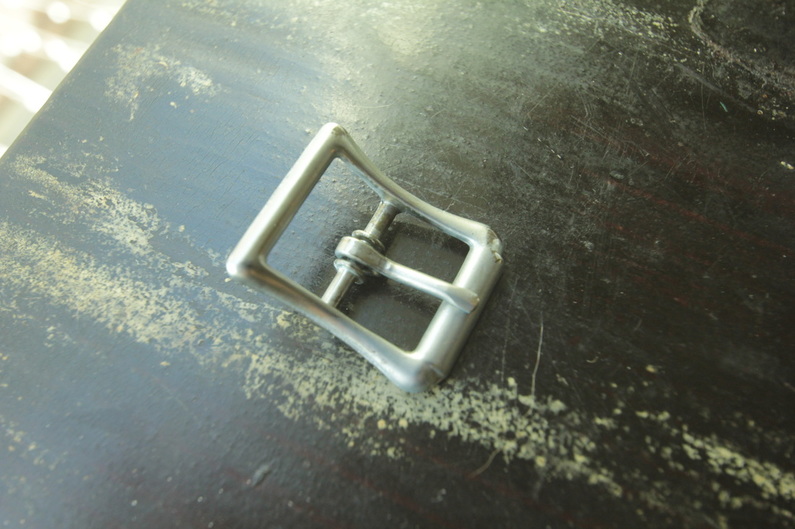 The antiqued nickel buckle formally sold as a brass plated buckle. 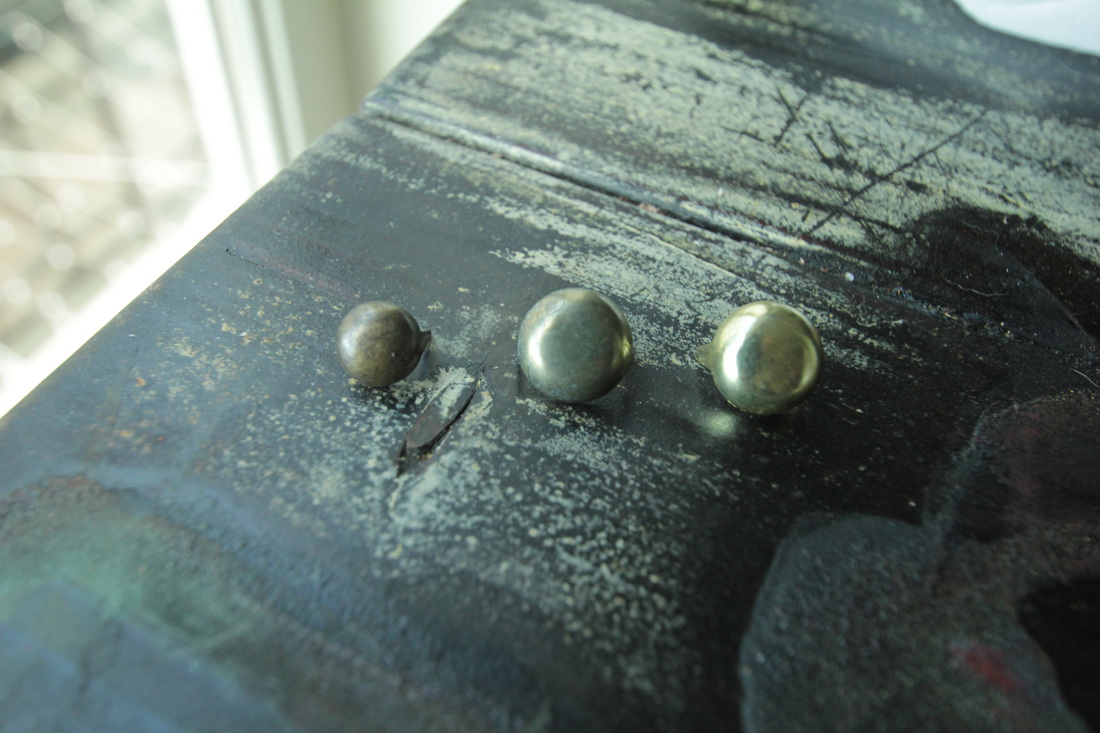 From left to right: store bought antique brass spot, our antiqued brass spot, and the original brass plated spot. by Willow Enright  Daryl Dixon and Michonne from AMC's The Walking Dead. It seems like the list of characters that I would like to do a cosplay for keeps expanding every day. If it isn’t a character from one of my favorite TV shows then it’s a movie version that I want to capture. Every year the list grows with some other awesome set of armor, or gun holster that absolutely needs to be made. Some of the classics I’ve been wanting to do for FOREVER… Here they are counting down to my number one.  Rey No Last Name from Star Wars Episode VII: The Force Awakens. 10.) Rey: Star Wars: Episode VII Rey grew up in the waste lands of the desert planet Jakku, where she spent her childhood dreaming of the day when her family would return for her. But when we are introduced to her she had already gained a reputation as a warrior and scavenger in the junk fields of Niima Outpost. She shows off her talents, learned at the planet's Starship Graveyard and wins a special place in our hearts. She goes on to show that girls can kick ass, pilot spaceships, and speak Wookie. Yes, she wins us over even before we learn she has a lot more on her side including the infamous, Force. 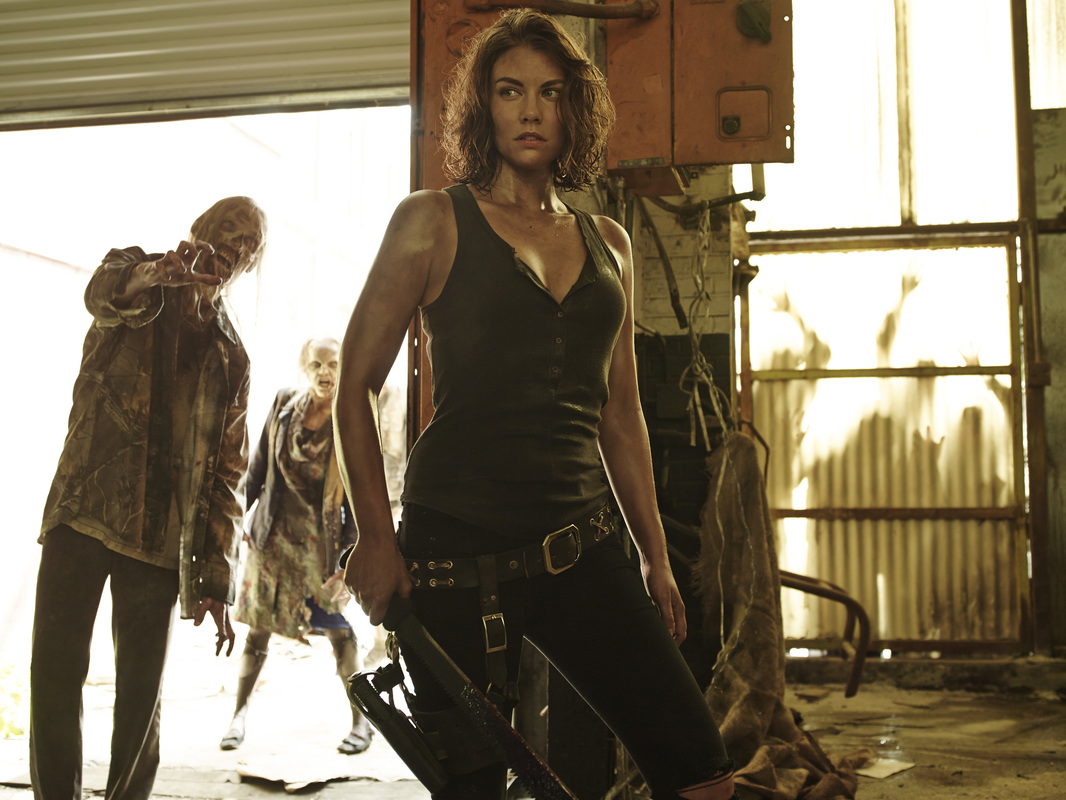 Maggie Greene from AMC's The Walking Dead. 9.) Maggie Greene: The Walking Dead Maggie is the eldest daughter of Hershel Greene and grew up on the Greene family farm. This is where we as the audience meet her in AMC’s The Walking Dead. Her family and farm comes to the aid of Rick’s son, Carl having been shot by their man, Ottis. However, my favorite scene with Maggie is when she rides her horse out to find Laurie and she clubs the walker with the baseball bat. Yeah, Maggie. 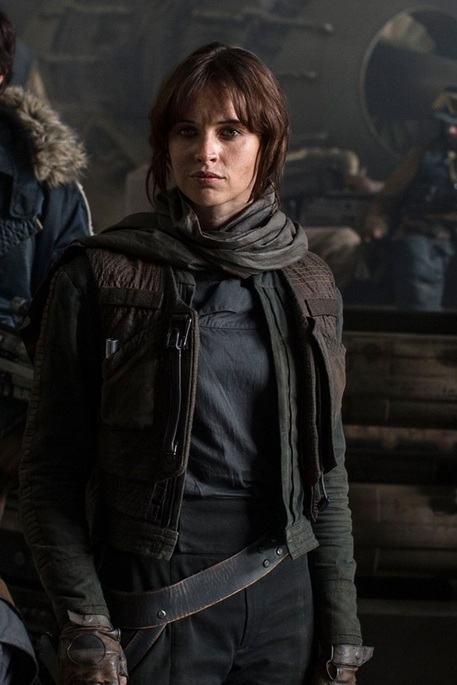 Jyn Erso from Rouge One A Star Wars Story. 8.) Jyn Erso: Rouge One A Star Wars Story Not too much is known about this character yet, but I’m excited for the strong rebel female spy! We know she doesn’t follow the rules, in fact she likes to break them. She’s smart, capable, and apparently totes a gun holster reminiscent of Han Solo’s. Want. 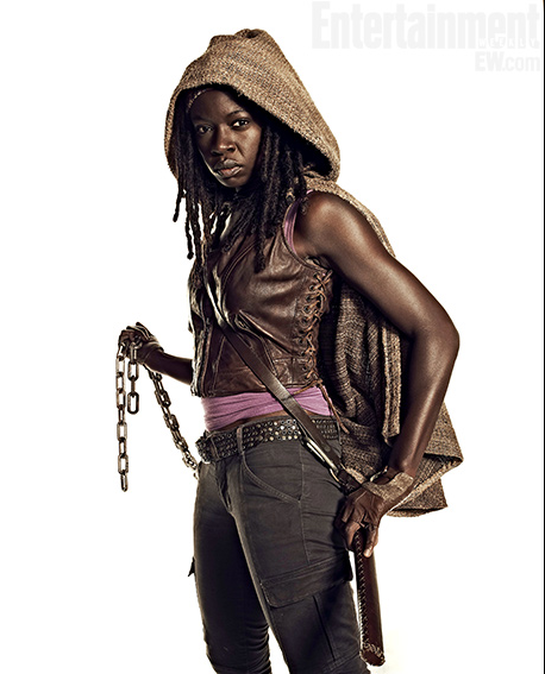 Michonne from AMC's the Walking Dead. 7.) Michonne: The Walking Dead This beautiful, badass, katana-wielding woman! Sexy, and hells bells kinda fun! She’s dark, she’s broody, she’s tough as nails, and she can kill several walkers with a single swing of her sword. Who wouldn’t want to be Michonne? Need I say more? 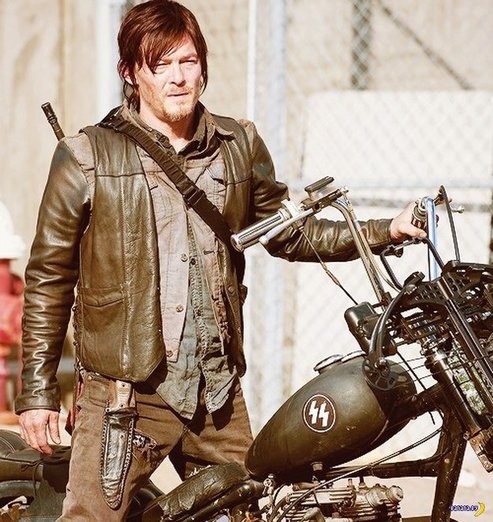 Daryl Dixon from AMC's The Walking Dead 6.) Daryl Dixon: The Walking Dead Everyone’s favorite shy guy… Daryl Dixon, the redneck turned hero. We love him running around with his crossbow and arrows, we loved him when he wouldn’t stop looking for Sofia, and dammit we love him when he looks at Dale and before he shoots him says, “Sorry, brother.” Ahh, Daryl. We frelling love you, and we all want to be you!  Obi-Wan Kenobi from Star Wars Episode III: Revenge of the Sith. 5.) Obi-Wan Kenobi: Star Wars: Episode III So, out of all the Jedi that have shown up in the Star Wars universe, I’m not 100% sure why I’m still stuck on completing an Obi-Wan Kenobi cosplay. There have been many amazing, interesting Jedi, but I guess for me Obi-Wan is the one I’ve always wanted to be because he seems rather human. He has flaws and doubts despite his devout beliefs, which makes him relatable.  Cpt. Malcolm Reynolds from the TV show Firefly. 4.) Mal Reynolds: Firefly/Serenity Space Cowboy, yes please! I aim to misbehave! “Yes, Sir! Captain Tight Pants, Sir!” This rustic, charming, troublemaker always means well, but somehow ends up getting the raw end of the deal every time. He takes care of his crew, and tries to keep to himself, except when he’s starting fights. “I swear by my pretty floral bonnet, I will end you!” 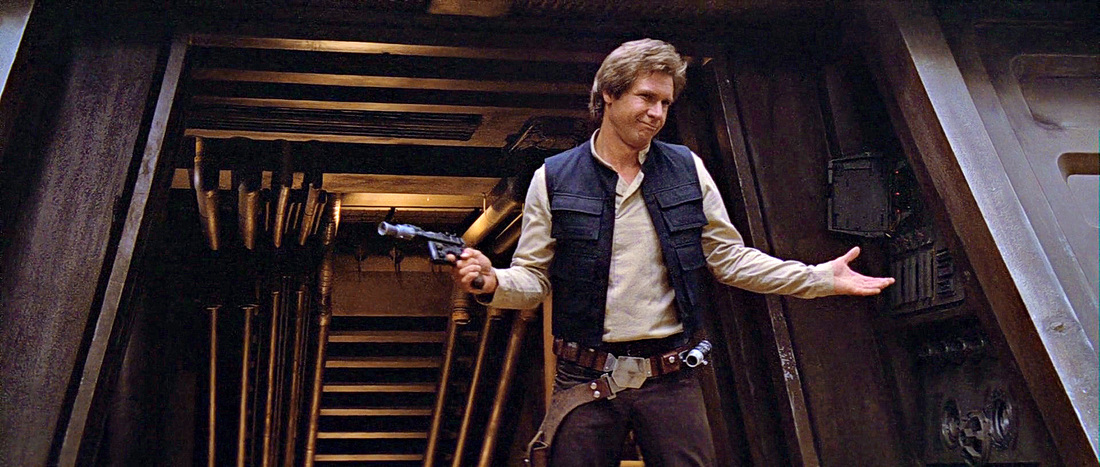 Han Solo from Star Wars Episode VI: Return of the Jedi. 3.) Han Solo: Star Wars Episode VI: Return of the Jedi Cavalier, charming, dangerous… we all wanted to be Han Solo. He gets the girl, flies an awesome spaceship, and brandishes the sweet blaster gun. Plus, he’s best friends with a Wookie who could tear your arm off! 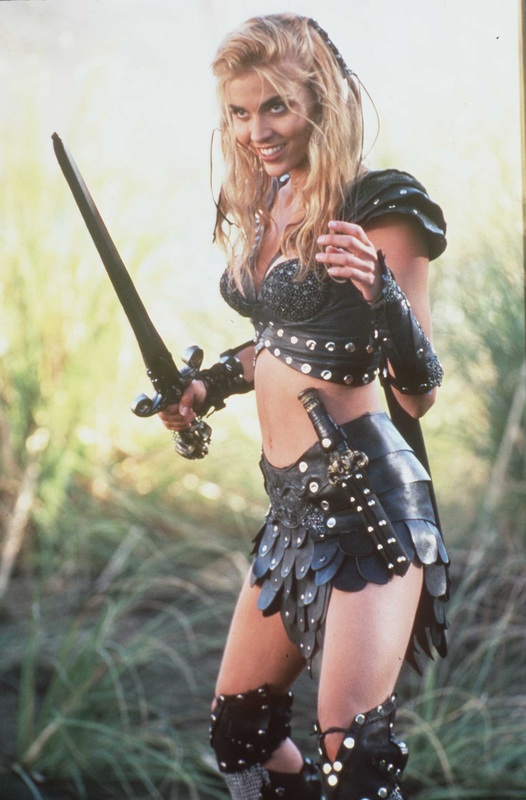 Calisto from Xena: Warrior Princess. 2.) Calisto: Xena Warrior Princess One of Xena’s more challenging nemesis, Calisto shows up as a revenge seeking warrior who turns into a God. We get her sad backstory, see her rather frightening warrior skills, and then she goes mad crazy before turning into an immortal God. She swaps bodies with Xena at one point, and the blond continues to haunt Xena the rest of her days. 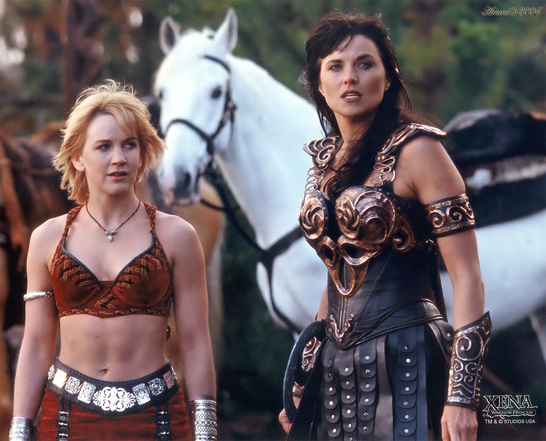 Gabrielle and Xena from the TV show Xena: Warrior Princess. 1.) Xena: Xena Warrior Princess
Eeeeiiii-yeiiii-eeeiiiii! Or however, Xena does that scream yell of hers. The Warrior Princess and her chakram and sword start off the series defending Gabrielle’s village, and we never lose the bard again. We instead follow the pair on all sorts of misadventures and Greek mythology tales as Xena teaches Gabrielle how to become a warrior herself. Since the redhead ends up inheriting the title of Amazon Princess, I think Xena did alright. What are some cosplays you long to create? |
Willow EnrightI started crafting out of leather in 2011, and now I am making it my life's work. I am writing this blog to help myself remember some of the small steps in past projects, sharing my triumphs and failures, as well as my love of leather. Archives
November 2017
Categories
All
|

|
Cosplay DIY (Blog) |
 RSS Feed
