|
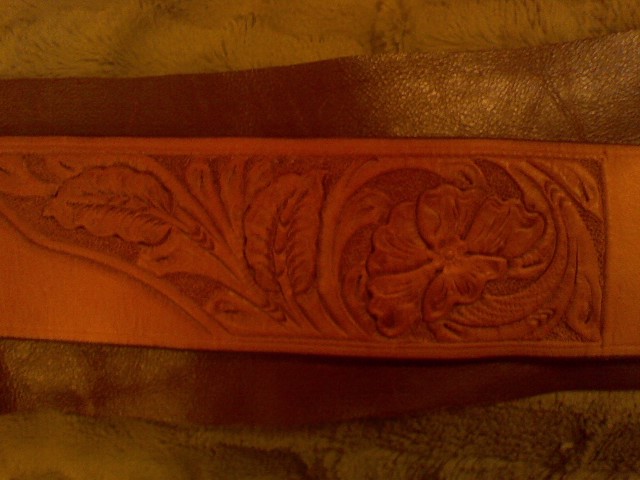
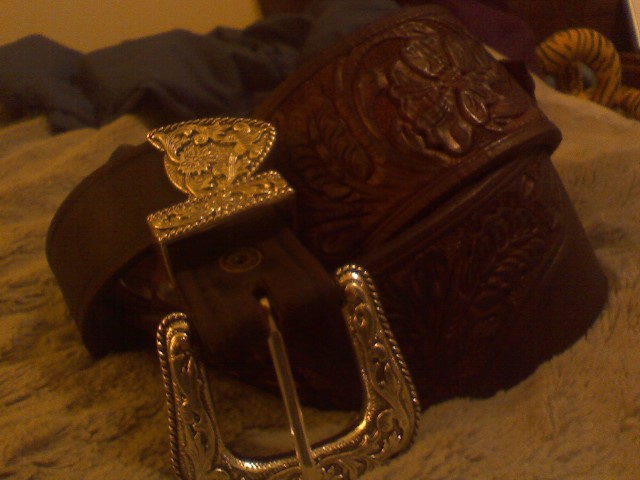
by Willow Enright Part IV: Arrived at Westland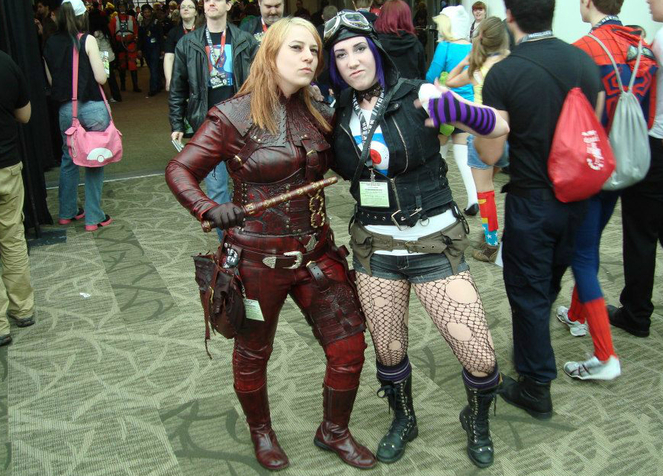 Cara Mason hanging with Tank Girl (Braden Duncan) at Emerald City Comic Con 2013. Let’s recap on my journey to become a Mord-Sith. I had created the whole outfit, from commissioning a catsuit, creating armor from cowhide, and modifying a pair of nubuck leather boots. In true Mord-Sith fashion, I decided that I clearly hadn’t worked hard enough and I set out to create a more worthy specimen. See Part I, Part II, and Part III for more details. What I had gathered from my first attempt was a set of amazing historical replica buckles, a reusable pattern, my customized leather catsuit, the maroon leather gloves, my handmade Agiel, and my now blood-red Merrell Tetra boots, and my belt. In the meantime I had purchased some antiqued brass rivets, as well as antiqued brass snaps, a swivel knife, and shoe lace hooks. But the best thing of all, was an amazing mallet, all thanks to Jon. 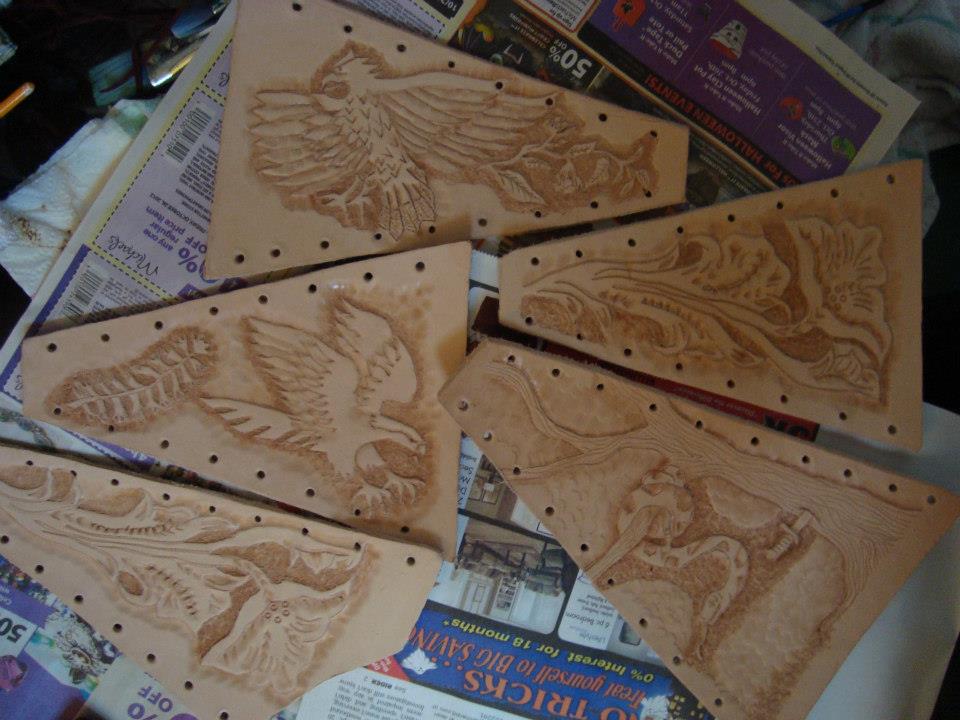 The Mord-Sith tooled neck gorget panels. Once I had that beautiful rawhide mallet in my hot little hands I started practicing my tooling. I used a scrap piece of leather to test out the different tools (six piece basic craftsman set, and my good ol’ screwdrivers) I learned through the tutorial videos that you should wet your leather slightly before doing any of the tooling work. It should be damp, but not soaked, and you should wait until the leather has almost returned to it’s natural lighter color. And you need to keep re-wetting the leather as you go and it dries out. For my neck gorget, I chose a flower design to tool, it would represent the D’Haran flower used to dye the Sister of the Agiel’s armor. Then I traced the flower pattern onto a piece of paper and used the old fashioned tracing transfer method of rubbing the backside of the paper to leave the design on the leather. Using my new swivel knife I carved the design, and then erased the left over pencil marks. Then I used the rawhide mallet and six piece craftsman set to tool out the designs. I also created several original designs to represent and reflect Cara Mason’s story specifically. Her neck gorget not only has multiple panels reflecting the D’Haran flower used to dye their leathers, but it also has a panel on the back which represents Cara’s experience of being taken captive to be trained as a Sister of the Agiel. It has a tree with a snake hanging from a branch and a knife stuck into the tree. When the Mord-Sith came to take Cara her father told her to grab the kitchen knife to fend them off, but Cara chose not to, thus was taken into captivity and trained by the Mord-Sith known to Cara as Snake. 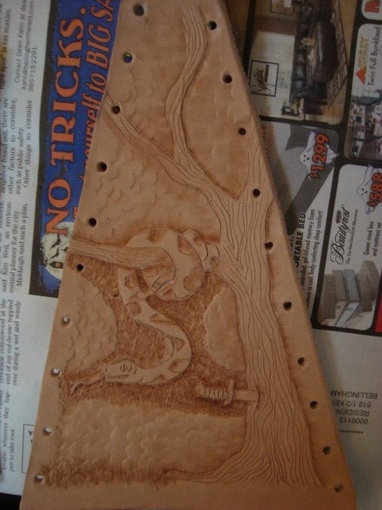 The Mord-Sith neck gorget panel showing a snake (the nickname of Cara's trainer) and a knife (which Cara wouldn't use even to defend herself). There are also two individual, detailed panels on the front. One, is of a blue-tailed sea hawk and comfrey branch. Cara herself said if she had to be a bird she would choose the blue-tailed sea hawk because they are relentless. Comfrey would have been used by the Sisters of the Agiel. It has several medicinal actions, and is known as a vulnerary and an astringent. These properties make it useful in the healing of minor wounds, both internal and external. Comfrey can be used for minor injuries of the skin, where it will work to increase cell production, causing wounds to heal over rapidly. It can be used internally for stomach and duodenal ulcers, where it will have the same effect. It is also demulcent, producing a mucilage that coats and soothes irritated tissues and it can reduce inflammation, and at the same time lessen scarring. The conclusion of the neck gorget scene is a second panel of a Falcon bearing a Yarrow branch. Yarrow is an analgesic and antiseptic, so that it stops bleeding, lessens pain, prevents infections, and is often abundant in open meadows. It is also available 12 months of the year in milder temperate zones. And to finish the gorget, I also used more of the elastic cording for connecting the pieces as well as incorporating the antiqued brass snaps on the back. 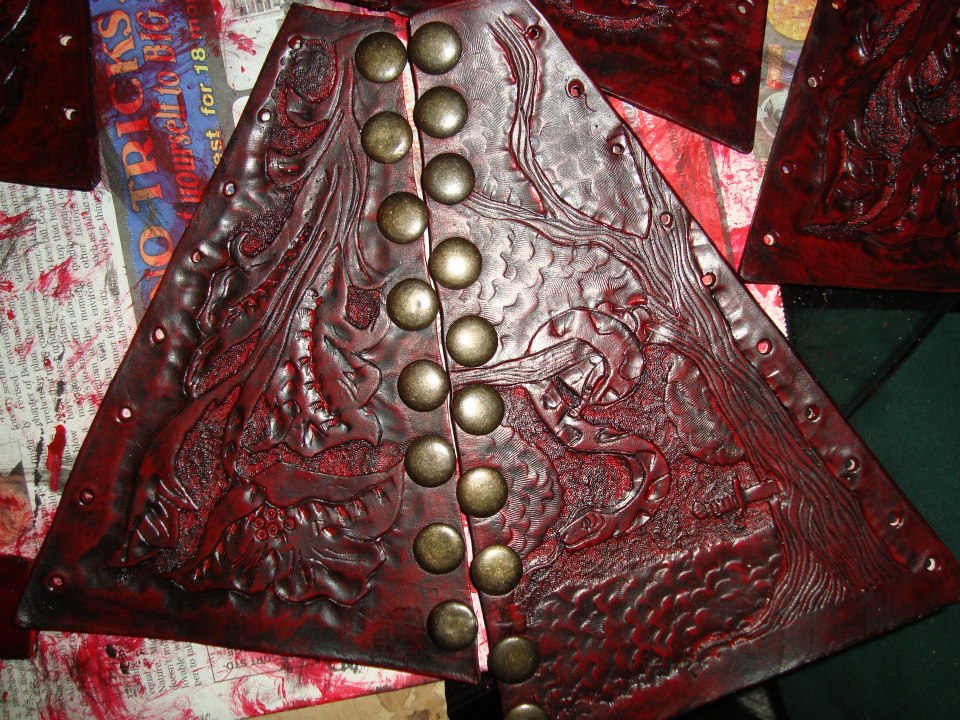 The back of the Mord-Sith neck gorget, showing the antiqued brass snaps, as well as the finished tooled panels. The leg holster has a tree bearing all the seasons to represent Cara’s time in Westland with Kahlan and Richard while Kahlan healed from her almost mortal wounds. The waist cincher has several different depictions on it. There’s Richard’s dragon Scarlet, a deer scene to show her time learning to hunt with Richard, as well as a wolf which Cara feels reflects her own prowess. There’s also the traditional design worn by Sister of the Agiel, a crescent moon and star showing the house of Rahl. The waist cincher was tricky for me. I decided to try a technique of water hardening, known as cuir bouilli. Unfortunately, I didn’t realize that technique would undo all the tooling I had already done on the piece. So, around three weeks worth of hard work undone in about 98 seconds. That sucked. However, after I did the water hardening and retooled the entire piece it looked amazing and was hard like armor. I also made all of the straps connecting it to the other armor pieces removable by snaps. That way I could wear the waist cincher on its own since it was awesome! 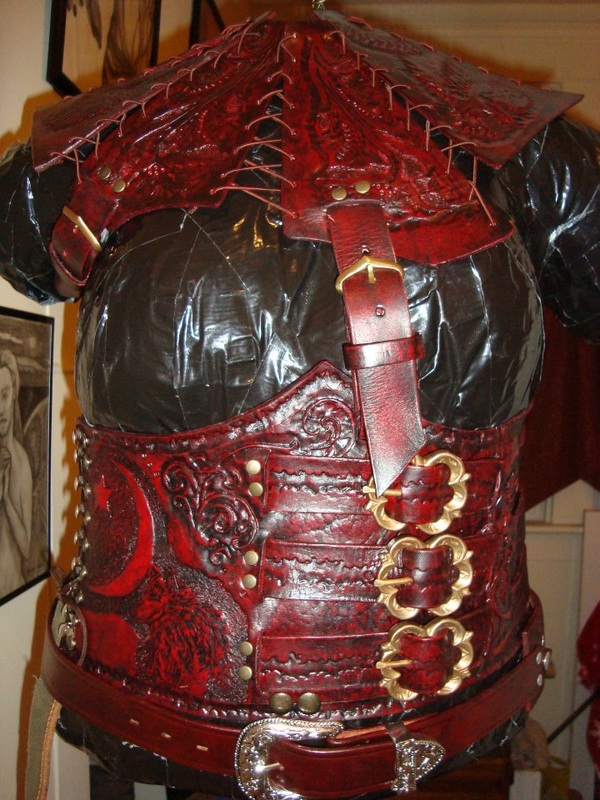 The belt, waist cincher, and neck gorget on my duct tape mannequin. Once all of the designing was done it was time to dye the leather to make it that fabulous blood-red. I first applied two to three layers of the Scarlet Red paint, followed by 2-3 layers of the Black Antique Stain. Then the Resolene to seal it and protect it. I used a sponge to apply the acrylic paint and resolene sealer to the leather. After everything was dry it was time to assemble the bits and pieces to create the armor as a whole. I found that straps were difficult due to the thickness of the leather, and wished I had a slightly thinner leather for these, say a 5-7 oz. I also wish that I had implored a water soaking to wet form the loops of the straps around the buckles and where they looped onto themselves. I think this would have let them sit more flush and not have as much tension for the riveted area. That, or a v-gouge tool to create the canal for the loop to fold better. 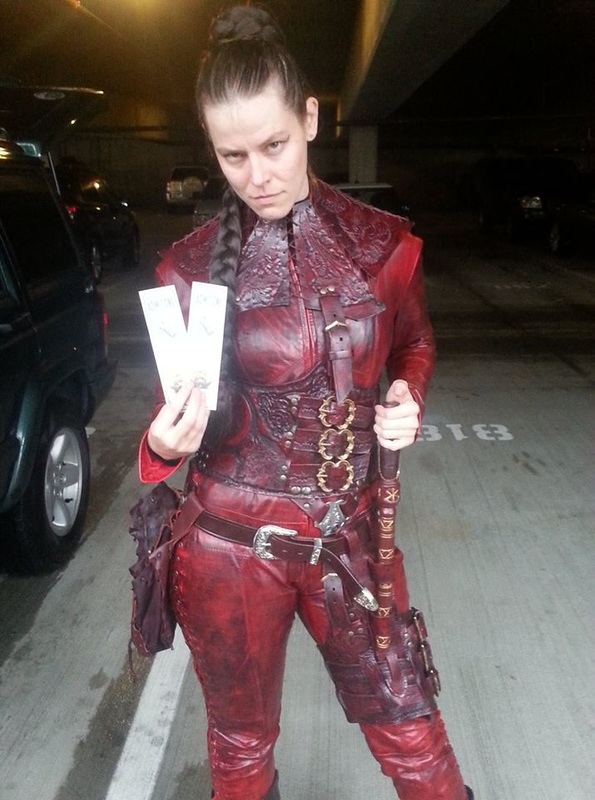 My girlfriend, Erin in my Mord-Sith Armor at Jet City Comic Con 2015. After four years of wearing the cosplay costume to multiple events the only upkeep it has needed is the occasional retouch to the strap edges with some antique stain. The buckles are narrow in design and the thick straps scrap each time you take the armor on and off. Otherwise, it’s still an amazing, beautiful piece of stunning craftsmanship, and I couldn’t be more proud of the end result.
1 Comment
by Willow Enright Part III: Becoming a Sister of the Agiel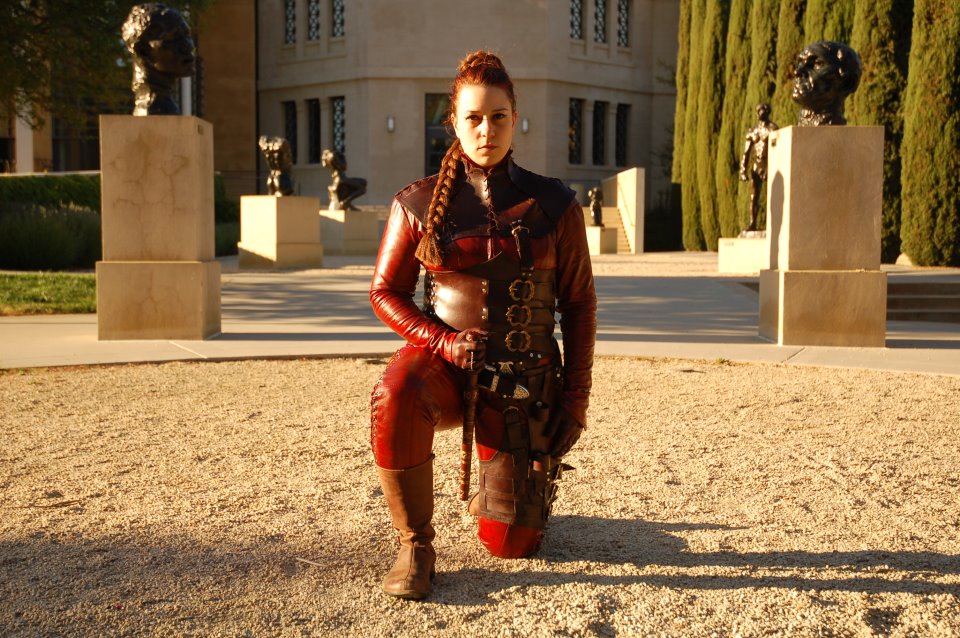 "Master Rahl guide us. Master Rahl teach us. Master Rahl protect us. In your light we thrive. In your mercy we are sheltered. In your wisdom we are humbled. We live only to serve. Our lives are yours." -Denna's Devotions to Master Rahl In classic cosplay fashion, I didn’t love my first attempt at the intimidating, yet alluring Mord-Sith. Others were highly impressed with the overall look, but I wasn’t satisfied as an artist. There were things that I loved, Loved, LOVED about the first attempt, but I really couldn’t get over the lack of a personalized tooling design. I really felt this would be something that the character, Cara Mason would articulate and show off as a source of pride. You can check out the earlier parts of this grandiose project with these two links: Part I, Part II. The leather I had chosen to use ended up being too stretchy to hold up well to the strain being put on it through moving. So, by the end of the convention I’d had to do multiple rivet repairs and I could tell that it probably wouldn’t hold up too well through multiple conventions. The wooden mallet and lack of sturdy enough work surface made a mess of the dome shaped rivets, plus they just weren’t riveted solidly enough to continue to hold well. Take a look at the photo below and see if you can spot what I'm talking about. 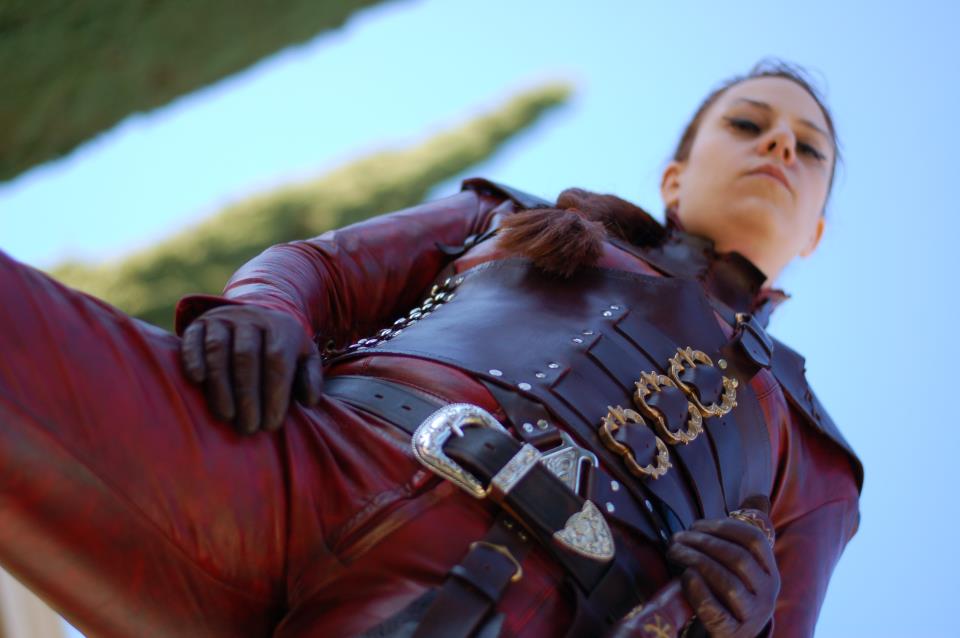 Mistress Denna overseeing your training. I started working on my second Mord-Sith armor about 6 months before Emerald City Comic Con 2013. I had to find the right piece of leather which involved watching several hides from several sellers on eBay until I finally found a nice 8-10 oz vegetable tanned cow half-side. I also had to find the right dye or paint to color the armor. I chose the acrylic leather paint from Angelus Scarlet Red, Fiebings Black Antique Stain, and Fiebings Acrylic Resolene. This allowed me to make the red as dark as I wanted by applying various layers of the antiquing stain. Plus, it adds an aged look to the leather. I tested out my color technique on several practice pieces before dying my cherry brown boots. 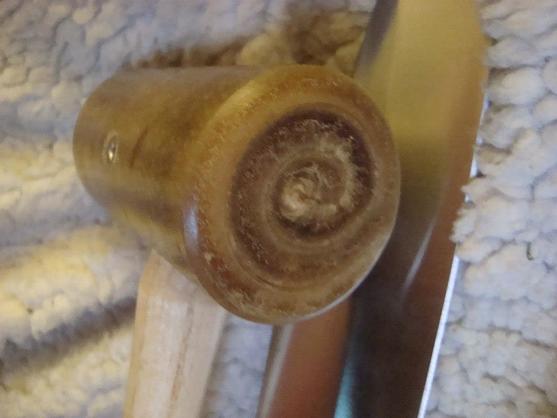 My wonderful Rawhide Mallet. Next, I had to get some antiqued brass rivets to better match the buckles. Here, I needed medium and large sized rivets due to the thickness of the leather. I also acquired some antiqued brass snaps for removing the neck gorget in the back, a swivel knife, and shoe lace hooks. I also needed to find tooling designs, and a new mallet for pounding.
I recall that my friend, Jon, actually bought me a rawhide mallet for my birthday that January. I can’t remember doing any of the tooling before I was given that mallet. So, I’m estimating that three months were spent gathering my new materials, cutting the leather using my armor pattern, and watching YouTube tutorials on tooling techniques. I should also mention that the 6 months prior to that were spent saving up funds for this second project. To be continued... by Willow Enright Part II: Journey through the Midlands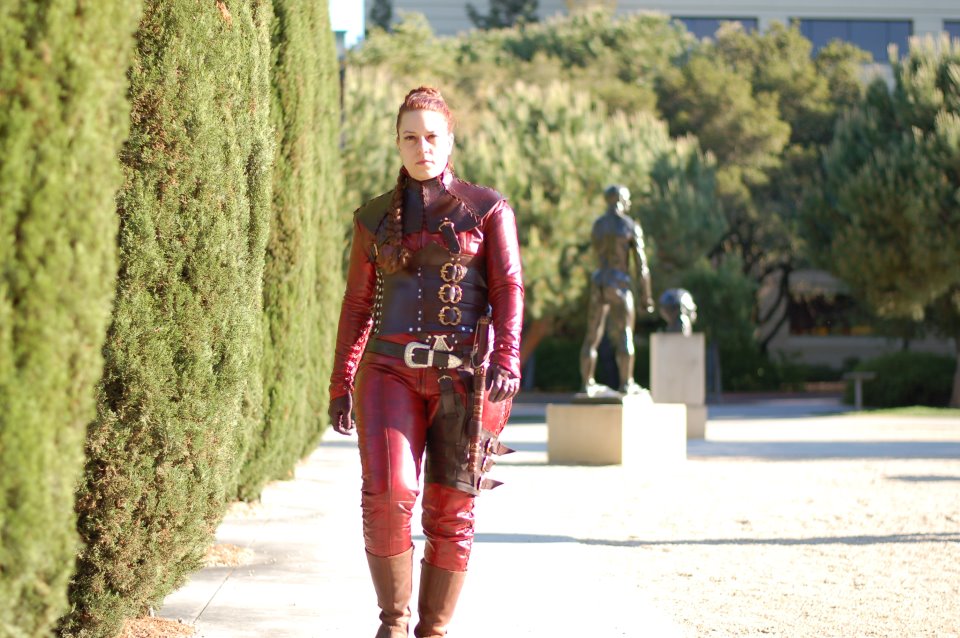 Look at that badass Mord-Sith strutting toward the camera. It's me Willow in my leather armor ready for battle. My journey as a Mord-Sith continued, to read more click here. I had my patterns designed, cut, and organized. My catsuit was ready for battle. I had my Goldilocks “just right” leather pieces cut and ready. Now it was time for embellishments and assembly. I chose to add a simple border design using a flat head screwdriver, I also used a textured stamp to add a bit of pattern to the edging design. I did all of this with the wooden mallet I had been advised to get. Don’t use the wood mallets. They are crap, and I recommend you invest in a better one. I love my Rawhide mallet, there are other types out there poly, or polymer and rubber are the first that spring to mind. The sturdier the better. 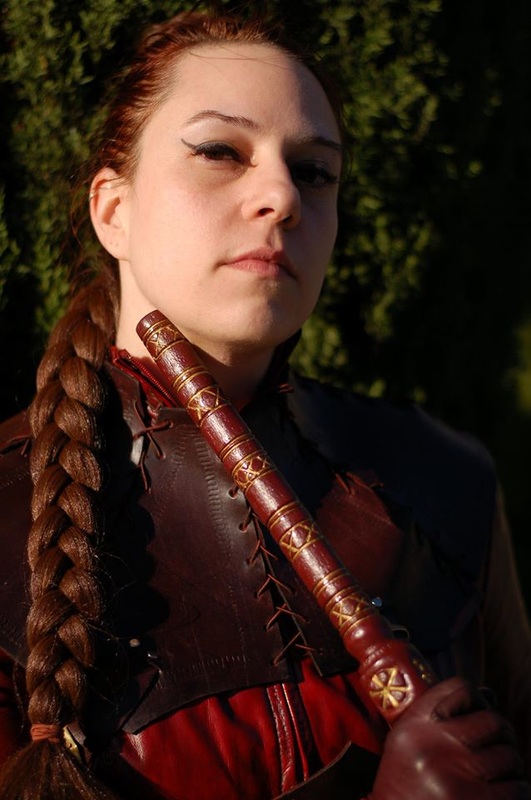 Me as Denna in my first Mord-Sith costume. Since the mahogany leather wasn’t a vegetable tanned leather meant for tooling, the stamping took great effort and didn’t really stand out. I think you could only see it if you were standing right next to me peering closely at the armor. However, it added something to the overall look of the armor in the end. You can take a look at the photo above to see what I mean. After doing the detailing design on the pieces it was time to put them all together. I used small and medium nickel rivets depending on the thickness of what I was riveting together. And that crappy wooden mallet… *cringe* My rivets didn’t look great. Most of the caps were too mushed down and no longer had the dome shape they were supposed to have. I didn’t have a good working surface, only a counter-top with a cutting board which weren’t hearty enough for riveting purposes.
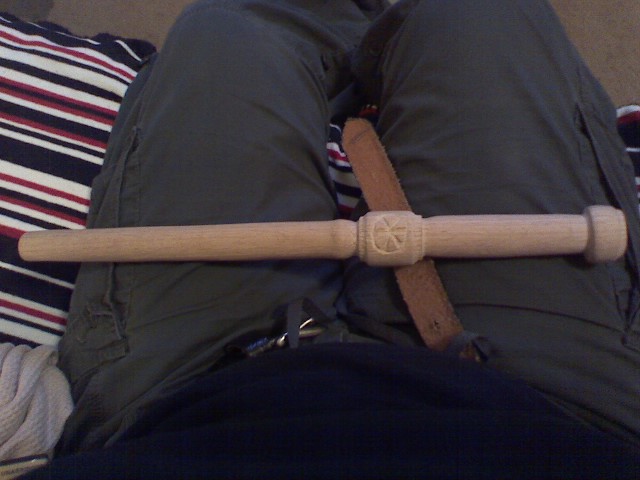
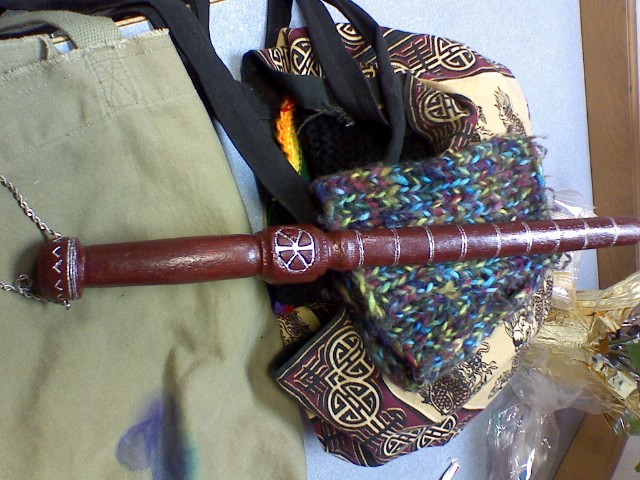
For connecting the pieces of the neck gorget I used a red elastic cording that I dyed with a mahogany colored leather dye beforehand. The elastic cording made it possible to stretch the gorget over your head while still giving the piece a firm tension to hold everything together. For my Agiel weapon I had a friend of mine, who does woodworking, start me with the basic shape. You can see in the pic above what it mainly looked like when I got it. I then carved the details into it myself with a pocket knife before using a latex paint on it, followed by a blood-red acrylic paint to match it in color to the armor. I then used a silver paint to accent the carved designs and wrapped some of the thinner maroon leather (I had purchased but didn’t use for the armor) around the handle. I drilled a hole through the end of the handle and added a silver bracelet for the wrist chain. Later the silver would be replaced with gold. 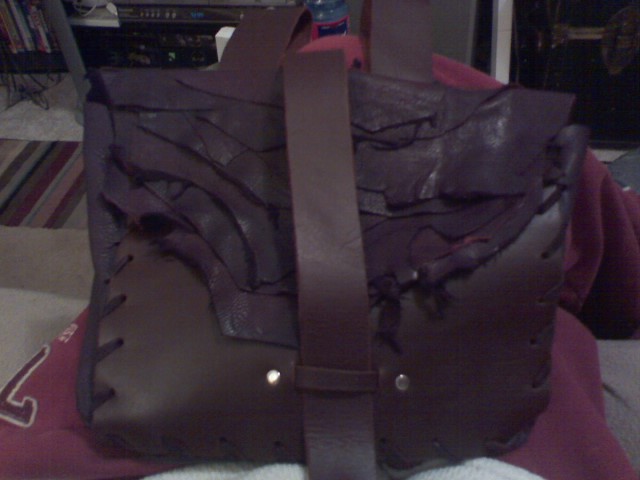 My Mord-Sith Belt Bag for great Comic Con swag. The night before Comic Con I realized that I had nowhere to carry anything. I made the hip bag from leather scraps that I had left over. I used fabric glue to hold the various pieces for the cover flap together and later stitched them together. I tied the bag pieces together with leather lacing and added loop straps so I could wear it on my wide Mord-Sith belt.
For my gloves, I simply bought a pair of Italian leather maroon colored gloves and cherry brown boots online on eBay. I didn’t even try to color the boots to match my armor the first time I wore the cosplay outfit. I did however, dye them blood-red to match when I did my second Mord-Sith armor re-creation for the character Cara Mason. To be continued... by Willow Enright Part I: Leaving D'Hara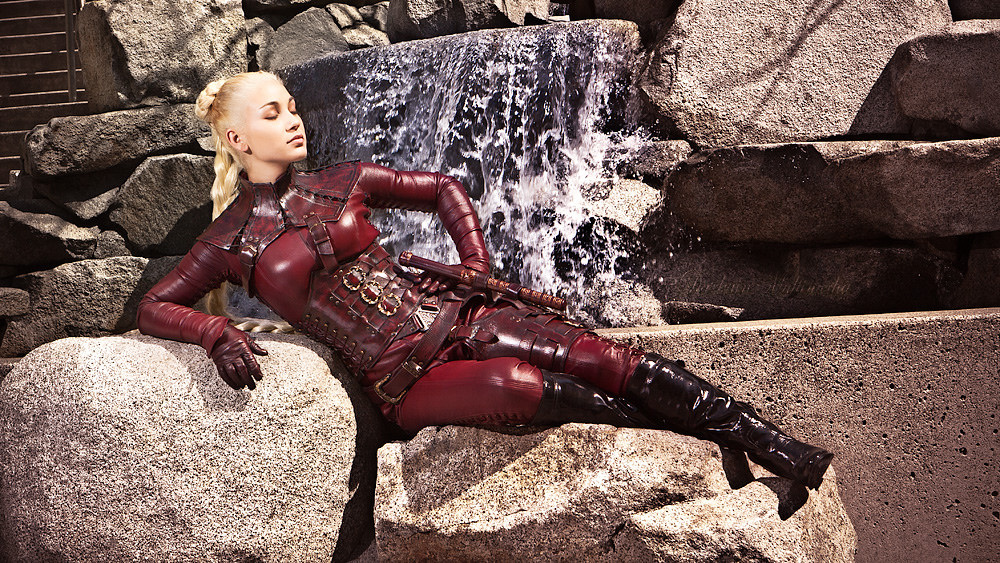 I fell in love with the blood-red, leather armored Mord-Sith characters the first time I saw them on Legend of the Seeker. Cara Mason, Sister of the Agiel, was the reason I decided to read Terry Goodkind’s novels from the Sword of Truth series. The characters are the personal guard of the Lord Rahl. They serve and protect their Lord, clad in a blood-red battle armor wielding their magical, pain-inflicting Agiel while brandishing the power of “the breath of life.” I loved both Sisters Raina and Cara so much in the books that I just had to try and create my own version of the Mord-Sith armor. I started with Raina’s armor first since I’m a natural brunette and figured that would be an easier cosplay for me. I had never worked with leather before, except the occasional bracelet at summer camp. So, I set out to do some research. Trying to find information on how to re-create the TV version of the Mord-Sith armor proved to be quite a challenge. In fact, it involved close study of a lot of printed still photos from actors wearing the leather armor while filming the show. I didn’t think that I would be able to do any of the design tooling since I had never touched leather working before, and I pretty much had no idea where to start in acquiring leather for the project. So, I began by watching various kinds of leather hides on Ebay. This gave me an idea of how much hides sold for, and a feel for the amount of material that went along with that. My first purchase was a nicely colored rustic brown, which was 3-4 oz upholstery leather that was about 6-7 sqf. It was too brown, too thin, and not enough material to complete the project. Next, I bought a lovely shade of maroon which was a closer match in color to the costume, but an even smaller piece of leather that turned out to be even thinner, a 2-3oz upholstery. Eventually I figured out the “oz” thicknesses, and then found a decent sized 12-14 sqf piece of 4-5 oz mahogany leather pre-dyed within my price range. I choose this leather for my first set of Mord-Sith armor because of the leather thickness. Since I wasn’t planning on doing any tooling this thickness of leather gave the impression of armor without being too thick for me as a newbie to work with. This way I could focus on getting the shape of the armor pattern right and use the beautifully detailed historical replica buckles that took forever to track down and cost me an arm and a leg. 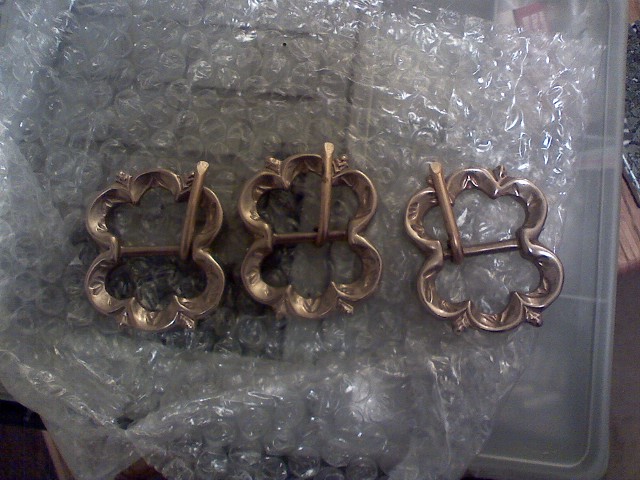 Just three of the many replica buckles purchased for my amazing Mord-Sith costume. While I worked on my research for the armor design I found an amazing costume designer, Tracy Black from Legend Costumes who happened to be just as passionate about Legend of the Seeker. She’d already been creating the amazing replica costumes from the show, having sewing skills far beyond mine, and using an industrial sewing machine. She created the leather cat suit for me as a commissioned piece. I had to save up big bucks for that part of the cosplay, but it was worth every penny. She was also extremely helpful in providing me tips and tricks along the way.
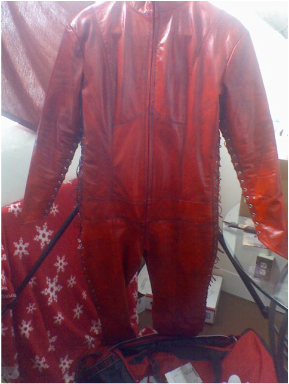
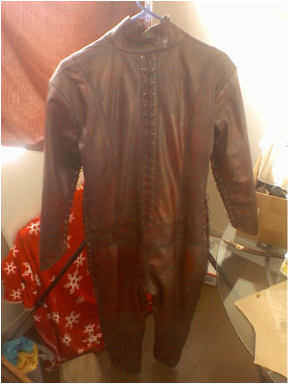
When my catsuit arrived it was more Mario Andretti red than blood-red (see picture on the left). Due to time limits, Tracy had sent it to me before finishing her darkening process and I had to complete that once it was in my possession. I chose to use a Mahogany colored dye to offset the bright red before I had learned that the antique stain would do the same thing without drying the leather out (see picture on right). As it was, I used the dye and then a leather sheen conditioner to condition the leather and protect it. I replaced the red nylon cording with the mahogany dyed elastic cording. I had to hand sew some of the maroon leather, that I had acquired in my original hunt for leather, to add in some inches to increase the modesty panels on the sides of the catsuit. I have an ample bottom which stretched the sides too far leaving a revealing gap at my hips and upper thighs. Once I had found the leather to work with, hunted down the replica buckles, and studied the heck out of the photos of the leather armor I was almost ready to begin. Obviously, I wasn’t going to start hacking up the leather I painstakingly rooted out without a working pattern first. I chose to make my first pattern out of paper grocery bags mostly because they can be recycled if I had a lot of screw ups. And there were quite a few of those. Then I discovered how hard it is to test whether a pattern will fit or not by attempting to hold it up to yourself, and decided that a duct-tape body double was in order. For that you need an old t-shirt, shorts, and several rolls of duct-tape. After I had a working paper bag pattern I traced them onto cardboard so that I could lay them out on the leather, fitting them all before cutting any of the pieces. I also had to find a thicker piece of leather to use for the belt since 4-5oz just isn’t hearty enough. I found a nice 8 oz piece on eBay that someone had left over, and since it was only enough for about half of the belt I chose to use an existing black belt that I already had to finish off the length. I had to cut the black belt into two sections that I then riveted to the thicker section I found online. The black belt had the ability to remove the buckle already, so I was able to add the Mord-Sith western style buckle that was used in the T.V. show. To be continued...
by Willow Enright  I often hear from folks that leather presents entirely way too many obstacles to overcome, especially when it comes to cosplay. I hear that leather is expensive, that it requires special tools, it takes too long to work with, and wearing leather is simply uncomfortable. I’ve been working with leather for over four years, some of these complaints are more true than others. “Leather is expensive.” This is often true. Unfortunately, budgeting is a tricky business, but like most intensive passions or hobbies, we have to plan a budget for them. If this is your first time working with leather, you don’t know what it’s going to cost, so know your upper limit on spending and have a backup costume ready. If you are the kind of person that seeks the cheapest avenue regardless of the costume, then cosplaying in leather is likely not for you. 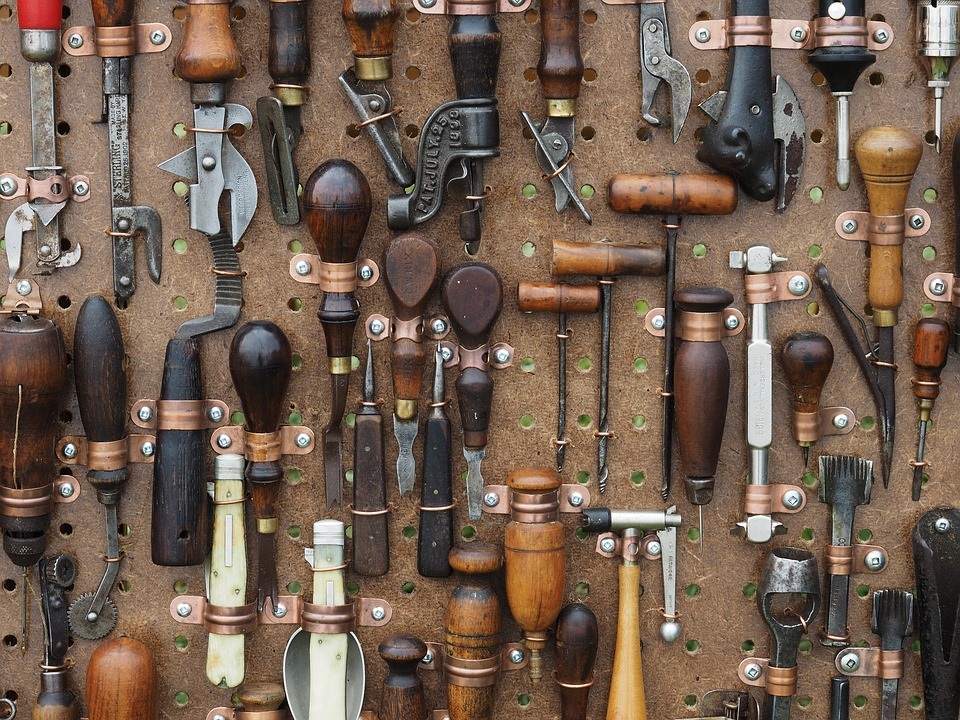 “Leather requires special tools.” That’s simply not true. When I first started I used regular household scissors, various screwdrivers, a hammer, and whatever knife I had handy. If you want some basic tools because you plan to do more than the simple basics, then I recommend these to start: swivel knife, a hole punch set of various sizes, a decent mallet (rawhide or marble, both are a bit spendy but worth it, NOT wood) rivet/snap setter set, an 18” metal ruler, cutting board or self healing mat, and a scrap piece of granite or marble (Look for a place that makes granite counters/table tops and see if they have a free scrap bin. This is where I acquired all three of mine.) If you want to try tooling fancy designs then get a Tandy six piece craftool basic stamp set. If you usually buy your costumes and don’t enjoy making them, then making it out of leather will be more of a challenge. “Leather takes too long to work with.” There’s never enough time. Mostly because you want everything to be so awesome. I’m right there with you on this one, however we all have our time frames and limits when it comes to getting a cosplay costume done on time, and really the only way around that is to plan like the devil. If you know that you absolutely have to be that new character coming out, then plan like mad to make sure that the timing can happen for you. I can understand that some people will always want to be the newest, most awesome character which will clearly limit your desire to make multiple complex leather cosplays that will last a long time. If that’s the case for you, then leather may not be the best medium for you to use. However, if you like leather and would use the item again for other events then investing in something that will last you is never a bad idea.  “Leather is uncomfortable.” Agree to disagree. My advice here is to know your own personal limits. If walking around all day in five inch heels isn’t a thing you already do then you probably don’t want to plan a cosplay where your character wears badass five inch heeled boots. My Mord-Sith cosplay technically should have five inched boots, however I have some messed up ankles from various sports injuries making high heels impossible for me, so I made mine flat boots. No one seems to care. The most important piece of advice is to test out your costume before you actually plan to wear it, this way you can make adjustments as needed. If you find out that your costume is too hot, then you should invest in a set of Under Armor clothes for underneath. These are special clothing garments that help to keep you cooler and usually run about $40-60 a piece. They are a bit spendy but they are an amazing investment and worth every single penny, plus they last a long time. Whether you make your costume out of leather or not, is not my main concern. I really just want to help people who are curious about leather, and if you have read this far you are one of those few that are, and to you I say, “go for it!” If you are still under the assumption that leather presents too many obstacles to overcome then leather cosplay is not for you. Hopefully you can still vicariously enjoy it through others. 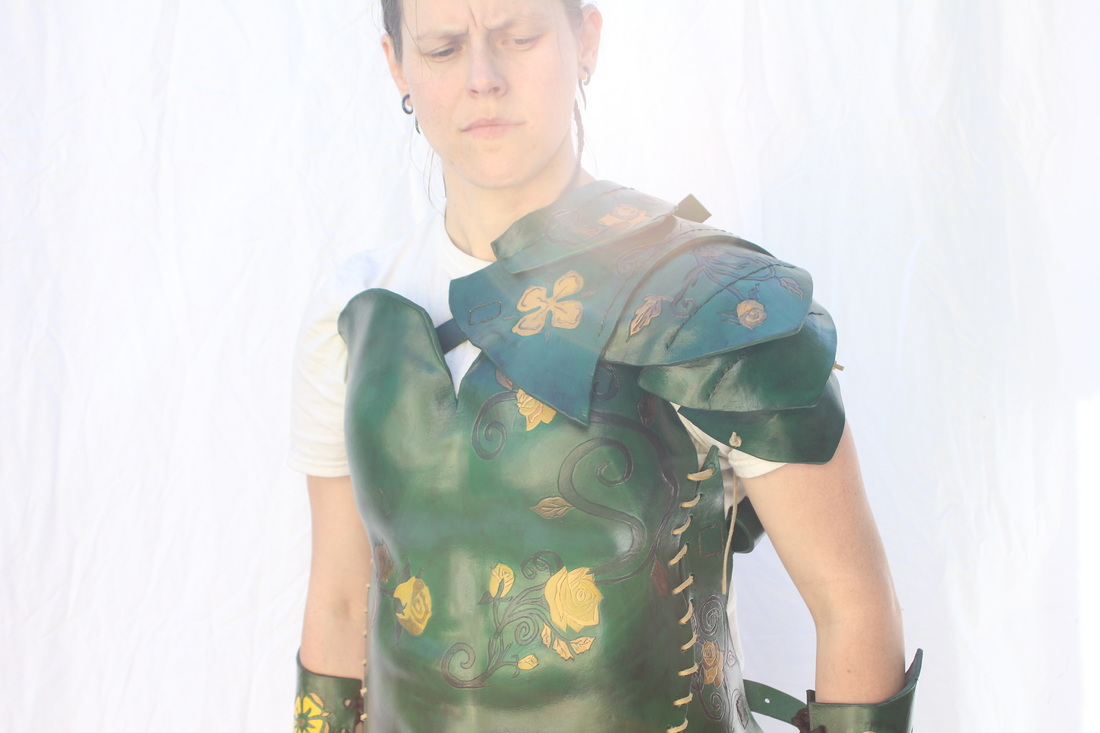 by Willow Enright 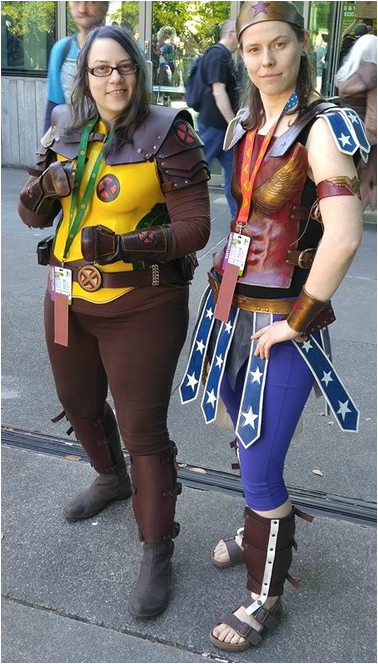 While I was attending ECCC, earlier this month, I was asked what material was used to make your costume? Leather was not the first thing on everyone's mind. A few of the inquires were "Is it plastic?," "How did you get foam to form like that?," and "Did you bake it in the oven?" Educating people along the way that leather is of course expensive when compared to foam, but how it's more durable, malleable, and protective. Thus, giving you greater longevity along with a greater quality. How durable is it you ask? My Mord-Sith outfit, which my girl was wearing this year, was created back in December of 2012. I'd like to see foam look this good four years later. Now I know what you're thinking, four years isn't a long time. I have friends who have sported belts or purses from their grandparents younger days. I can't wait to see how long and how well this leather holds up to decades of wear! 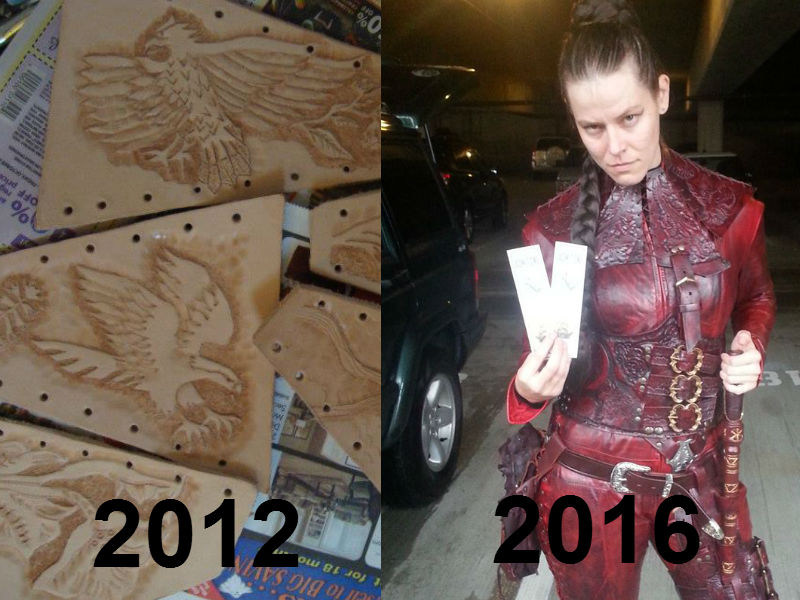 As far as malleability is concerned take a look at this wet formed figure below. I took a piece of leather, drowned it in a tub of water, then formed it to my girlfriend, Erin. The process took hours of drying and shaping while pressed against her, as I was helping form the breast shape into the leather. I would say that it was hard work, but I love an excuse to touch leather. The abs were situated under the leather as an added template, built out of sand and a rubber glove.  I can hear the comments now, "You claim that leather can be a protective layer, how's that possible?" Well, first off, historians have been in a decades long debate over the prevalence of leather armor and whether it was widely used. That being said, there's no argument against its existences; it did and does exist. Next you'll be saying, "But how effective is it?" My response to this question is, "Check out this video." In conclusion, while most of my cosplay armor isn't designed for real combat weapons since the leather used is a 7-9 oz. and not 13-15 oz., one can clearly see via the video above, leather as armor is quite effective against historically accurate weapons. Note, there was a distinct lack of any mace weapons, which will break your bones no matter what armor you wear. Not to mention, that leather can be formed to fit like a glove against ones body. Googling the phrase, "how long does leather last," the response from Google is, "Good leather properly cleaned and polished should last a long, long time. There are saddles over 100 years old." That's right some saddles are over 100! Let's see foam do all that.
|
Willow EnrightI started crafting out of leather in 2011, and now I am making it my life's work. I am writing this blog to help myself remember some of the small steps in past projects, sharing my triumphs and failures, as well as my love of leather. Archives
November 2017
Categories
All
|

|
Cosplay DIY (Blog) |
 RSS Feed
